Blog

  • closefrom-rs

    SYNOPSIS

    closefrom fd cmd arg

    DESCRIPTION

    closefrom – close(2) a range of file descriptors before exec(2)

    closefrom closes all file descriptors numbered fd and higher before
    executing a program.

    exec(2)ing a file can unintentionally leak file descriptors to
    the new process image. These file descriptors may provide unexpected
    capabilities to
    the process.

    closefrom is run as a part of an exec chain, closing many descriptors
    similar to the closefrom(2) system
    call, before executing the target process.

    EXAMPLES

    ucspi-unix is an example of the “Defer to Kernel”
    privilege separation model in Secure Design
    Patterns
    .

    The guarantees are broken because ucspi-unix leaks the listening
    socket
    to the application
    subprocess. The application subprocess can race the server in accepting
    new connections and bypass unix socket permissions and socket credential
    checks.

    #include <stdio.h>
    #include <unistd.h>
    
    #include <err.h>
    
    #include <sys/types.h>
    #include <sys/socket.h>
    #include <sys/un.h>
    
    /* cc -g -Wall -o accept accept.c */
    
    int main(int argc, char *argv[]) {
      int fd;
      struct sockaddr_un addr;
      socklen_t addrlen = sizeof(addr);
    
      for (;;) {
        fd = accept(3, (struct sockaddr *)&addr, &addrlen);
        if (fd < 0) {
          warn("accept");
          continue;
        }
        (void)write(fd, "12345678\n", 9);
        (void)close(fd);
      }
    }

    # run unixserver as root
    sudo unixserver -m 077 /tmp/test.sock -- setuidgid nobody ./accept
    
    # connect to the socket
    $ sudo nc -U /tmp/test.sock
    $ sudo nc -U /tmp/test.sock
    $ sudo nc -U /tmp/test.sock
    12345678
    
    # with closefrom
    sudo unixserver -m 077 /tmp/test.sock -- closefrom 3 setuidgid nobody ./accept
    accept: accept: Bad file descriptor
    

    LXC

    shell

    This example opens and leaks a file descriptor to cat(1):

    #!/bin/bash
    
    exec 9</dev/null
    exec $@

    $ leakfd ls -al /proc/self/fd
    total 0
    dr-x------. 2 msantos msantos  0 Aug 28 09:28 .
    dr-xr-xr-x. 9 msantos msantos  0 Aug 28 09:28 ..
    lrwx------. 1 msantos msantos 64 Aug 28 09:28 0 -> /dev/pts/19
    lrwx------. 1 msantos msantos 64 Aug 28 09:28 1 -> /dev/pts/19
    lrwx------. 1 msantos msantos 64 Aug 28 09:28 2 -> /dev/pts/19
    lr-x------. 1 msantos msantos 64 Aug 28 09:28 3 -> /proc/32048/fd
    lr-x------. 1 msantos msantos 64 Aug 28 09:28 9 -> /dev/null
    
    $ leakfd closefrom 3 ls -al /proc/self/fd
    total 0
    dr-x------. 2 msantos msantos  0 Aug 28 09:29 .
    dr-xr-xr-x. 9 msantos msantos  0 Aug 28 09:29 ..
    lrwx------. 1 msantos msantos 64 Aug 28 09:29 0 -> /dev/pts/19
    lrwx------. 1 msantos msantos 64 Aug 28 09:29 1 -> /dev/pts/19
    lrwx------. 1 msantos msantos 64 Aug 28 09:29 2 -> /dev/pts/19
    lr-x------. 1 msantos msantos 64 Aug 28 09:29 3 -> /proc/32058/fd
    

    OPTIONS

    None.

    BUILDING

    cargo build
    

    ALTERNATIVES

    • bash

    #!/bin/bash
    
    set -o errexit
    set -o nounset
    set -o pipefail
    
    NOFILE="$(ulimit -n)"
    LOWFD="$1"
    shift
    for fd in $(seq "$LOWFD" "$NOFILE"); do
      eval "exec $fd>&-"
    done
    exec $@

    SEE ALSO

    close(2), closefrom(2), exec(3)
    Visit original content creator repository
    https://github.com/msantos/closefrom-rs

  • inspiration-api

    Inspiration API

    An experimental API designed to improve my own skills at using both Scala and the Play Framework.

    Running Locally

    The service depends on the use of SBT and Docker.

    Docker Setup

    Launch a PSQL docker image exposed on port 5432

    • docker-compose up -d

    Setup default tables automatically with provided script

    • psql -h localhost -U user inspiration_db -f dbsetup.sql

    Note that the JDBC DB connection requires 2 env vars to be set:

    • DB_USER
    • DB_PASS

    These will vary depending on your local postgres setup.

    val connectionUrl = s"jdbc:postgresql://localhost:5432/inspiration_db?user=${sys.env("DB_USER")}&password=${sys.env("DB_PASS")}"

    API Start

    • In one terminal run the command sbt run
    • In another terminal curl the inspiration endpoint: curl localhost:9000/inspiration

    A basic html page is provided at the index route if you load up localhost:9000 in a browser you will see instructions for the available endpoints

    Available Endpoints

    GET

    /inspiration – returns a single string containing a random quote featuring the author.

    curl localhost:9000/inspiration
    

    POST

    /inspiration – adds post data to postgres DB – requires user to specify author and quote

    curl -X POST -H 'Content-Type: application/json' -d '{"author": "dmcm", "quote": "quotation of the year"}' localhost:9000/inspiration
    

    PUT

    /inspiration – updates data in postgres DB – requires user to specify index, author and quote

    curl -X PUT -H 'Content-Type: application/json' -d '{"index": 5, "author": "dmcm", "quote": "quotation of the year"}' localhost:9000/inspiration
    

    DELETE

    /inspiration/:index – deletes entry from postgres DB – requires user to specify index within url

    curl -X DELETE localhost:9000/inspiration/6
    

    Docker

    The service can be run from a Docker container:

    # build and tag image locally
    docker build -t inspiration_api:v1 .
    
    # port forwarding Docker to localhost:9000
    docker run -ti -p 9000:9000 --network="host" <docker-image-id>
    
    # publish docker image to docker hub
    docker push <docker-repo>
    
    Visit original content creator repository https://github.com/dan-mcm/inspiration-api
  • dalle-ai-clone-next13

    This is a Next.js project bootstrapped with create-next-app.

    Getting Started

    First, run the development server:

    npm run dev
    # or
    yarn dev
    # or
    pnpm dev

    Open http://localhost:3000 with your browser to see the result.

    You can start editing the page by modifying pages/index.tsx. The page auto-updates as you edit the file.

    API routes can be accessed on http://localhost:3000/api/hello. This endpoint can be edited in pages/api/hello.ts.

    The pages/api directory is mapped to /api/*. Files in this directory are treated as API routes instead of React pages.

    This project uses next/font to automatically optimize and load Inter, a custom Google Font.

    Learn More

    To learn more about Next.js, take a look at the following resources:

    You can check out the Next.js GitHub repository – your feedback and contributions are welcome!

    Deploy on Vercel

    The easiest way to deploy your Next.js app is to use the Vercel Platform from the creators of Next.js.

    Check out our Next.js deployment documentation for more details.

    Visit original content creator repository
    https://github.com/yaninyzwitty/dalle-ai-clone-next13

  • alsa-control

    ALSA Control

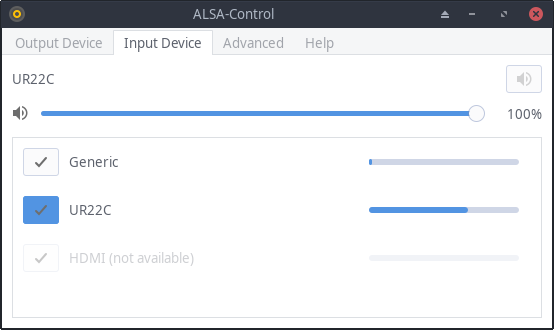
    Since ALSA provides dmix for soundcards that don’t support multiplexing and softvol for those that can’t control their volume, it is not necessary to run pulseaudio for that. This application creates .asoundrc default configurations for this purpose, while the GUI may work as a replacement for pavucontrol.

    Not having pulseaudio is not compatible with everything. For example, Discord in Firefox and Terraria were silent without Pulseaudio. Maybe apulse helps.

    If you encounter problems, don’t hesitate to open an issue in this repo! Even if the issues that prevent this app from working are ALSA related, it would be nice if they can be detected and named in the GUI.

    You might be interested in https://pipewire.org/. My audio broke in various ways again after updating stuff, breaking multiplexing even with dmix and pulseaudio and preventing the alsa-control sound test from working, but pipewire works.

    Jack

    You can use this to control the volume while running jack. Firefox seems to prefer talking to jack directly over using the default device provided by the generated asoundrc though, so the volume change doesn’t affect it. Before starting jack, the ALSA-Control GUI needs to be closed because jack can’t acquire the input device as long as the level is monitored, or you select “none” as input in Cadence.

    Installation

    Install alsa-control from the AUR or run:

    pip3 install pyalsaaudio
    git clone https://github.com/sezanzeb/alsa-control.git
    cd alsa-control
    python3 setup.py install
    

    Usage

    It should create an entry in your applications menu. But you can also start it from the console:

    alsacontrol-gtk
    

    If the daemon didn’t already start due to a system restart, you can start it either from the user interface, or with:

    alsacontrol-daemon-gtk
    

    While the above command runs in a separate terminal, try to change the volume with the following commands. For convenience, bind this to your multimedia keys in your user interface.

    alsacontrol -v +5
    alsacontrol -v -5
    alsacontrol -m
    

    Running pulseaudio at the same time may cause problems. Keyboard shortcuts may break if you have the xfce pulseaudio plugin active.

    Features

    Basically provide everything that is needed to comfortably use ALSA without pulseaudio in a GUI

    • Show a volume meter as notification on volume changes or mute toggling
    • Change the volume of soundcards without Master controls with softvol
    • Generate an asoundrc file that is automatically included in ~/.asoundrc based on config
    • Control volumes with sliders and a mute button
    • Always show up to date devices in the GUI
    • Add a button to test the speaker setup
    • Show speaker-test errors in the GUI
    • Add a dropdown to change output pcm devices
    • Jack support (first start jack, then the GUI to select it)
    • Add a list of input devices and show their input level
    • Startmenu .desktop entry
    • Start the daemon on login
    • Make dmix, softvol, dsnoop, channels and samplerate configurable
    • Get it into the AUR
    • Write some specs for the UI (using stubs for pyalsaaudio)
    • Detect when sound-test is blocking and doing nothing
    • Provide .deb files

    Testing

    pylint alsacontrol --extension-pkg-whitelist=alsaaudio
    sudo python3 setup.py install && python3 tests/test.py
    

    Contributing

    I’m interested in your pull requests and will gladly review them. Make sure to give your code docstrings and make it as PEP compliant as possible.

    Visit original content creator repository https://github.com/sezanzeb/alsa-control
  • FlatBuffer

    FlatBuffer Android Sample Application

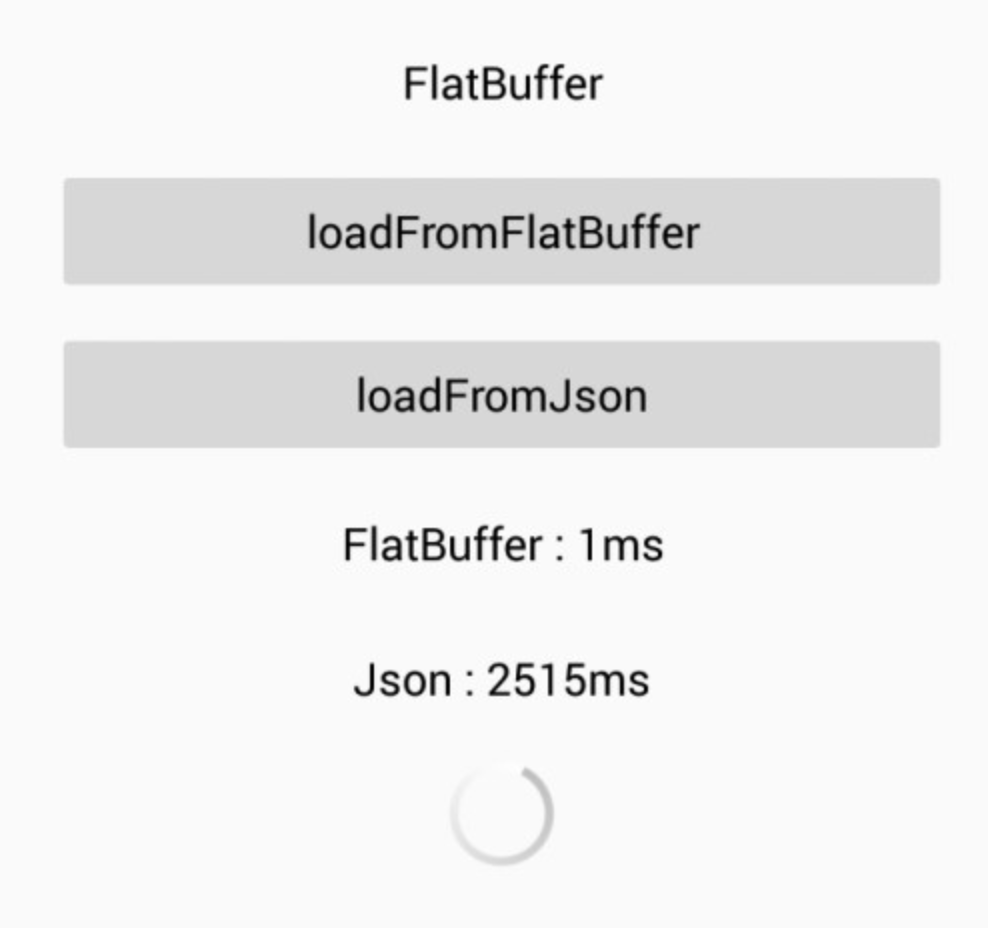
    This app shows how fast flat buffer works when we compare it with json.

    Outcome School Blog – High-quality content to learn Android concepts.

    FlatBuffers Vs JSON

    FlatBuffer is too much faster than JSON.

    Try Fast Android Networking Library for easy and fast networking

    Another awesome library for debugging databases and shared preferences.

    How to start with flatBuffers

    $ git clone https://github.com/google/flatbuffers.git
    $ cd flatbuffers
    • Run the command on the basis of your platform
    $ cmake -G "Unix Makefiles"
    $ cmake -G "Visual Studio 10"
    $ cmake -G "Xcode"
    • now build for your platform as usual. This should result in a flatc executable
    • Now create your schema file with extension .fbs. Guide to write a schema can be found here.And also have your sample json file.
    $ ./flatc -j -b schema.fbs sample.json
    • This will create few java file and one bin file. Java files are like model(POJO for flatBuffer) of your json.Place the java files in your application package and bin file in raw folder(bin file is only for testing as it is converted to byte that is to be passed to flatbuffer for testing).
    • Now we have to get flatbuffer jar file.
    $ cd flatbuffers
    $ cd java
    $ mvn install
    // This will download all the dependencies.
    $ cd target
    • Here you will get the flatbuffers-java-1.3.0-SNAPSHOT.jar file that you have to put it in your libs folder of android project.
    • For rest you can see my sample project.

    Major steps:

    • Prepare your schema.fbs.
    • Have a sample json.
    • Build flatBuffer google project to generate your java files to be used in main application.
    • Generate java files.

    Find this project useful ? ❤️

    • Support it by clicking the ⭐ button on the upper right of this page. ✌️

    You can connect with me on:

    Read all of our blogs here.

    License

       Copyright (C) 2022 Amit Shekhar
    
       Licensed under the Apache License, Version 2.0 (the "License");
       you may not use this file except in compliance with the License.
       You may obtain a copy of the License at
    
           http://www.apache.org/licenses/LICENSE-2.0
    
       Unless required by applicable law or agreed to in writing, software
       distributed under the License is distributed on an "AS IS" BASIS,
       WITHOUT WARRANTIES OR CONDITIONS OF ANY KIND, either express or implied.
       See the License for the specific language governing permissions and
       limitations under the License.
    
    Visit original content creator repository https://github.com/amitshekhariitbhu/FlatBuffer
  • Advent-of-Code-2023

    Advent-of-Code-2023

    Welcome to Advent of Code 2023! 🎄🌟

    Advent of Code

    Table of Contents

    About Advent of Code

    Advent of Code is an annual coding challenge that takes place during the month of December. Each day, starting from December 1st until December 25th, a new coding puzzle is released. These puzzles are designed to be fun, challenging, and a great way to improve your programming skills.

    For more information and to participate, visit the official Advent of Code website.

    Getting Started

    To get started with Advent of Code 2023, follow these steps:

    1. Visit the Advent of Code website to create an account if you don’t have one.
    2. Check the daily puzzle releases starting from December 1st.
    3. Solve the puzzles using your programming language of choice.
    4. Share your solutions with the community and discuss them on the Advent of Code Subreddit.

    Puzzle Solutions

    In this repository, you can find my solutions to the Advent of Code 2023 puzzles. The solutions are organized by day, and each day has its own folder containing the input file and the solution code.

    Feel free to explore the solutions, but try to solve the puzzles on your own first!

    Contributing

    If you would like to contribute your solutions, improvements, or additional insights, please follow these steps:

    1. Fork this repository.
    2. Create a new branch for your changes: `git checkout -b feature/your-feature`.
    3. Make your contributions.
    4. Test your changes thoroughly.
    5. Commit your changes: `git commit -m “Your commit message”`.
    6. Push to your branch: `git push origin feature/your-feature`.
    7. Create a pull request.

    Please make sure to adhere to the code of conduct.

    Acknowledgments

    Special thanks to Eric Wastl, the creator of Advent of Code, and the entire community for making this event possible. Let’s celebrate the joy of coding together!

    License

    This project is licensed under the MIT License – see the LICENSE file for details.

    Visit original content creator repository https://github.com/faresbrayek2/Advent-of-Code-2023
  • voyager

    Voyager

    Package manager for C/C++ software.

    Voyager is an enterprise focused package manager for C and C++ that integrates with Artifactory:

    • Integrates with Visual Studio (MSBuild) and CMake
    • Host packages in your own network on your own server
    • Works with the free Community Edition of Artifactory
    • Easy to use, just call voyager install and then build your software the regular way
    • Very simple package format, allowing easy packaging of existing software solutions (no need to overhaul your entire build system)

    The reason we’ve created voyager at Prodrive Technologies is that third-party options did not fit our workflow.
    We have a lot of existing software which would need significant changes to integrate with one of the existing package managers for C/C++.

    Installation and usage

    To use voyager, install one of the releases and run voyager login to authenticate with an Artifactory server.
    After that run voyager install to install the dependencies of the project that you want to build.
    For more information about the usage of voyager, take a look at the documentation site.

    Developing

    Voyager is written in Python, 3.10 is the recommended version. To develop on the project create a virtual environment and run the python file.

     uv venv --python 3.10
     uv run voyager

    To build the python packages run:

     uv build --wheel
     uv build --wheel .\plugins\voyager_listplugins\

    To build the application run:

     uv run pyinstaller deploy/voyager.spec

    Contributing

    See the Contributing guidelines

    Roadmap

    • Investigate support for anonymous authentication
    • Support for Artifactory Cloud. According to dohq-artifactory another class needs to be used
    • Add proper testcases that use Artifactory Cloud, so they are runnable by everyone
    • Change UpdateChecker class to read the latest version from Github releases

    License

    Apache License 2.0

    Contact

    Feel free to open an issue with your questions or ideas.
    If there’s something that cannot be disclosed through an issue, for example, a vulnerability, then send an email to: opensource@prodrive-technologies.com

    Visit original content creator repository
    https://github.com/ProdriveTechnologies/voyager

  • JobSpiders

    基于Scrapy框架的Python3就业信息Jobspiders爬虫

    • Items.py : 定义爬取的数据
    • pipelines.py : 管道文件,异步存储爬取的数据
    • spiders文件夹 : 爬虫程序
    • settings.py : Srapy设定,请参考 官方文档
    • scrapy spider
    • 爬取三大知名网站,使用三种技术手段
    • 第一种直接从网页中获取数据,采用的是scrapy的基础爬虫模块,爬的是51job
    • 第二种采用扒接口,从接口中获取数据,爬的是智联招聘
    • 第三种采用的是整站的爬取,爬的是拉钩网
    • 获取想要的数据并将数据存入mysql数据库中,方便以后的就业趋势分析

    实现功能:

    • 从三大知名网站上爬取就业信息,爬取发布工作的日期薪资城市岗位有那些福利要求分类等等,并将爬到的数据存到mysql数据库中

    使用教程:

    运行前需要安装的环境

    • Python3 Ubantu16.04自带,sudo apt-get install python3.5

    • mysql : sudo apt-get install mysql-server

    • 安装虚拟环境和虚拟环境的wrapper

      sudo apt-get install python-pip python-dev build-essential
      sudo pip install --upgrade pip
      sudo pip install --upgrade virtualenv
      sudo pip install virtualenvwrapper
      
      • 配置virtualenvwrapper的工作空间

        • cd ~
        • mkdir .virtualenvs
        • sudo find / -name virtualenvwrapper.sh
        • vim ~/.zshrc 注意vim自己当前所用的shell,$SHELL查看,用的是bash就vim ~/.bashrc,末行加上
        export WORKON_HOME=$HOME/.virtualenvs
        source /usr/local/bin/virtualenvwrapper.sh

        注意替换自己find到的virtualenvwrapper.sh位置

    • 其次就是安装一些模块,提供三种

      1. 最简单的方法 pip install -r requirements.txt
      2. 第2种方式如果安装了virtualenv和virtualenvwrapper就直接运行以下命令安装
      mkvirtualenv --python=/usr/bin/python3 py3scrapy
      workon py3scrapy
      安装好scrapy框架:
        pip install scrapy
        - 安装时遇到一个错误twisted/test/raiser.c:4:20: fatal error: Python.h: No such file or directory,解决办法:先安装 **python-dev,python3-dev**,再安装
        - 可以使用豆瓣源加速安装
        pip install -i https://pypi.douban.com/simple scrapy
        pip install fake-useragent
        sudo apt-get install libmysqlclient-dev
        pip install mysqlclient -i https://pypi.douban.com/simple
        其余的在pycharm中alt enter安装
      
      
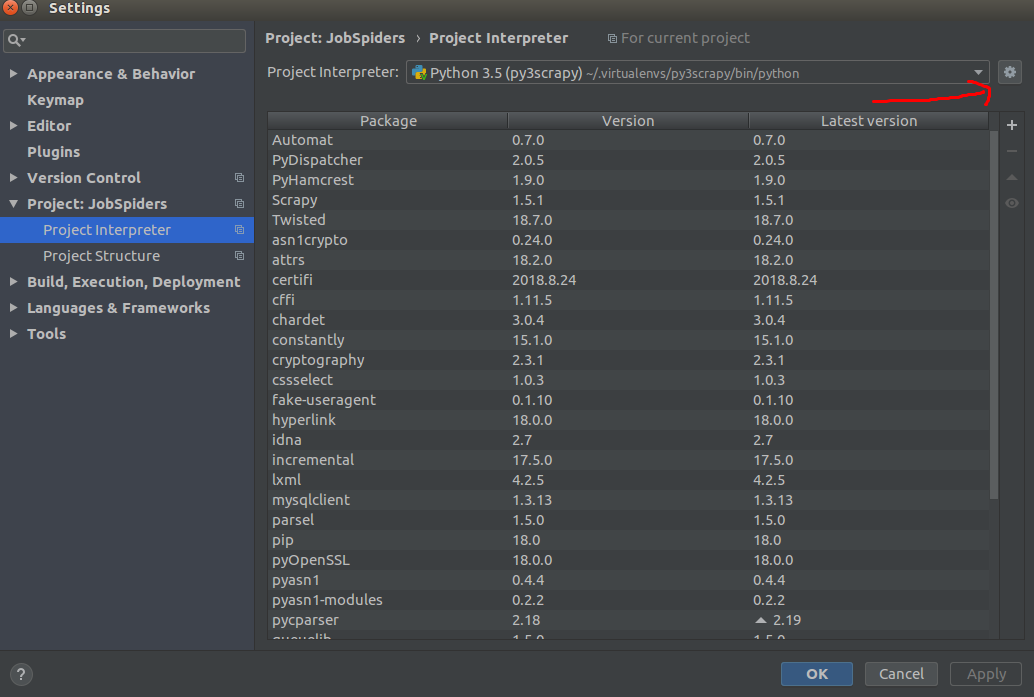
      1. 如果没有安装虚拟环境可以在pycharm中进行安装,alt+enter选择,如果没有正确的模块,就在setting中的project中的解释器Interpreter,再点击+号在里面搜索
      2. 2019-3-10更新 发现一个问题环境问题,就是现在的Scrapy版本最新的1.6的,但是一点六的移除了一些组件导致安装的时候会报一个 “ImportError: No module named ‘scrapy.contrib’ “,所以自己去github上搜索scrapy通过源码编译安装1.5.1

    运行项目

    • git clone https://github.com/wqh0109663/JobSpiders.git
    • 把下好的项目在pycharm中打开
    • 新建一个数据库叫jobspider,编码用utf-8 ,运行jobspider.sql文件
      • create database jobspider charset utf8;
      • use jobspider;
      • source sql路径;
    • 运行main文件,打开注释内容,运行需要的spider即可,运行拉勾网的时候要改动谷歌浏览器的驱动chromedriver位置
    • 或者直接在命令行中运行scrapy runspider XX某某spider
    • 使用拉钩网模块的时候注意改成自己的拉钩网账号(我的已经改密码了,老是提示我的异地登陆),还有就是更改chromedriver的位置

    下面是一条爬到的数据

    下面是博客地址

    数据分析

    爬虫只是为了获得数据,重要的还是如何做数据分析

    生成词云

    • 连接数据库,取出其中的10000条数据,使用结巴分词,将中文进行拆分,手动去掉没有意义的词
    • 连接数据库,取出其中的10000条数据,使用pkuseg-python分词(最近才出的新的分词),将中文进行拆分,手动去掉没有意义的词,分词准确率提高了但是貌似性能不高,慢的要死
    • 效果图,待完善


    TODO

    2019-3-11更新

    发现一个问题:就是使用驱动获取cookie,与使用浏览器自己打开,所弹出的登录页面有所不同,手动打开的网页中没有图片验证码,而使用驱动(无论是谷歌浏览器驱动还是火狐的浏览器驱动均没有用,亲测),根据相关文档查看到根据驱动是可以获取到指纹特征,所以拉钩也可能在这方面做过手脚,也看到使用驱动下面的一行代码会为true,‘window.navigator.webdriver’,所以应该还是挺多的方法可以检测是不是机器人在操作。

    2019-3-14更新

    拉钩网两处需要验证码的地方

    1. 登录(Fixed)

      login

    2. 302重定向(Fixed)

      http://rootvoice.top/wp-content/uploads/2025/08/20190314224307.png

    拉钩网验证

    robot

    引进图片识别

    2019-3-23更新

    修改spider下的lagou.py,修改为自己的若快账号和拉钩账号

    想要拉钩网数据参考testlagou.py

    动态更新cookie值就可以了,全站难度有点大,直接请求接口比较简单

    2023-02-15 update

    51job update ,see new51job.py

    Visit original content creator repository https://github.com/wqh0109663/JobSpiders
  • JobSpiders

    基于Scrapy框架的Python3就业信息Jobspiders爬虫

    • Items.py : 定义爬取的数据
    • pipelines.py : 管道文件,异步存储爬取的数据
    • spiders文件夹 : 爬虫程序
    • settings.py : Srapy设定,请参考 官方文档
    • scrapy spider
    • 爬取三大知名网站,使用三种技术手段
    • 第一种直接从网页中获取数据,采用的是scrapy的基础爬虫模块,爬的是51job
    • 第二种采用扒接口,从接口中获取数据,爬的是智联招聘
    • 第三种采用的是整站的爬取,爬的是拉钩网
    • 获取想要的数据并将数据存入mysql数据库中,方便以后的就业趋势分析

    实现功能:

    • 从三大知名网站上爬取就业信息,爬取发布工作的日期薪资城市岗位有那些福利要求分类等等,并将爬到的数据存到mysql数据库中

    使用教程:

    运行前需要安装的环境

    • Python3 Ubantu16.04自带,sudo apt-get install python3.5

    • mysql : sudo apt-get install mysql-server

    • 安装虚拟环境和虚拟环境的wrapper

      sudo apt-get install python-pip python-dev build-essential
      sudo pip install --upgrade pip
      sudo pip install --upgrade virtualenv
      sudo pip install virtualenvwrapper
      
      • 配置virtualenvwrapper的工作空间

        • cd ~
        • mkdir .virtualenvs
        • sudo find / -name virtualenvwrapper.sh
        • vim ~/.zshrc 注意vim自己当前所用的shell,$SHELL查看,用的是bash就vim ~/.bashrc,末行加上
        export WORKON_HOME=$HOME/.virtualenvs
        source /usr/local/bin/virtualenvwrapper.sh

        注意替换自己find到的virtualenvwrapper.sh位置

    • 其次就是安装一些模块,提供三种

      1. 最简单的方法 pip install -r requirements.txt
      2. 第2种方式如果安装了virtualenv和virtualenvwrapper就直接运行以下命令安装
      mkvirtualenv --python=/usr/bin/python3 py3scrapy
      workon py3scrapy
      安装好scrapy框架:
        pip install scrapy
        - 安装时遇到一个错误twisted/test/raiser.c:4:20: fatal error: Python.h: No such file or directory,解决办法:先安装 **python-dev,python3-dev**,再安装
        - 可以使用豆瓣源加速安装
        pip install -i https://pypi.douban.com/simple scrapy
        pip install fake-useragent
        sudo apt-get install libmysqlclient-dev
        pip install mysqlclient -i https://pypi.douban.com/simple
        其余的在pycharm中alt enter安装
      
      
      1. 如果没有安装虚拟环境可以在pycharm中进行安装,alt+enter选择,如果没有正确的模块,就在setting中的project中的解释器Interpreter,再点击+号在里面搜索
      2. 2019-3-10更新 发现一个问题环境问题,就是现在的Scrapy版本最新的1.6的,但是一点六的移除了一些组件导致安装的时候会报一个 “ImportError: No module named ‘scrapy.contrib’ “,所以自己去github上搜索scrapy通过源码编译安装1.5.1

    运行项目

    • git clone https://github.com/wqh0109663/JobSpiders.git
    • 把下好的项目在pycharm中打开
    • 新建一个数据库叫jobspider,编码用utf-8 ,运行jobspider.sql文件
      • create database jobspider charset utf8;
      • use jobspider;
      • source sql路径;
    • 运行main文件,打开注释内容,运行需要的spider即可,运行拉勾网的时候要改动谷歌浏览器的驱动chromedriver位置
    • 或者直接在命令行中运行scrapy runspider XX某某spider
    • 使用拉钩网模块的时候注意改成自己的拉钩网账号(我的已经改密码了,老是提示我的异地登陆),还有就是更改chromedriver的位置

    下面是一条爬到的数据

    下面是博客地址

    数据分析

    爬虫只是为了获得数据,重要的还是如何做数据分析

    生成词云

    • 连接数据库,取出其中的10000条数据,使用结巴分词,将中文进行拆分,手动去掉没有意义的词
    • 连接数据库,取出其中的10000条数据,使用pkuseg-python分词(最近才出的新的分词),将中文进行拆分,手动去掉没有意义的词,分词准确率提高了但是貌似性能不高,慢的要死
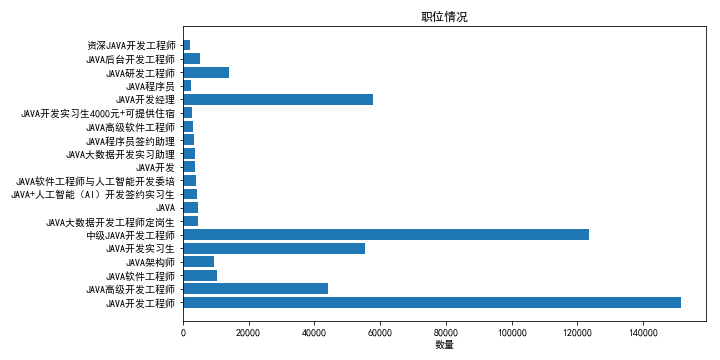
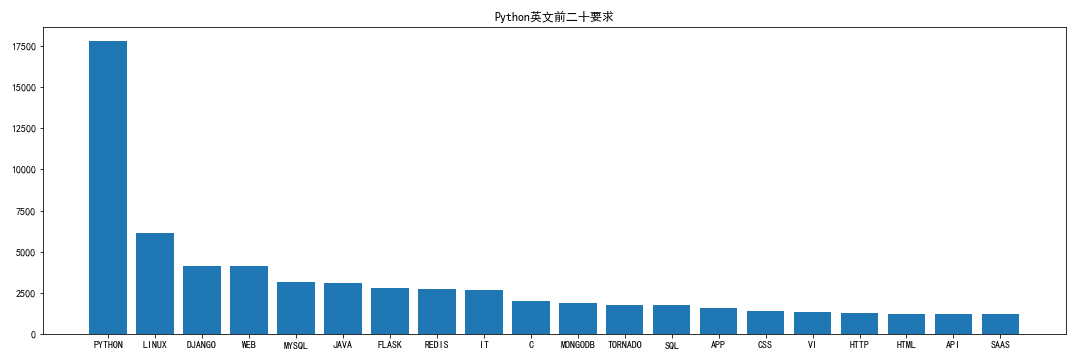
    • 效果图,待完善


    TODO

    2019-3-11更新

    发现一个问题:就是使用驱动获取cookie,与使用浏览器自己打开,所弹出的登录页面有所不同,手动打开的网页中没有图片验证码,而使用驱动(无论是谷歌浏览器驱动还是火狐的浏览器驱动均没有用,亲测),根据相关文档查看到根据驱动是可以获取到指纹特征,所以拉钩也可能在这方面做过手脚,也看到使用驱动下面的一行代码会为true,‘window.navigator.webdriver’,所以应该还是挺多的方法可以检测是不是机器人在操作。

    2019-3-14更新

    拉钩网两处需要验证码的地方

    1. 登录(Fixed)

      login

    2. 302重定向(Fixed)

      http://rootvoice.top/wp-content/uploads/2025/08/1756386530_528_20190314224307.png

    拉钩网验证

    robot

    引进图片识别

    2019-3-23更新

    修改spider下的lagou.py,修改为自己的若快账号和拉钩账号

    想要拉钩网数据参考testlagou.py

    动态更新cookie值就可以了,全站难度有点大,直接请求接口比较简单

    2023-02-15 update

    51job update ,see new51job.py

    Visit original content creator repository https://github.com/wqh0109663/JobSpiders
  • DevWhisperer

    Contentful Gatsby Starter Blog

    Create a Gatsby blog powered by Contentful.

    An article page of the starter blog

    Static sites are scalable, secure and have very little required maintenance. They come with a drawback though. Not everybody feels good editing files, building a project and uploading it somewhere. This is where Contentful comes into play.

    With Contentful and Gatsby you can connect your favorite static site generator with an API that provides an easy to use interface for people writing content and automate the publishing using services like Travis CI or Netlify.

    Features

    Getting started

    See our official Contentful getting started guide.

    Get the source code and install dependencies.

    $ git clone https://github.com/contentful/starter-gatsby-blog.git
    $ npm install
    

    Or use Gatsby Cloud

    Use Deploy Now to get started in Gatsby Cloud:

    Deploy to Gatsby Cloud

    If you use Deploy Now, Gatsby Cloud will run the gatsby-provision script on your behalf, if you choose, after you Quick Connected to your empty Contentful Space. That script will add the necessary content models and content to support this site.

    Or use the Gatsby CLI.

    $ gatsby new contentful-starter-blog https://github.com/contentful/starter-gatsby-blog/
    

    Set up of the needed content model and create a configuration file

    This project comes with a Contentful setup command npm run setup.

    This command will ask you for a space ID, and access tokens for the Contentful Management and Delivery API and then import the needed content model into the space you define and write a config file (./.contentful.json).

    npm run setup automates that for you but if you want to do it yourself rename .contentful.json.sample to .contentful.json and add your configuration in this file.

    Crucial Commands

    npm run dev

    Run the project locally with live reload in development mode.

    npm run build

    Run a production build into ./public. The result is ready to be put on any static hosting you prefer.

    npm run serve

    Spin up a production-ready server with your blog. Don’t forget to build your page beforehand.

    Deployment

    See the official Contentful getting started guide.

    Contribution

    Feel free to open pull requests to fix bugs. If you want to add features, please have a look at the original version. It is always open to contributions and pull requests.

    You can learn more about how Contentful userland is organized by visiting our about repository.

    Visit original content creator repository https://github.com/yutounun/DevWhisperer