Notes App is a simple application intended for use as a lightweight base for various demos. It’s implemented in the Sinatra framework, and faithfully applies Xpirit’s branding in the UI.
Running Notes App
The easiest way to run Notes App is with Docker.
To run Notes App with Azure SQL Edge (via Docker Compose):
docker-compose up
To run Notes App standalone:
docker run -it -p 80:80 ghcr.io/xpiritbv/notes-app:latest
After starting up with the above command, Notes App will be available at http://localhost/.
Configuration
By default, Notes App will use a local sqlite database file within the container. However, you may override this and use a DBMS of your choice. Notes App will configure the appropriate settings in database.yml with your specified values.
Environment Variable
Description
DB_ADAPTER
database.yml: <environment>.adapter
DB_HOST
database.yml: <environment>.host
DB_PORT
database.yml: <environment>.port
DB_DATABASE
database.yml: <environment>.database
DB_USERNAME
database.yml: <environment>.username
DB_PASSWORD
database.yml: <environment>.password
BIND_ADDRESS
Defaults to 0.0.0.0
BIND_PORT
Defaults to 80
Alternatively, you may specify a Rails database connection string in DATABASE_URL. The existing database yaml configuration will be overridden by this value (docs).
Note: Unless NOTES_ENV is specified, the default environment is development.
Releasing New Versions
This repository contains a GitHub Action which builds and publishes the Notes App container to GHCR whenever a new release is tagged.
Deploy Notes App
This repository contains a set of Terraform configurations describing a secure deployment on Microsoft Azure. You can find these files in the /deploy folder.
PHP-DEV is a small package that includes a web server, PHP and some tools needed to develop a web application.
You can easily decide which version of PHP you want to use and whether you want to start an Apache or a Nginx webserver by setting the values in a docker-compose.yml.
We recommend using pluswerk/docker-global as a wrapper for your projects, since this Dockerfile has been built keeping that in mind.
Create a compose/Development/docker-compose.yml like shown below.
Change all your settings. Mainly the VIRTUAL_HOST, WEB_DOCUMENT_ROOT and optionally the Application Context.
The Environment Variable CONTEXT is used to switch between different docker-compose.yml files.
Then you can copy the start.sh into your project and start it.
This is an example of a docker-compose.yml file.
It is enough to put this file into the project, configure it and start the Docker Project.
Further information can be found in the Documentation.
Example file: compose/Development/docker-compose.yml
services:
web:
image: pluswerk/php-dev:nginx-8.4-alpinevolumes:
- .:/app# the docker socket is optional if no node container is needed
- /var/run/docker.sock:/var/run/docker.sock:ro
- ~/.ssh:/home/application/.ssh
- ~/.composer/cache:/home/application/.composer/cache
- ~/.gitconfig:/home/application/.gitconfigenvironment:
# Take a look at VIRTUAL_* in the documentation under Nginx Reverse ProxyVIRTUAL_HOST: docker-website.${TLD_DOMAIN:?TLD_DOMAIN is required},sub.docker-website.${TLD_DOMAIN:?TLD_DOMAIN is required}# HTTPS_METHOD: noredirectWEB_DOCUMENT_ROOT: /app/publicXDEBUG_CLIENT_HOST: ${XDEBUG_CLIENT_HOST:-}php.xdebug.idekey: ${XDEBUG_IDEKEY:-PHPSTORM}PHP_IDE_CONFIG: ${XDEBUG_IDEKEY:-"serverName=_"}# Project Env vars (enable what you need)# APP_ENV: development_docker# PIMCORE_ENVIRONMENT: development_docker# TYPO3_CONTEXT: Development/docker# Don't forget to connect via bash start.shAPPLICATION_UID: ${APPLICATION_UID:-1000}APPLICATION_GID: ${APPLICATION_GID:-1000}node:
image: node:24volumes:
- ./:/appworking_dir: /appenvironment:
# Don't forget to connect via bash start.shAPPLICATION_UID: ${APPLICATION_UID:-1000}APPLICATION_GID: ${APPLICATION_GID:-1000}stop_signal: SIGKILLentrypoint: bash -c 'groupmod -g $$APPLICATION_GID node; usermod -u $$APPLICATION_UID node; sleep infinity'networks:
default:
name: globalexternal: true
Hint for the example above:
In your own configuration you might want to replace docker-website with your project name, e.g typo3.
TLD_DOMAIN is an environment variable, your nginx container listens on for incoming requests. e.g. example.com.
Your project will then be reachable by going to this domain: typo3.example.com
Tested with
This project is a basic php-installation and should be able to run most applications.
Nonetheless has this tool successfully been tested/used with:
Install the gem and add it to the application’s Gemfile by executing:
Add the integration_workflow gem to your application’s Gemfile:
gem 'integration_workflow'
And then execute:
bundle install
Usage
To define a workflow with steps and actions, you can use the step and action methods, there are 2 options:
without options:
workflow=IntegrationWorkflow.newdostep'Step 1'doaction'Action 1'doputs"Running #{name} in #{step_name}"endendstep'Step 2'doaction'Action 1'doputs"Running #{name} in #{step_name}"endendendworkflow.run
with options:
workflow=IntegrationWorkflow.new(user_id: '1')dostep'Step 1'doaction'Action 1'doputs"Running #{name} in #{step_name} with user_id: #{options[:user_id]}"endendstep'Step 2'doaction'Action 1'doputs"Running #{name} in #{step_name} with user_id: #{options[:user_id]}"endendendworkflow.run
Development
After checking out the repo, run bin/setup to install dependencies. Then, run rake spec to run the tests. You can also run bin/console for an interactive prompt that will allow you to experiment.
To install this gem onto your local machine, run bundle exec rake install. To release a new version, update the version number in version.rb, and then run bundle exec rake release, which will create a git tag for the version, push git commits and the created tag, and push the .gem file to rubygems.org.
This is a collection of various technical icons, glyphs, logos and other imagery all in SVG format. The icons are mainly Azure related but there are various other brands and logos plus abstract/generic symbols.
All files are run through SVGO to clean them up and optimize them, with ‘removeDimensions’ plugin enabled
Many overlaps exist between the three main Azure icon sets, this expected, but each set also has unique icons hence their reason for inclusion. Condensing down to one merged super-set would be a huge undertaking
I do not attribute ownership to any of these icons & images. No copyright infringement is intended.
All files have been sourced and scraped from the public internet and various Microsoft sites. They are collected here under fair use.
Microsoft permits the use of these icons in architectural diagrams, training materials, or documentation. You may copy, distribute, and display the icons only for the permitted use unless granted explicit permission by Microsoft. Microsoft reserves all other rights.
Don’t crop, flip or rotate icons
Don’t distort or change icon shape in any way
Don’t use Microsoft product icons to represent your product or service
Icon Galleries
To view the icons, thumbnail gallery pages for each of the main sets is provided. The gallery pages also allow you to search the icons, view them on a range of light & dark backgrounds and also download the icon in SVG or PNG format.
Note. These galleries only work when viewing this repo from GitHub pages here https://code.benco.io/icon-collection/
If viewing the downloaded icons in Windows, install PowerToys and enable the ‘File Explorer Preview’ module as it supports showing SVGs as thumbnails within explorer
This set is the official downloadable collection from the Azure Architecture Center, the best place to look if you’re after an Azure service or common Azure related icon. The set has been flattened (no sub-directories) and superfluous prefixes removed from the filenames
Scraped from main Azure docs site, all major Azure services are in here plus a couple of other useful icons. It’s a smallish set and a good place to start if you require an icon for a top level Azure service.
This set comprises the “Microsoft Azure Icon Repository” from the Microsoft Cloud Design Studio. There is an almost complete overlap with the above two sets, however there’s some unique icons in here, and icons from the Azure portal which aren’t anywhere else.
Very large set of 1200+ icons including many Azure services, but mostly focused on other concepts, actions and gyphs. This has been scraped from https://azure.microsoft.com/en-gb/patterns/styles/glyphs-icons/ This is made public, as part of the “Sundog” Azure.com design system.
Various product, company & programing language logos, hand picked & fetched from various sources online. Theses may or may not be directly Azure related
Many other Azure & Microsoft icons sourced from various places; Azure.com pages, Azure Docs git repo, Azure portal etc. Most of these are hand picked or moved here manually, these shouldn’t overlap with the other sets, but may do
Links to Other Collections
These are not part of this icon set, but linked to here as a useful external resources
Not a set of icons, but a browser extension for Chrome and Edge which allows you to easily grab icons from the Azure portal
Scraping & Other Tools
Various Node.js and bash scripts used for scraping, converting and generating the gallery pages are contained in the _tools folder. These are provided as-is with minimal documentation. Here be dragons.
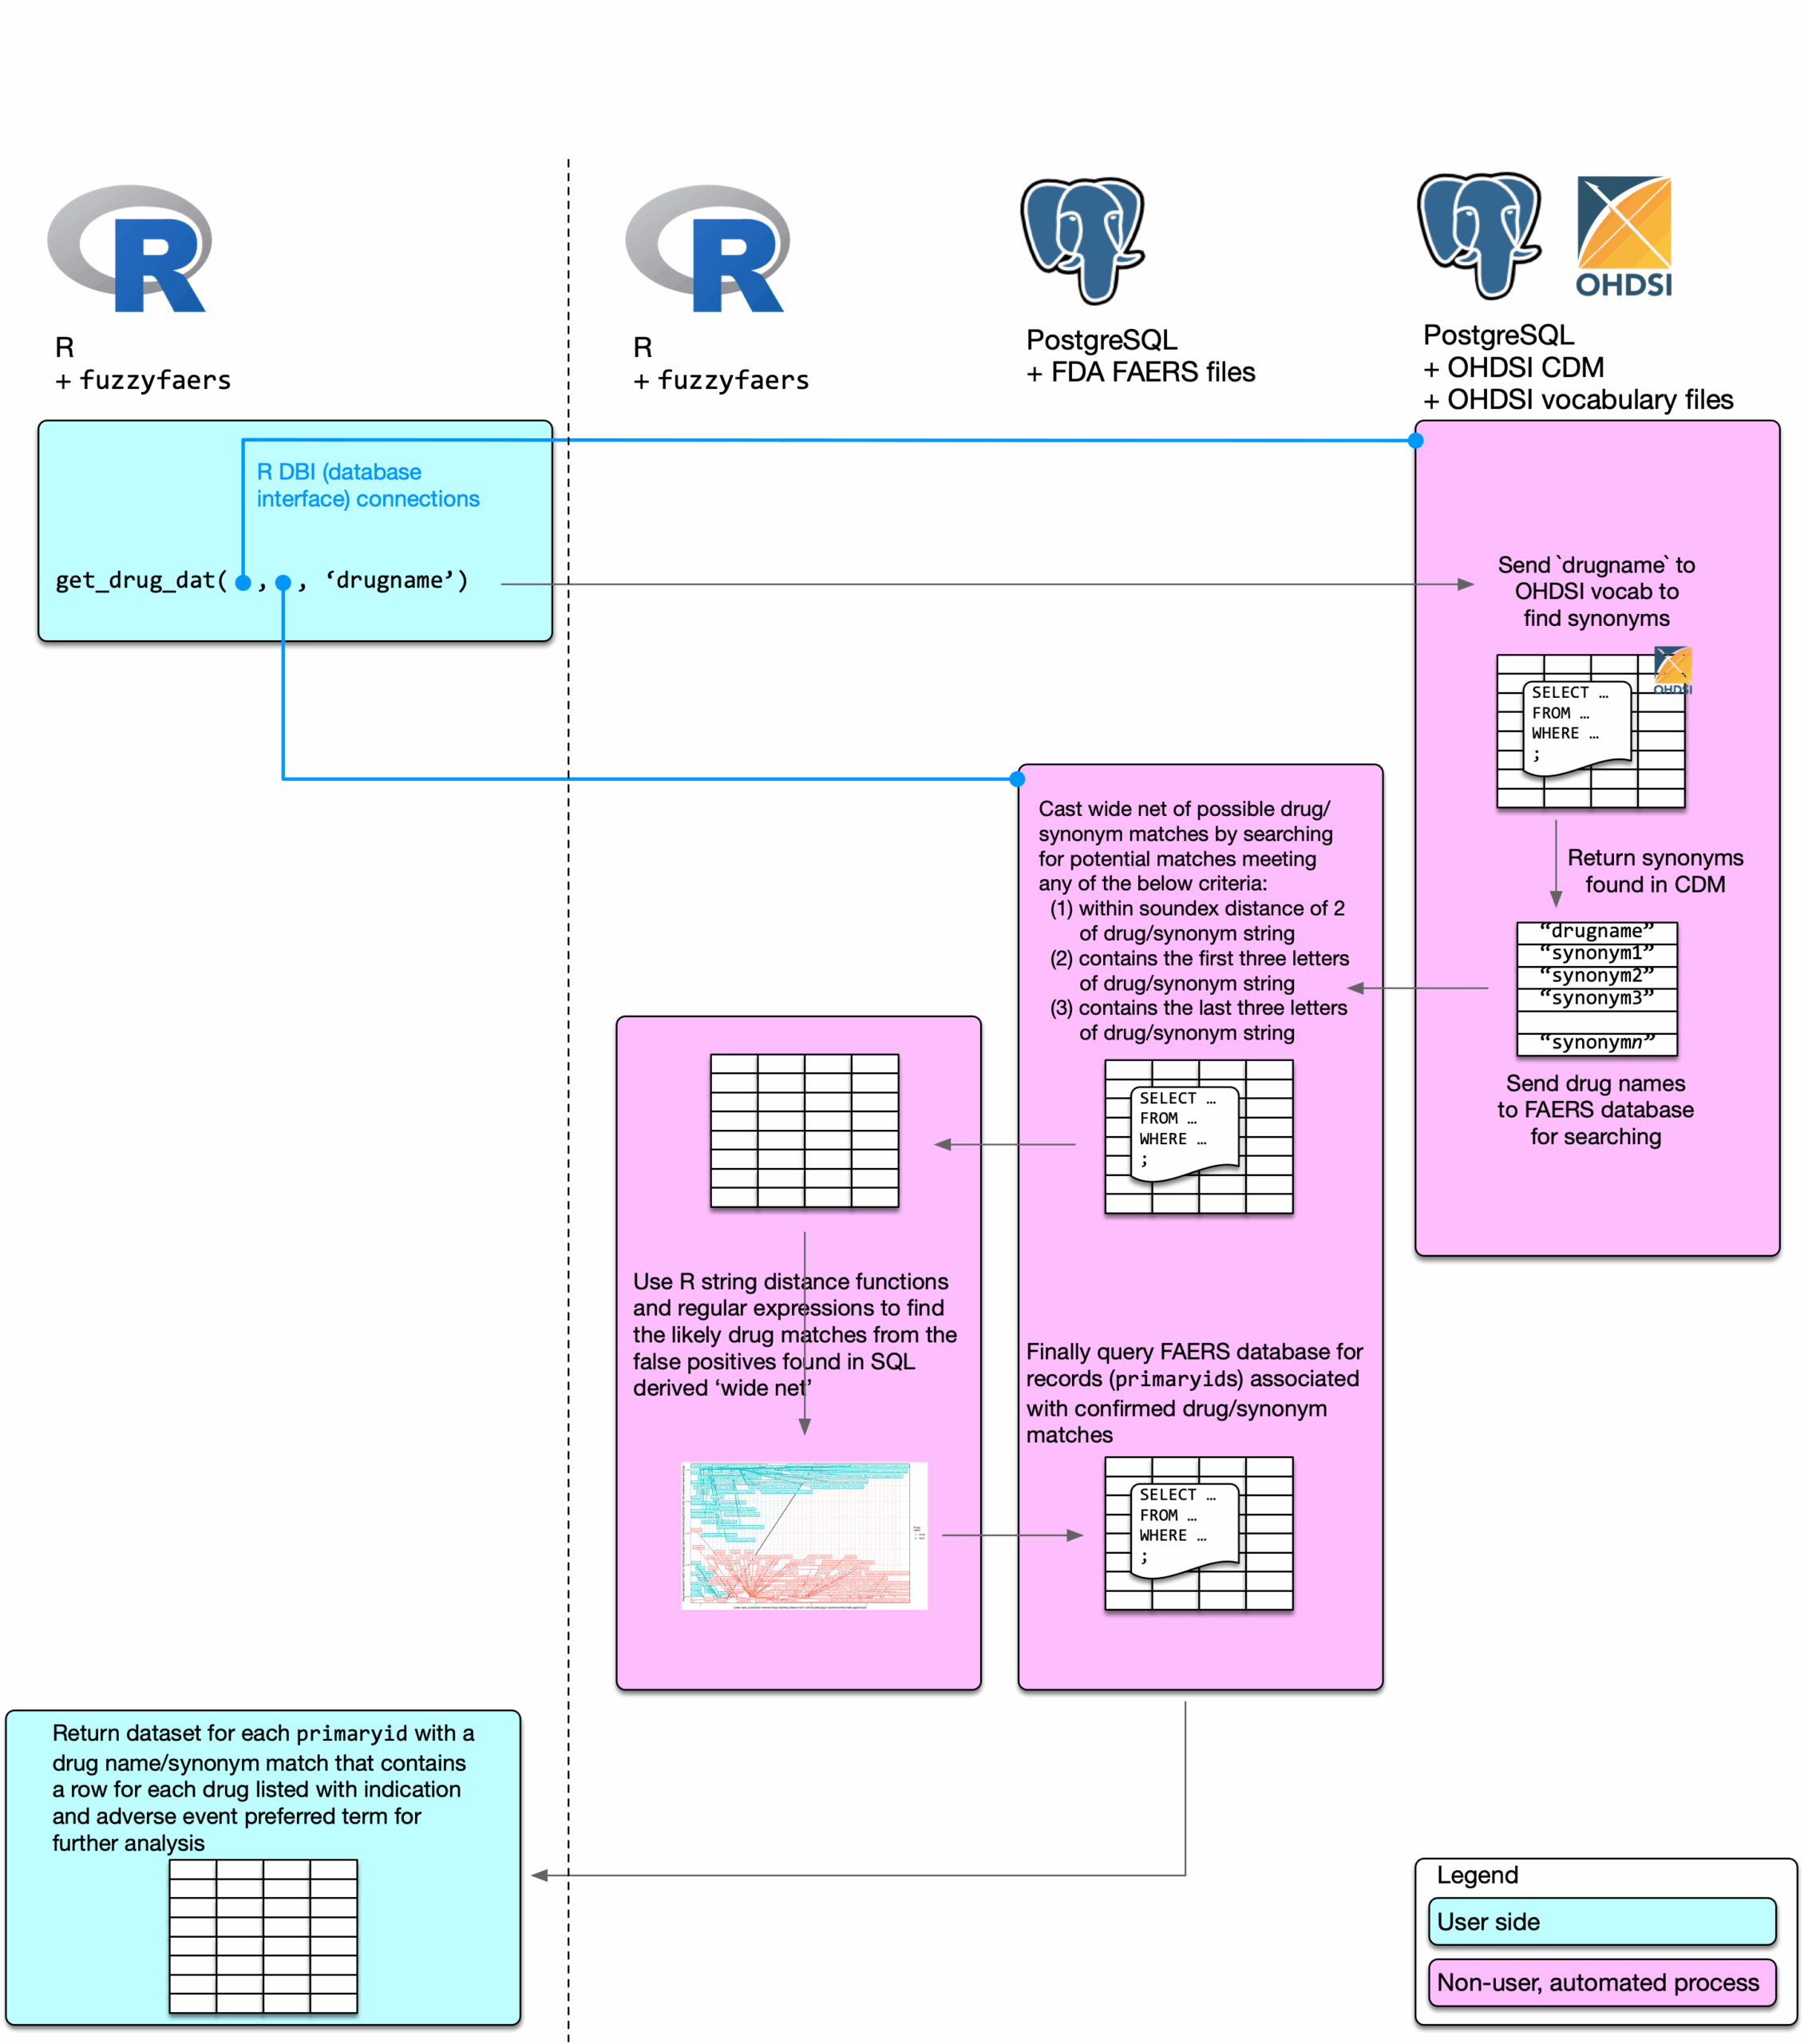
As drug names (whether they be generic/clinical or branded) are provided to the FDA and do not undergo standardisation, this package provides an automated way to extract records of a drug, its synonyms and their inevitable misspellings (plus superfluous text). Fuzzy string matching is required to do this, thus, fuzzyfaers.
Background and motivation
Signal detection of adverse drug events often requires analysis of tabulated count data as seen in the below table.
Event(s) X
Event(s) Y
Drug(s) A
a
b
Drug(s) B
c
d
To get to this data, or a flat dataset with a single record for each adverse event is a time consuming process. Not only that but finding synonyms to drug names is a painfully manual process, compounded by alternative spellings and superfluous text included in the drug text fields.
This package aims to
provide data in as ready-to-go format as possible with instructions to house it in a manageable database environment accessible by R, and
automate the drug synonym (and misspelling) searching in the database to extract single record adverse event data.frames in R.
Prerequisites
All required software are free and available on Linux, Mac OS and Windows. Testing has been undertaken on Ubuntu LTS 18.04 and Windows 10 systems. You will likely need ~10Gb of disk space for the database/data installation and enough memory to deal with data.frames in R potentially with millions of records (I have found 32Gb of memory sufficient for me).
OHDSI (Observational Health Data Sciences and Informatics) common data model (CDM) vocabulary files. These files allow us to automatically check for drug synonyms through their excellent vocabulary mappings. The vocabulary files can be downloaded at Athena (sign up required, free).
library(devtools) # see https://www.r-project.org/nosvn/pandoc/devtools.htmldevtools::install_github('tystan/fuzzyfaers')
library(fuzzyfaers)
### see help file to run example
fuzzyfaers process to extact drug specific FAERS data
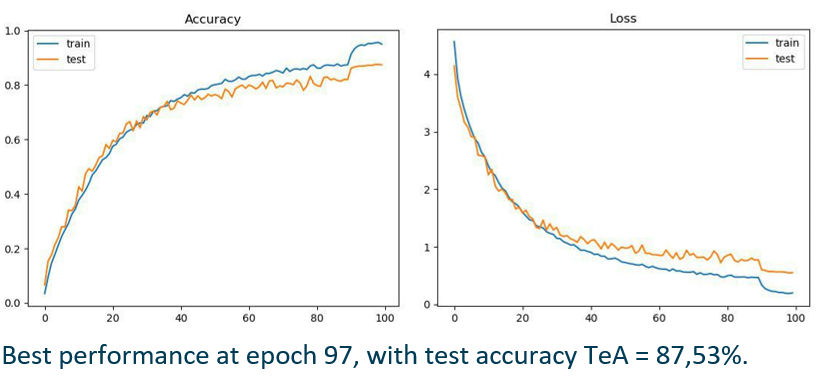
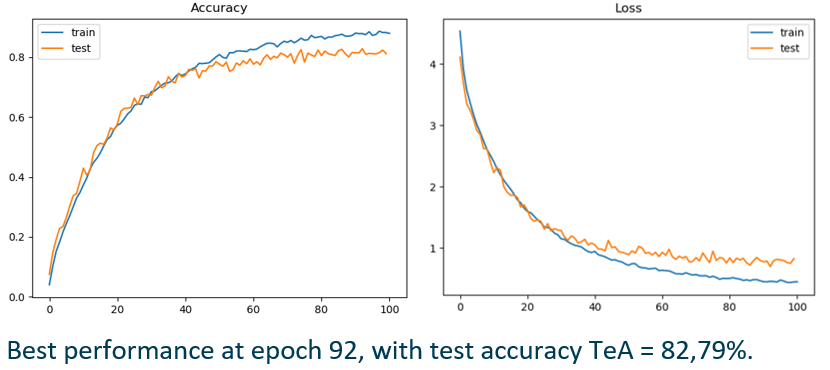
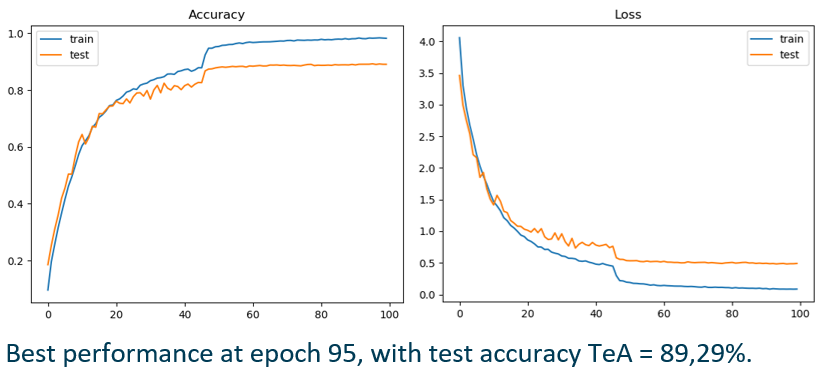
We have trained a classifier on the faces, so that given an image of the black_white dataset it returns its class (black or white).
We have used a face detection model (chosen between https://www.learnopencv.com/face-detection-opencv-dlib-and-deep-learning-c-python/) and generated a new version of Utrain, in which, in every image, we have extracted the face, classified it (black or white) and converted it in the opposite colour throught the corresponding CycleGAN model. We have therefore generated the Utrain-inv dataset.
After the previous turotial with AWS Lambda, here is now the Google Cloud Functions version.
This repository shows how to create an Google Cloud function to proxy OpenCage Geocoder API.
Why a function as a service to wrap a REST API? You may don’t want to expose your own OpenCage API key to your client end users, analyze requests sent to Open Cage, etc. So here is a solution to proxy the requests on your own infrastructure.
Tutorial
In this tutorial we will be using the serverless framework from serverless.com.
We will first need a Google account to activate the Google Cloud Plateform.
Prerequisites
node, npm or yarn
serverless: for convenience install it globally:
$ npm install -g serverless
Assuming serverless has been setup globally, the sls and serverless commands are available.
Google – Credentials
The Serverless Framework needs access to account credentials for your Google Cloud account so that it can create and manage resources on your behalf.
Create a Google Cloud Account
We need a Billing Account with a credit card attached to use Google Cloud Functions. Here’s how to create one:
There is a dropdown near the top left of the screen (near the search bar that lists your projects). Click it and select Create Project.
Enter a Project name and select the Billing Account you created in the steps above.
Click on Create to start the creation process.
Wait until the Project was successfully created and Google will redirect you to your new Project.
Verify your currently within your new Project by looking at the dropdown next to the search bar. This should mark your new Project as selected.
Enable the necessary APIs
You need to enable the following APIs so that Serverless can create the corresponding resources.
Go to the API dashboard, select your project and enable the following APIs:
Google Cloud Functions
Google Cloud Deployment Manager
Google Cloud Storage
Stackdriver Logging
Get credentials
You need to create credentials Serverless can use to create resources in your Project.
Go to the Google Cloud API Manager and select Credentials on the left.
Click on Create credentials and select Service account key.
Select New service account in the Service account dropdown.
Enter a name for your Service account name (e.g. “opencage-function”).
Select Project –> Owner as the Role.
Key type is JSON.
Click on Create to create your private key.
The so called keyfile will be downloaded on your machine.
Save the keyfile somewhere secure. I recommend making a folder in your home folder and putting it there; like this, ~/.gcloud/keyfile.json. You can change the file name from keyfile to anything according to the goolge project name. Just remember the path you saved it to!
Create a new serverless boilerplate
serverless will help up us to bootstrap the project with the command
Open up your serverless.yml file and update the service name
service: opencage-geocoder
Update the provider config in serverless.yml
Open up your serverless.yml file and update the provider section with your Google Cloud Project id and the path to your keyfile file. It should look something like this:
Like in the example above, feel free to use node Plateform version 8 instead of 6. Google Cloud funciton are not generally available, here the region parameter is set to us-central1 which point to the only available location while I am writing this tutorial.
install dependencies
We will hide OpenCage Geocoder API key and we will set it in an environment file, so we will use the dotenv library, then the OpenCage API request will be held by the opencage-api-client library
$ npm i -S opencage-api-client dotenv
serverless helpers
Serverless comes will some useful plugins, We will use the environment generator file plugin
$ npm i -D serverless-env-generator
Edit serverless.yml file, adding this after provider: section
plugins:
  - serverless-google-cloudfunctions
  - serverless-env-generator

# Plugin config goes into custom:
custom:
  envFiles: #YAML files used to create .env file
    - environment.yml
Environment variable
Use serverless env generator to create environment.yml file
$ serverless env --attribute OCD_API_KEY --value <YOUR-OPEN-CAGE-API-KEY> --stage dev
Serverless: Successfuly set OCD_API_KEY 🎉
now let’s generate a .env file.
$ serverless env generate
Serverless: Creating .env file...
Lets code it:
Open the index.js file and remove its content. Replace it by :
As we exported opencage from our module, we have to specify it in the serverless yml file. opencage will be the function name, geocode is the handler and we will use geocode for the path
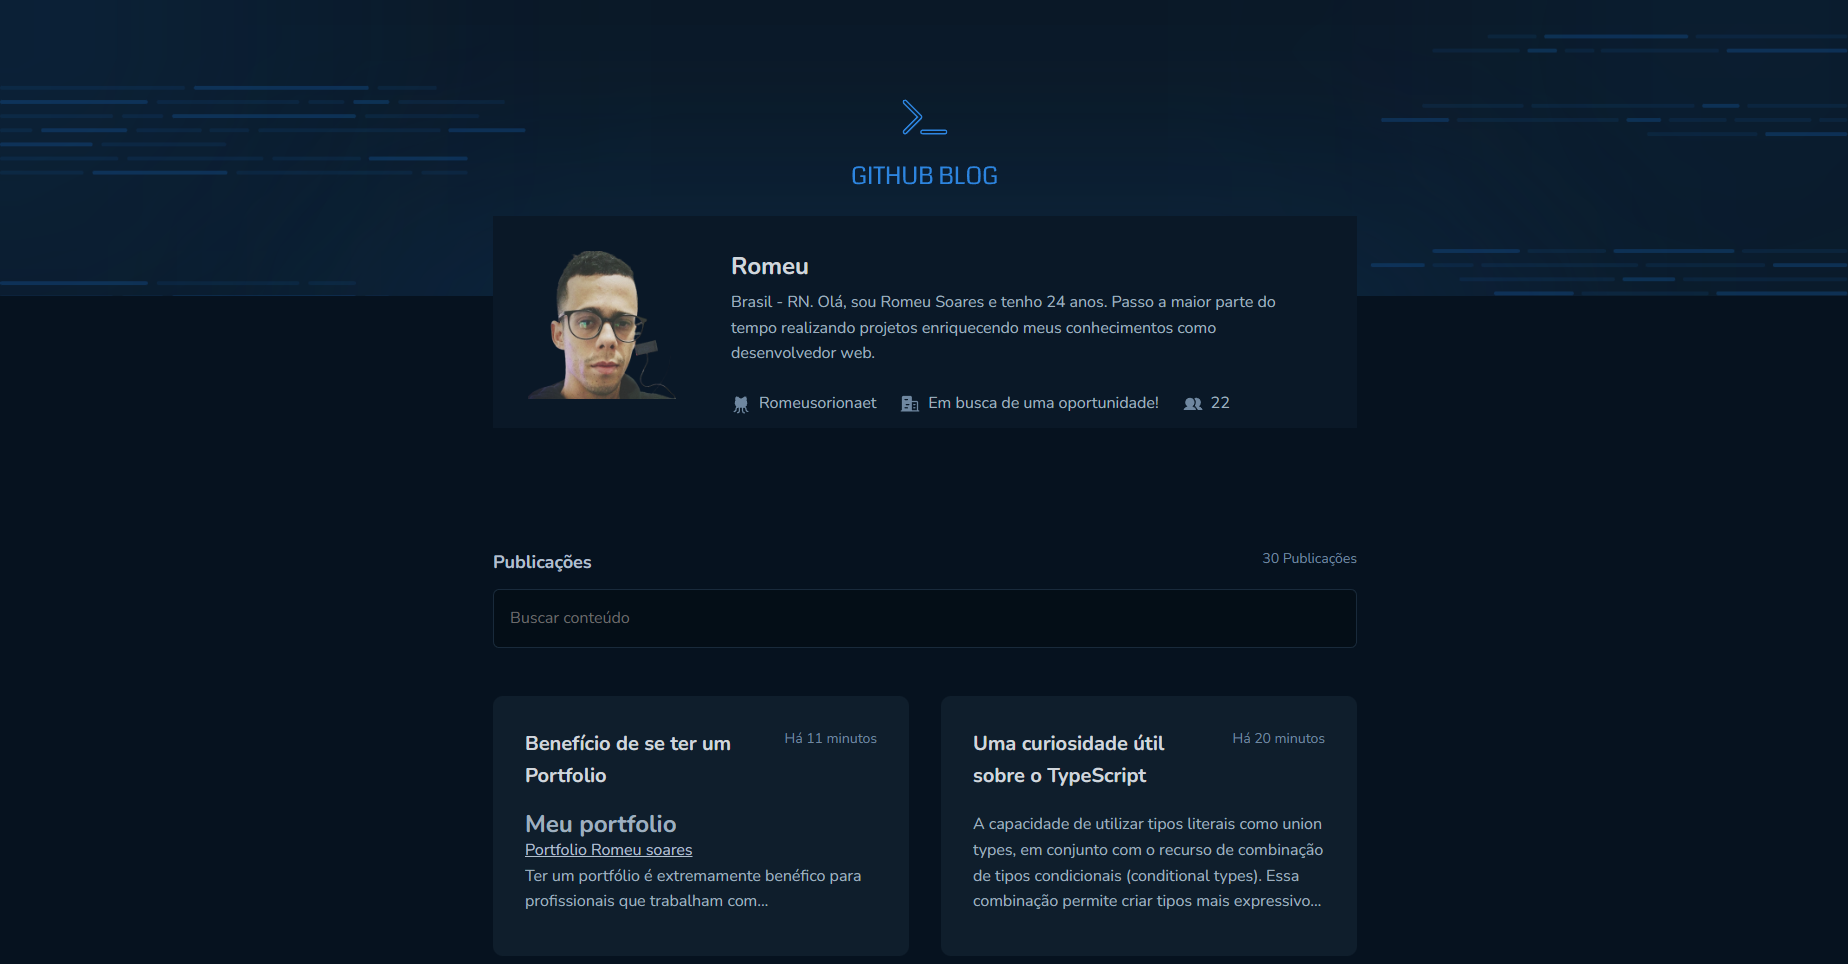
Bem-vindo ao Github Blog! Este é um site onde compartilho questões e curiosidades sobre ferramentas de desenvolvimento web. Aqui, você encontrará informações úteis, dicas e truques relacionados ao mundo do desenvolvimento Web
Principais Tecnologias usadas
ReactJS
Vite
TypeScript
HTML
Styled-Components
Além disso, utilizo diversas bibliotecas e ferramentas adicionais para aprimorar a experiência de desenvolvimento e fornecer recursos adicionais aos leitores. Algumas dessas bibliotecas e ferramentas incluem:
Phosphor Icons: Uma biblioteca de ícones SVG moderna e personalizável.
ESLint: Uma ferramenta de análise de código estática que ajuda a identificar e corrigir problemas de código.
date-fns: Uma biblioteca JavaScript para manipulação e formatação de datas.
Axios: Um cliente HTTP baseado em Promises para fazer requisições a APIs.
React Markdown: Uma biblioteca para renderizar conteúdo Markdown em componentes React.
Problemas e sugestões
Se você encontrar algum problema ou tiver sugestões de melhorias para o Github Blog, por favor, abra uma nova issue neste repositório. Faremos o possível para avaliar e responder prontamente aos problemas e sugestões relatados.
Obrigado por visitar o Github Blog! Espero que você encontre conteúdo valioso e interessante relacionado ao desenvolvimento web. Fique à vontade para explorar o site e compartilhar suas dúvidas e opiniões.