Blog

  • jekyll-minibundle

    Jekyll Minibundle plugin

    Gem version CI

    A straightforward asset bundling plugin for Jekyll, utilizing external asset conversion/minification tool of your choice. The plugin provides asset concatenation for bundling and asset fingerprinting with MD5 digest for cache busting.

    There are no runtime dependencies, except for the minification tool used for bundling (fingerprinting has no dependencies).

    The plugin requires Jekyll version 3 or 4. It is tested with Ruby MRI 2.7 and later.

    The plugin works with Jekyll’s watch mode (auto-regeneration, Jekyll option --watch), but not with incremental feature enabled (Jekyll option --incremental).

    Minibundle plugin does not affect the behavior of Jekyll’s built-in asset conversion. The plugin is designed to incorporate the results produced by external asset tools only.

    Features

    There are two features: fingerprinting with MD5 digest over the contents of the asset file (any type of file will do), and asset bundling combined with the first feature.

    Asset bundling consists of concatenation and minification. The plugin implements concatenation and leaves choosing the minification tool up to you. UglifyJS is a good and fast minifier, for example. The plugin connects to the minifier with standard unix pipe, feeding asset file contents to it in desired order via standard input, and reads the result from standard output.

    Why is this good? A fingerprint in asset’s path is the recommended way to handle caching of static resources, because you can allow browsers and intermediate proxies to cache the asset for a very long time. Calculating MD5 digest over the contents of the file is fast and the resulting digest is reasonably unique to be generated automatically.

    Asset bundling is good for reducing the number of requests to the backend upon page load. The minification of stylesheets and JavaScript sources makes asset sizes smaller and thus faster to load over network.

    Usage

    The plugin ships as a RubyGem. To install:

    1. Add the following line to the Gemfile of your site:

      gem 'jekyll-minibundle'
    2. Run bundle install.

    3. Instruct Jekyll to load the gem by adding this line to the configuration file of your site (_config.yml):

      plugins:
        - jekyll/minibundle

      (Use the gems key instead of plugins for Jekyll older than v3.5.0.)

    An alternative to using the plugins configuration option is to add the _plugins/minibundle.rb file to your site project with this line:

    require 'jekyll/minibundle'

    You must allow Jekyll to use custom plugins. That is, do not enable Jekyll’s safe configuration option.

    Asset fingerprinting

    If you just want to have an MD5 fingerprint in your asset’s path, use the ministamp Liquid tag in a Liquid template file. For example, fingerprinting CSS styles:

    <link rel="stylesheet" href="{{ site.baseurl }}/{% ministamp _assets/site.css assets/site.css %}" media="screen, projection">

    When it’s time to render the ministamp tag, the plugin copies the source file (_assets/site.css, the first tag argument) to the specified destination path (assets/site.css, the second tag argument) in Jekyll’s site destination directory. The filename will contain a fingerprint.

    The tag outputs the asset destination path, encoded for HTML, into Liquid’s template rendering outcome. For example, when site.baseurl is empty:

    <link rel="stylesheet" href="/assets/site-390be921ee0eff063817bb5ef2954300.css" media="screen, projection">

    Another example, this time fingerprinting an image and using the absolute_url Liquid filter of Jekyll to render the absolute URL of the image in the src attribute:

    <img src="{{ "https://github.com/" | absolute_url }}{% ministamp _assets/dog.jpg assets/dog.jpg %}" alt="My dog smiling to the camera" title="A photo of my dog" width="195" height="258" />

    This feature can be combined with asset generation tools external to Jekyll. For example, you can configure Sass to take input files from _assets/styles/*.scss and to produce output to _tmp/site.css. Then, you use the ministamp tag to copy the file with a fingerprint to Jekyll’s site destination directory:

    <link rel="stylesheet" href="{{ site.baseurl }}/{% ministamp _tmp/site.css assets/site.css %}">

    ministamp call syntax

    The argument for the ministamp tag must be in YAML syntax, and parsing the argument as YAML must result either in a String or a Hash. What you saw previously was the argument being parsed as a String; it’s effectively a shorthand version of passing the argument as a Hash with certain keys. That is, in the following call:

    {% ministamp _tmp/site.css assets/site.css %}

    the argument is a String: "_tmp/site.css assets/site.css". The call is equivalent to the following call with a Hash argument:

    {% ministamp { source_path: _tmp/site.css, destination_path: assets/site.css } %}

    The Hash argument allows expressing more options and quoting source_path and destination_path values, if needed.

    The supported keys for the Hash argument are:

    Key Required? Value type Value example Default value Description
    source_path yes string '_tmp/site.css' The source path of the asset file, relative to the site directory.
    destination_path yes string 'assets/site.css' The destination path of the asset file, relative to Jekyll’s site destination directory. If the value begins with / and render_basename_only is false, ministamp‘s output will begin with /.
    render_basename_only no boolean true false If true, ministamp‘s rendered URL will be the basename of the asset destination path. See Separating asset destination path from generated URL for more.

    With a Hash argument, the plugin processes source_path and destination_path values through a tiny template engine. This allows you to use Liquid’s variables as input to ministamp tag. An example with Liquid’s assign tag:

    {% assign asset_dir = 'assets' %}
    <link rel="stylesheet" href="{% ministamp { source_path: _tmp/site.css, destination_path: '{{ asset_dir }}/site.css' } %}">

    The above would use assets/site.css as the destination path.

    Note that you must quote destination_path‘s value, otherwise YAML does not recognize it as a proper string.

    To refer to Jekyll’s configuration options (_config.yml) in the template, prefix the variable name with site.. For example, to refer to baseurl option, use syntax {{ site.baseurl }} in the template.

    See Variable templating for details about the template syntax.

    Asset bundling

    This is a straightforward way to bundle assets with any minification tool that supports reading input from stdin and writing the output to stdout. You write the configuration for input sources directly into the content file where you want the markup tag for the bundle file to appear. The markup tag contains the path to the bundle file, and the Jekyll’s site destination directory will have the bundle file at that path. The path will contain an MD5 fingerprint.

    Place the minibundle Liquid block into the Liquid template file where you want the block’s generated markup to appear. Write bundling configuration inside the block in YAML syntax. For example, to bundle a set of JavaScript sources:

    {% minibundle js %}
    source_dir: _assets/scripts
    destination_path: assets/site
    baseurl: '{{ site.baseurl }}/'
    assets:
      - dependency
      - app
    attributes:
      id: my-scripts
      async:
    {% endminibundle %}
    

    Then, specify the command for launching your favorite minifier in _config.yml:

    baseurl: ''
    
    minibundle:
      minifier_commands:
        js: node_modules/.bin/uglifyjs

    When it’s time to render the minibundle block, the plugin launches the minifier and connects to it with a Unix pipe. The plugin feeds the contents of the asset files in source_dir directory as input to the minifier (stdin). The feeding order is the order of the files in the assets key in the block configuration. The plugin expects the minifier to produce output (stdout) and writes it to the file at destination_path in Jekyll’s site destination directory. The filename will contain a fingerprint.

    The block outputs <link> (for css type) or <script> (for js type) HTML element into Liquid’s template rendering outcome. Continuing the example above, the block’s output will be:

    <script src="/assets/site-8e764372a0dbd296033cb2a416f064b5.js" type="text/javascript" id="my-scripts" async></script>

    You can pass custom attributes, like id="my-scripts" and async above, to the generated markup with attributes map inside the minibundle block.

    As shown above for the baseurl key, you can use Liquid template syntax inside the contents of the block. Liquid renders block contents before the minibundle block gets the turn to render itself. Just ensure that block contents will result in valid YAML.

    For bundling CSS assets, use css as the argument to the minibundle block:

    {% minibundle css %}
    source_dir: _assets/styles
    destination_path: assets/site
    baseurl: '{{ site.baseurl }}/'
    assets:
      - reset
      - common
    attributes:
      media: screen
    {% endminibundle %}
    

    And then specify the minifier command in _config.yml:

    minibundle:
      minifier_commands:
        css: _bin/remove_whitespace
        js: node_modules/.bin/uglifyjs

    minibundle call syntax

    Use css or js as the argument to the opening tag, for example {% minibundle css %}.

    The block contents must be in YAML syntax. The supported keys are:

    Key Value type Value example Default value Description
    source_dir string '_assets' The source directory of assets, relative to the site directory. You can use period (.) to select the site directory itself.
    assets array of strings ['deps/one', 'deps/two', 'app'] [] Array of assets relative to source_dir directory, without type extension. These are the asset files to be bundled, in order, into one bundle destination file.
    destination_path string 'assets/site' The destination path of the bundle file, without type extension, relative to Jekyll’s site destination directory. If the value begins with / and baseurl is empty, baseurl will be set to "https://github.com/" implicitly.
    baseurl string '{{ site.baseurl }}/' '' If nonempty, the bundle destination URL inside minibundle‘s rendered HTML element will be this value prepended to the destination path of the bundle file. Ignored if destination_baseurl is nonempty.
    destination_baseurl string '{{ site.cdn_baseurl }}/' '' If nonempty, the bundle destination URL inside minibundle‘s rendered HTML element will be this value prepended to the basename of the bundle destination path. See Separating asset destination path from generated URL for more.
    attributes map of keys to string values {id: my-link, media: screen} {} Custom HTML element attributes to be added to minibundle‘s rendered HTML element.
    minifier_cmd string 'node_modules/.bin/uglifyjs' Minifier command specific to this bundle. See Minifier command specification for more.

    Minifier command specification

    You can specify minifier commands in three places:

    1. In _config.yml (as shown earlier):

      minibundle:
        minifier_commands:
          css: _bin/remove_whitespace
          js: node_modules/.bin/uglifyjs
    2. As environment variables:

      export JEKYLL_MINIBUNDLE_CMD_CSS=_bin/remove_whitespace
      export JEKYLL_MINIBUNDLE_CMD_JS="node_modules/.bin/uglifyjs"
    3. Inside the minibundle block with minifier_cmd option, allowing blocks to have different commands from each other:

      {% minibundle js %}
      source_dir: _assets/scripts
      destination_path: assets/site
      minifier_cmd: node_modules/.bin/uglifyjs
      assets:
        - dependency
        - app
      attributes:
        id: my-scripts
      {% endminibundle %}
      

    These ways of specification are listed in increasing order of specificity. Should multiple commands apply to a block, the most specific one wins. For example, the minifier_cmd option inside the {% minibundle js }% block overrides the setting in the $JEKYLL_MINIBUNDLE_CMD_JS environment variable.

    Recommended directory layout

    It’s recommended that you exclude the files you use as asset sources from Jekyll itself. Otherwise, you end up with duplicate files in the site destination directory.

    For example, in the following snippet we’re using assets/src.css as asset source to ministamp tag:

    , the template begin{{ var }}end results in beginfooend.

    The engine supports variable substitution only. It does not support other expressions. If you need to, you can write complex expressions in Liquid, store the result to a variable, and use the variable in the template.

    If you need literal { or } characters in the template, you can escape them with backslash. For example, \{ results in { in the output. To output backslash character itself, write it twice: \\ results in \ in the output.

    Inside variable subsitution (between {{ and }}), anything before the closing }} tag is interpreted as part of the variable name, except that the engine removes any leading and trailing whitespace from the name. For example, in the template {{ var } }}, var } is treated as the name of the variable.

    A reference to undefined variable results in empty string. For example, begin{{ nosuch }}end will output beginend if there’s no variable named nosuch.

    Separating asset destination path from generated URL

    Use the render_basename_only: true option of the ministamp tag and the destination_baseurl option of the minibundle block to separate the destination path of the asset file from the generated URL of the asset. This allows you to serve the asset from a separate domain, for example.

    Example usage, with the following content in _config.yml:

    cdn_baseurl: 'https://cdn.example.com'

    For the ministamp tag:

    <link rel="stylesheet" href="{{ site.cdn_baseurl }}/css/{% ministamp { source_path: '_tmp/site.css', destination_path: assets/site.css, render_basename_only: true } %}">

    The asset file will be in Jekyll’s site destination directory with path assets/site-ff9c63f843b11f9c3666fe46caaddea8.css, and Liquid’s rendering will result in:

    <link rel="stylesheet" href="https://cdn.example.com/css/site-ff9c63f843b11f9c3666fe46caaddea8.css">

    For the minibundle block:

    {% minibundle js %}
    source_dir: _assets/scripts
    destination_path: assets/site
    destination_baseurl: '{{ site.cdn_baseurl }}/js/'
    assets:
      - dependency
      - app
    {% endminibundle %}

    The bundle file will be in Jekyll’s site destination directory with path assets/site-4782a1f67803038d4f8351051e67deb8.js, and Liquid’s rendering will result in:

    <script type="text/javascript" src="https://cdn.example.com/js/site-4782a1f67803038d4f8351051e67deb8.js"></script>

    Capturing Liquid output

    Use Liquid’s capture block to store output rendered inside the block to a variable, as a string. Then you can process the string as you like.

    For example:

    {% capture site_css %}{% ministamp _assets/site.css assets/site.css %}{% endcapture %}
    <link rel="stylesheet" href="{{ site_css | remove_first: "assets/" }}">

    Liquid’s rendering outcome:

    <link rel="stylesheet" href="site-390be921ee0eff063817bb5ef2954300.css">

    Example site

    See the sources of an example site.

    Known caveats

    The plugin does not work with Jekyll’s incremental rebuild feature (Jekyll option --incremental).

    License

    MIT. See LICENSE.txt.

    Visit original content creator repository https://github.com/tkareine/jekyll-minibundle
  • speech_detection

    A Demo

    This matlab classifier aims to distinguish normal speech, abusive/angry/violate speech and environmental noise.
    The speech/noise classifier is based on audio features Zero-Cross-Rate and Spectral Flux, the abusive speech classifier is based on features Mel-frequency cepstral coefficients and Harmonic Ratio. The classifier uses K-Nearest-Neighbors.
    SVM and decision tree are also tested, but are not chosen due to poor performance.
    My training data, reports and other files can be found at this dropbox link: https://www.dropbox.com/sh/s4fho148k6l3npz/AADJnnfqUJlQU_0QIEMbSsfCa?dl=0

    Prerequisites

    Matlab R2014 or higher (not quite sure…)
    Most bugs in old versions are due to different names of functions. For example, wavread is used in old version rather than audioread. To check if your version of matlab is suitable, type in your matlab console

    help audioread
    

    If the explanation for ‘audioread’ apears, then continue to type

    help audiorecorder
    

    If the explanations for two functions are listed, then you have them in your current matlab, and you can run my code now.

    Installation and running the code

    Download my matlab code

    git clone https://github.com/zhiyuan8/speech_detection.git
    

    Change your Matlab working directory to the folder where you download my code. Open my_code_real_time.m file. Go to load KNN model and do normalization section, paste the code in your matlab console.

    clear all;% close worksheet
    clc;% close console
    fclose('all'); % close all open files
    modelSpeech_Non = 'model_11_11_speech_noise_S_Flux_ZCR_filter_6stats.mat';
    modelSpeech_Abuse = 'model_11_12_speech_abuse_MFCC_filter_6stats.mat'; 
    if strfind(modelSpeech_Non, 'filter')
        filter_dec1 = true;
    else
        filter_dec1 = false;
    end
    if (strfind(modelSpeech_Abuse, 'filter'))
        filter_dec2 = true;
    else
        filter_dec2 = false;
    end
    KNN_Non=10; %
    KNN_Abuse=10;
    durationSecs=20;
    Fs=16000; %Keep consistant with 16 kHz that I use for training datasets
    nbit=16; %Keep consistant with 16 nbits that I use for training datasets
    

    The only part you shall change is ‘durationSecs’ which indicates the length of this audio recording. I set it as 20s. The codes above tells matlab what features you choose for detection, as well as parameters for audio recorder and classifier.
    Then, paste the code above in matlab console to launch detection:

    [recorder,samples,label1, P1, trainchosen1, label2, P2, trainchosen2, calc_time] ...
        = Real_Time_KNN(Fs,nbit, durationSecs,modelSpeech_Non,modelSpeech_Abuse,...
            KNN_Non,KNN_Abuse,filter_dec1,filter_dec2);
    

    A figure will be generated and you can speak to your computer and see performance of this classifier.

    Results

    1.Open Matlab, Normally Speak to microphone. Speech identification works well and can identify my speech. When there is a short break between my two sentences, the classifier can find that short blank.

    Classfier performance for my speak in normal emotion and pace

    2.Open Matlab, make some noises. Noise identification works well. At first some high-frequent noises (clapping table, knock keyboards) are hard to tell, but after adding a dB filter, the classifier works better.

    Classfier performance for some noise

    3.Open Matlab, Speak violently or broadcast an angry audio from phone. In this example the abusive classifier works well. But when I test it with my voice, it is hard to distinguish. Due to the fact that most of training audios are scream shouting, my low male voice is hard to classify when I speak violently.

    Classfier performance for a 20s angry female speech from Internet

    Tranining data source

    All my training data are uploaded this this Dropbox link: https://www.dropbox.com/sh/ysphojpsy0gy1i0/AACPxTSIqPiRnOBROvT6Ee6Sa?dl=0 The training data comes from different databases, and I use matlab to change sampling frequency and nbits. All my training audios have been transferred to 16000 kHz and 16 nbits (see Training and Testing by User Section). It can be regarded as audio compression because some audios are 44100kHz or 22050kHz.

    In speech / environmental noise identification, there are around 1000 files for each class. The comments help you find the corresponding folder after you download the whole datasets.

    Class Description # of files Database Comments
    Speech Voice on phone ≈350 http://www.speech.cs.cmu.edu/databases/pda/ Very clear speech via phone
    Speech Daily speech ≈100 https://github.com/amsehili/noise-of-life Use ‘speech’ folder
    Speech Daily speech ≈50 https://freesound.org/search/?q=speech&f=&s=score+desc&advanced=0&g=1 Search ‘speech’
    Speech ‘A’ ‘E’ ‘I’ ‘O’ ‘U’ ≈50 https://github.com/vocobox/human-voice-dataset Pronouncation for AEIOU
    Speech Male/female/baby scream or cry ≈200 https://github.com/amsehili/noise-of-life Use ‘maleScream’ ‘femaleScream’ ‘babyCry’ ‘femaleCry’
    Speech Scream, shout ≈50 https://www.freesoundeffects.com/free-sounds/human-sound-effects-10037/ Search ‘scream’,’shout’
    Speech angry abusive speeches ≈200 https://freesound.org/search/?q=abusive&f=&s=score+desc&advanced=0&g=1 Search ‘f*ck’, ‘sh*t’,’abusive’,’cursive’… Be ready for a mental pollution…
    Noice Noise in life(animals, music, cars, alarms, machines…) ≈800 https://github.com/karoldvl/ESC-50 Randomly choose some
    Noice Noise indoor (breath, yawns, keyboards, electronic devices…) ≈200 https://github.com/amsehili/noise-of-life Use ‘breathing’,’doorClapping’,’electricalShalver’,’hairDryer’,’handsClapping’,’keyBoards’,’Keys’,’Music’,’Water’,’yawn’

    In speech / abusive speech identification, there are around 400 files for each class. The comments help you find the corresponding folder after you download the whole datasets.

    Class Description # of files Database Comments
    Abusive Speech Male/female/baby scream or cry ≈200 https://github.com/amsehili/noise-of-life See ‘BabyCry’ ‘FemaleCry’ ‘FemaleScream’ ‘MaleScream’ folder in this repo
    Abusive Speech angry abusive speeches ≈200 https://freesound.org/search/?q=abusive&f=&s=score+desc&advanced=0&g=1 Search ‘f_ck’, ‘sh_t’,’abusive’,’cursive’… Be ready for a mental pollution…
    Normal Speech Randomly choosen speeches ≈400 from ‘Voice on phone’ and ‘Daily speech’ above Randomly choosen files

    Training and Testing by User

    The name of models follows ‘Date + usage + features + filter + statistics’. For example, model_11_12_speech_abuse_MFCC_filter_6stats means that the model used all 6 statistics (max/min/mean/median/standard deviation/ std divided by mean) of MFCC feature with noise filter and is used for abusive speech detection.

    Understanding how KNN works

    The KNN model finds k (=10) nearest audios in training datasets and makes the decision. After following instructions in Installation and running the code, you shall have outputs [recorder,samples,label1, P1, trainchosen1, label2, P2, trainchosen2, calc_time] in your workingsheet. The trainchosen1 and trainchosen2 stores indices of chosen traning files for 2 classifier. Go to file my_code_real_time.m ‘s section check chosen file names. Paste the code in your console:

    [~, ~, ~, classNames1, FileNames1] = kNN_model_load(modelSpeech_Non);
    for i= 1:length(trainchosen1)
        ['in second' num2str(i), classNames1{1},' is identified according to']
        FileNames1{1}(trainchosen1{i,1})
    end
    

    Now, the selected training audios to identify class 1 (‘speech’ in this case) will be outputed. Also, you can paste this to see selected audio samples to detect class 2 (‘noise’ in this case)

    for i= 1:length(trainchosen2)
        ['in second' num2str(i), classNames1{2}, 'is identified according to']
        FileNames1{2}(trainchosen1{i,2})
    end
    

    And then you will know which files are chosen for your speech/noise identifier. It is important for testers to know, because some bad examples will have side effects. I found that some training files with weak voice will mislead your identifier to regard your speech as noise, while some training files with songs will misguide your identifier to treat noise as human speech.

    Test models that I have trained in models folder

    For example, if you want to test whether ‘spectral flux + ZCR + Energy Entropy’ features work better than ‘spectral flux + ZCR’ which I choose for speech/noise detection, then copy model_11_12_speech_S_Flux_ZCRE_Entropy_filter_6stats.mat file from models folder to your current directory.
    Follow the instructions in Installation and running the code but remember to change your model’s name:

    modelSpeech_Non = 'model_11_12_speech_S_Flux_ZCRE_Entropy_filter_6stats.mat';
    

    Training your own KNN model

    Users may be more interested in training their own model based on their own collected audios.
    Go to my_code_real_time.m‘s train a KNN-model with desired features + stats section. Specify your desired features at Feature_Names variable, if I want Zero-Cross_rate and Energy, then I will write

    Feature_Names = {'ZCR','E'}
    

    All features are listed here {‘ZCR’,’E’,’E_Entropy’,’S_Centroid’,’S_Spread’,’S_Entropy’,’S_Flux’,’S_Rolloff’,’MFCC_01′,’MFCC_02′,’MFCC_03′,’MFCC_04′,’MFCC_05′,’MFCC_06′,’MFCC_07′,’MFCC_08′,’MFCC_09′,’MFCC_10′,’MFCC_11′,’MFCC_12′,’MFCC_13′,’H_Ratio’} Also, remember to change the directory where you save your traning audios:

    strDir =  path to 'speech/noise' folders or 'speech/abuse' folders;
    

    Paste the section in console and you will get a new ModelName.mat file.

    stWin=0.05; stStep=0.05; % there will be 20 elements in each window 
    mtWin=1.0; mtStep=1.0; % our discriminative window is 1s
    filter_dec = true; % Remeber to double check it
    Statistics = { 'mean', 'median' , 'min' , 'max' , 'std' , 'std / mean'}; % 6 stats, you can change
    Feature_Names = {'H_Ratio','MFCC_01','MFCC_02','MFCC_03','MFCC_04','MFCC_05','MFCC_06','MFCC_07','MFCC_08'...
    'MFCC_09','MFCC_10','MFCC_11','MFCC_12','MFCC_13'}; % there are 22 features for you to choose
    modelFileName = ['new_model_11_12_speech_abuse_MFCC_H_Ratio_filter_6stats.mat'];  % remember to change model name to your desired one
    strDir = 'C:\Users\Zhiyuan Li\Desktop\Prof_Ashish_Goel\training_data\speech_abuse\'; %remember to change folder directory
    kNN_model_add_class(modelFileName, 'abuse', [strDir 'abuse'], Statistics, Feature_Names, stWin, stStep, mtWin, mtStep,filter_dec); % remember to change the class 1 to your desired one
    kNN_model_add_class(modelFileName, 'speech', [strDir 'speech'], Statistics, Feature_Names, stWin, stStep, mtWin, mtStep,filter_dec);% remember to change the class 2 to your desired one
    

    Unify sampling frequency and nbits of audio files for model training

    Audios may be in different sampling frequency and differnt nbits. So I write a matlab script to unify them.
    Open my_code_change_audio.m. Go to check Fz and bits of audios section and change the path to the directory where you download your audios. Paste the codes in console

    clear all;% close worksheet
    clc;% close console
    fclose('all'); % close all open files
    path= 'C:\Users\Zhiyuan Li\Desktop\Prof_Ashish_Goel\training_data\speech_non_speech\speech'; % remember to change your directory
    [Bits, Fs, Channels, FileNames] = check_bits_Fz(path);
    

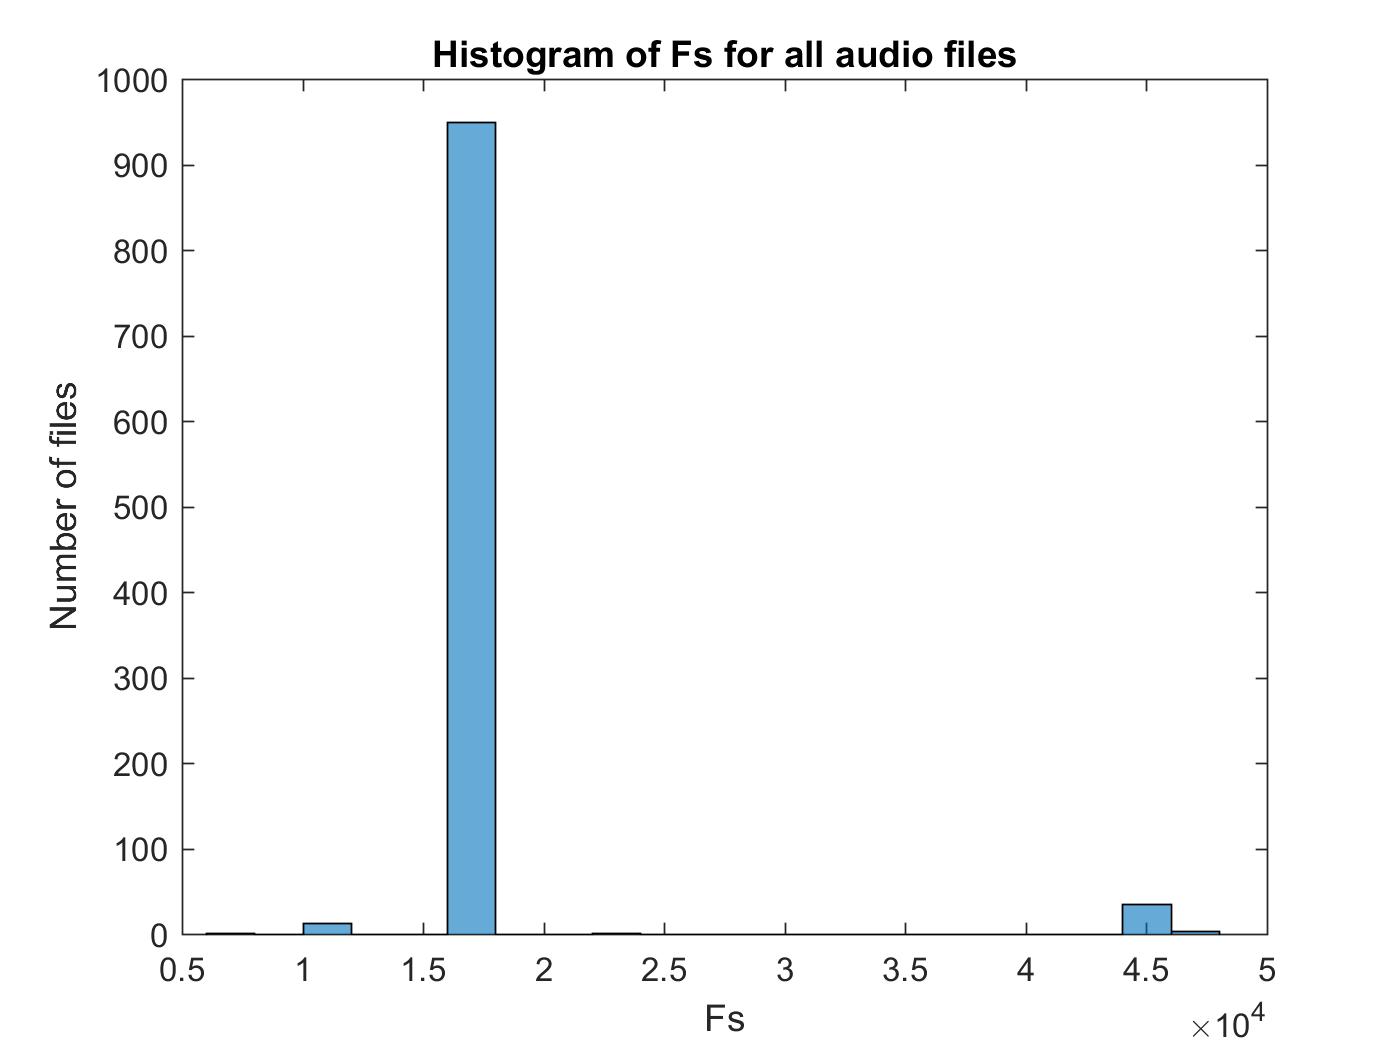
    Now, plot the histogram and you will see how ‘nbits’, ‘sample frequency’ and ‘number of audio channels’ distrbute. Paste the code in plot distribution of Bit_temp & Fs_temp

    figure;histogram(Bits)
    xlabel('Bits');ylabel('Number of files');title('Histogram of Bits for all audio files')
    figure;histogram(Fs)
    xlabel('Fs');ylabel('Number of files');title('Histogram of Fs for all audio files')
    figure;histogram(Channels,'BinWidth',1)
    xlabel('Channels');ylabel('Number of files');title('Histogram of Channels for all audio files')
    

    You will get three histograms, one of them is as following:

    Sampling frequency histogram

    Now, go to section change Fs, bites(), specify the directory for your audios and the directory where you want to save new audios. You will change them to your desired sampling frequency and nbits by paste those codes from section change Fs, bites() into console:

    Fs_new = 16000; % New Fs, for those audios with Fs<Fs_new, they will be omitted
    bit_new = 16; % New bit
    path= 'C:\Users\Zhiyuan Li\Desktop\Prof_Ashish_Goel\training_data\speech_non_speech'; % remember to change your directory
    pathNew= 'C:\Users\Zhiyuan Li\Desktop\Prof_Ashish_Goel\training_data\speech_non_speech\new'; % remember to change your directory and make sure this folder exists
    change_bit_Fz(path,pathNew,Fs_new,bit_new);
    

    Your desired files will be generated in your new working directory.

    Contributing

    Acknowledgments

    Visit original content creator repository https://github.com/zhiyuan8/speech_detection
  • pgn-tactics-generator

    pgn-tactics-generator

    About

    This is a python application dedicated to creating chess puzzles/tactics from a pgn file.
    Also it can download your games from lichess.org and use that file.

    It’s based on the great https://github.com/clarkerubber/Python-Puzzle-Creator by @clarkerubber

    Things that I changed:

    • Use a local pgn file with games as a source.
    • Write results to a file called tactics.pgn
    • Default engine depth to 8, so it’s faster. Before it was nodes=3500000 this is a depth around 20. So it took several minutes to analyze a game. With depth 8 it takes seconds.
    • You can use the depth argument to change the depth if you want more precision.
    • chess.pop_count to chess.popcount, because it was failing

    This is too complex, give something easy.

    There is another option if you don’t want to install and manage python scripts
    I created a more user friendly tactics generator and it’s online http://chesstacticsgenerator.vitomd.com
    It uses a different approach to create tactics, so probably it will generate a different set of tactics.

    Installation

    This script requires the Requests and Python-Chess libraries to run, as well as a copy of Stockfish
    Is recommended that you use Python 3 and pip3. But it could work with Python 2.7 and pip (probably you will need to install futures pip install futures )

    Please, take a look at development doc for details.

    Install requirements

    pip3 install -r requirements.txt --user

    Setup

    MacOS / Linux : sh build-stockfish.sh to obtain the current lichess Stockfish instance.

    Launching Application

    Downloading games for a specific user

    You can download games from a specific user using this command:
    python3 download_games.py <lichess username>

    By default, it will download the last 60 games from blitz, rapid and classical.

    Arguments

    You can use the max argument to get more games and use the lichess api token with the token argument to make the download faster. https://lichess.org/api#operation/apiGamesUser

    It will save the games in the games.pgn file

    Example to get 100 games using the token

    python3 download_games.py <lichess username> --max 100 --token 123456789

    Downloading games from tournaments

    You can download games from multiple tournaments using this command:

    python3 download_tournaments.py E14kHVwX tdntXNhy

    The arguments are the tournaments ids separate by a space

    It will save the games in the games.pgn file

    Generate tactics

    To execute the generator execute this command. By default it will look for the games.pgn file:

    python3 main.py

    Arguments

    • --quiet to reduce the screen output.
    • --depth=8 select the Stockfish depth analysis. Default is 8 and will take some seconds to analyze a game, with --depth=18 will take around 6 minutes.
    • --games=ruy_lopez.pgn to select a specific pgn file. Default is games.pgn
    • --strict=False Use False to generate more tactics but a little more ambiguous. Default is True
    • --threads=4 Stockfish argument, number of engine threads, default 4
    • --memory=2048 Stockfish argument, memory in MB to use for engine hashtables, default 2048
    • --includeBlunder=False If False then generated puzzles won’t include initial blunder move, default is True
    • --stockfish=./stockfish-x86_64-bmi2 Path to Stockfish binary.
      Optional. If omitted, the program will try to locate Stockfish in current directory or download it from the net

    Example:
    python3 main.py --quiet --depth=12 --games=ruy_lopez.pgn --strict=True --threads=2 --memory=1024

    Tactics output

    The resulting file will be a pgn file called tactics.pgn. Each tactic contains the headers from the source game.
    The result header is the tactic result and not the game result. It can be loaded to a Lichess study or to an app like iChess to practice tactics.

    Problems?

    Stockfish errors

    Want to see all my chess related projects?

    Check My projects for a full detailed list.

    Visit original content creator repository
    https://github.com/vitogit/pgn-tactics-generator

  • deep21

    deep21

    arXiv License: MIT Open In Colab

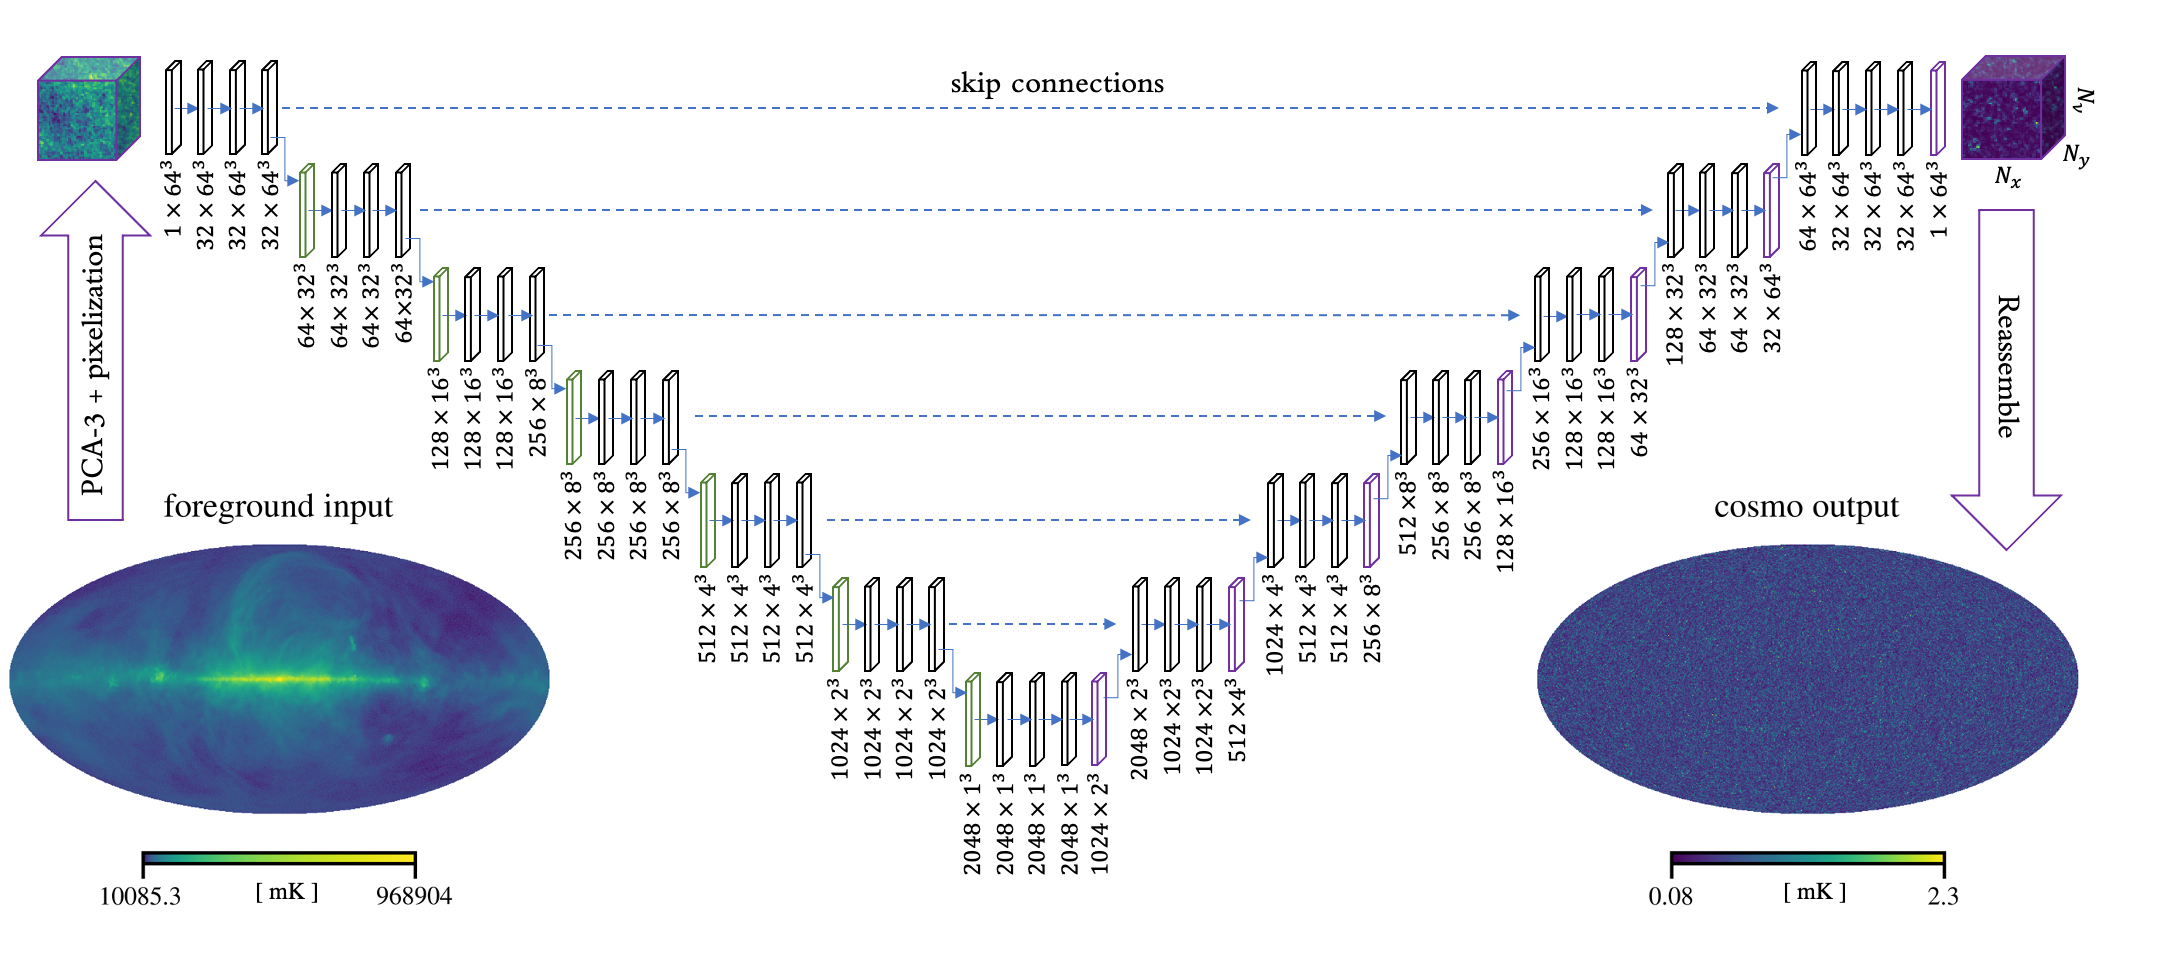
    Repository for deep convolutional neural networks (CNN) to separate cosmological signal from high foreground noise contamination for 21-centimeter large-scale structure observations in the radio spectrum.

    panel-gif

    Read the full publication here: https://arxiv.org/abs/2010.15843

    Browser-based tutorial available via this Google Colab notebook

    unet-diagram

    Contents:

    • pca_processing:

      • HEALPix simulation data processing from .fits to .npy voxel format.
      • Cosmological and foreground simulations generated using the CRIME package
      • Ideally pca_script.py should be run in parallel (each single-sky simulation takes about 3 minutes to process on a standard CPU node)
    • UNet CNNs implemented in Keras:

      • input and output tensor size: (64,64,64,1) \sim (N_x, N_y, N_\nu,$ num_bricks) for 3D convolutions, $(64,64,64) \sim (N_x, N_y, N_\nu)$ for 2D convolutions.
      • 3D and 2D convolutional model parts stored in respective unet/unet_Nd.py files
    • configs:

      • .json parent configuration file with cleaning method and analysis parameters to be edited for user’s directory
    • data_utils:

      • Data loaded using dataloaders.py to generate noisy simulations in batch-sized chunks for network to train
      • my_callbacks.py for varying learning rate and computing custom metrics during training
    • sim_info:

      • frequency (nuTable.txt) and HEALPix window (rearr_nsideN.npy) indices for CRIME simulations
    • train.py: script for training UNet model. Modify Python dictionary input for appropriate number of training epochs

    • run.sh:

      • sample slurm-based shell script for training ensemble of models in parallel
    • hyperopt:

      • folder for hyperparameter tuning on given dataset

    Training Data Availability:

    All 100 full-sky simulations used for this analysis are now publicly available on Globus under the folder ska2. Polarised foregrounds and another set of data are available under ska_polarized and ska_sims respectively.

    The training data used in the published UNet is located under the folder ska. Each of the independently-seeded 100 simulations is located under a numbered folder. For instance, for simulation 42’s data is structured as:

    |`sim_42`
    |----`cosmo`
    |--------`cosmo_i.fits`
    |---`fg`
    |--------`fg_i.fits`


    where i indexes frequencies from 350 to 691 MHz. To feed the data into pca_script.py, the configs/config.json file should be modified to point to ska2.

    Visit original content creator repository https://github.com/tlmakinen/deep21
  • UCR-Drone-Control

    UCR Drone Control

    This repository combines a trajectory planning, communication protocol, and robotics libraries for a simple interface to control multiple drones. Our code is built with the ROS (Melodic) and PX4 Autopilot frameworks to develop the drone control software. The MAV Trajectory Generation library generates an optimized, minimum snap, path for our drones to follow. Finally, MAVLink (MAVROS) is our primary messaging protocol, interfacing with the drones.

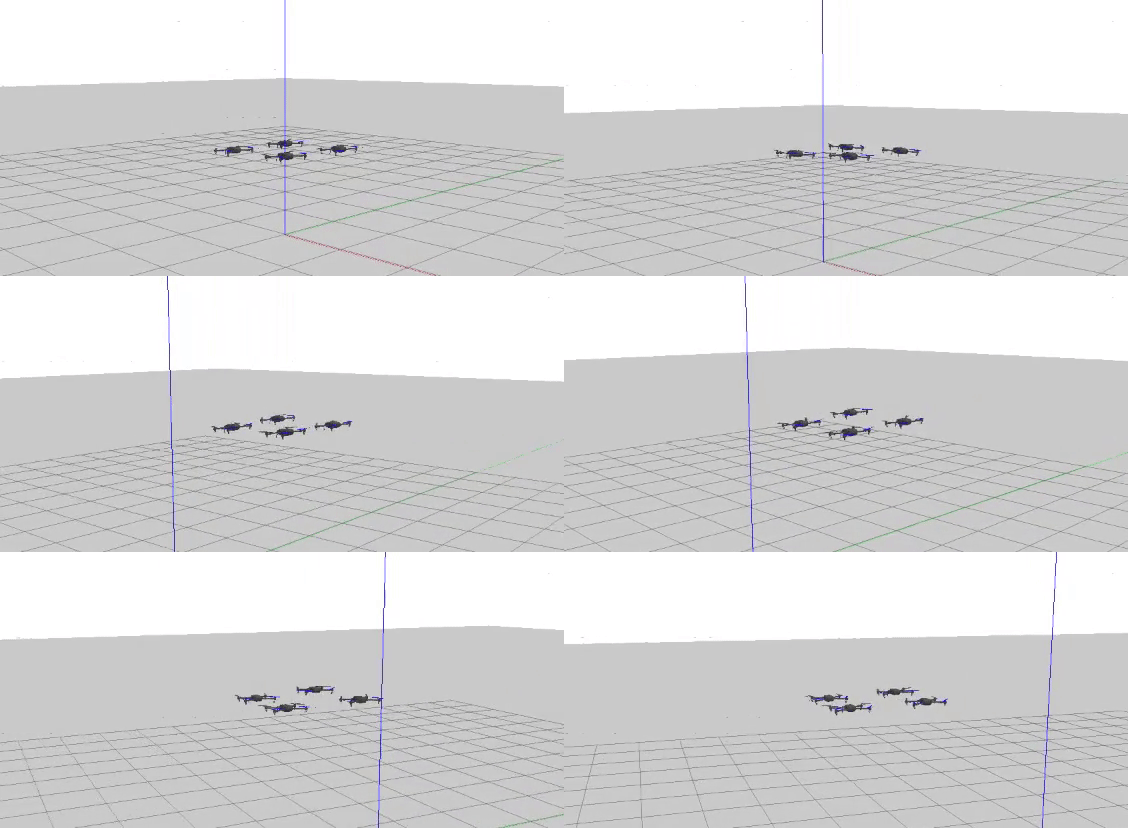
    droneDemo1


    Advisors: Hanzhe Teng

    Developers: Isean Bhanot


    Installation

    Tip: Only use catkin build, never use catkin_make.

    1. Install VMWare and set up a disc image of Ubuntu 18.04 LTS.12

      • Disable “Accelerate 3D graphics” setting under Virtual Machine Settings -> Display.
      • The rest of these instructions take place in the Ubuntu environment.
    2. Install Git on VMWare and set up SSH keys.3

      • Use sudo apt install git to install Git.
    3. Follow the Ubuntu Development Enviorment and Gazebo SITL Simulation setup.

      • Install PX4 Related Dependencies. 4
        • Once Firmware folder cloned, use the latest stable version. i.e. Run git checkout tags/v1.13.0 in Firmware.
        • Delete Firmware folder after completing steps.
      • Install ROS Melodic. 5
        • Full Desktop Installation
      • Install Simulation Common Dependencies. 6
        • Run all code, except line 12, line by line in the terminal.
        • Running pyulog install command is not necessary.
      • Build Quadrotor Model & Setup Gazebo7
        • Before building quadcopter models, update Pillow8 and GStreamer9
      • Install MAVROS, MAVLink, & Setup Workspace 10
        • Source Installation (Released/Stable)
    4. Install MAV Trajectory Generation Package 11

      • When installing additional system dependencies, replace indigo with melodic.
      • Replace catkin config --merge-devel with catkin config --link-devel
    5. Install QGroundContol 12

      • Install Linux/Ubuntu version.
    6. Create a ROS package “drone_control”

    cd ~/[Workspace Name]/src
    mkdir drone_control
    git clone --recursive git@github.com:IseanB/UCR-Drone-Control.git
    mv UCR-Drone-Control drone_control
    cd ~/[Workspace Name]
    catkin build
    . ~/[Workspace Name]/devel/setup.bash
    
    1. Create a file title “multiDrone.cpp” in the src/src folder path.
      • Write your multi drone control software in here.
      • Examples of multi drone control software are given in other branches with the multiDroneControl prefix, followed by how its controlled.

    Installation Bug Fixes:

    1. Pillow Build Error 8
    2. GStreamer Error 9
    3. Gazebo/Rendering Error 13
    4. Symforce Error (Look above, under Install PX4 Related Dependencies for fix.)

    Commands

    Setup World, MAVROS nodes, and four drones

    roslaunch drone_control fourDronesNodes.launch

    Running drone# node(single drone control)

    rosrun drone_control single_control

    Running multi_control node(multi drone control)

    rosrun drone_control multi_control

    Running Google Tests(Optional)

    rosrun drone_control test_drone_control


    Technical Breakdown

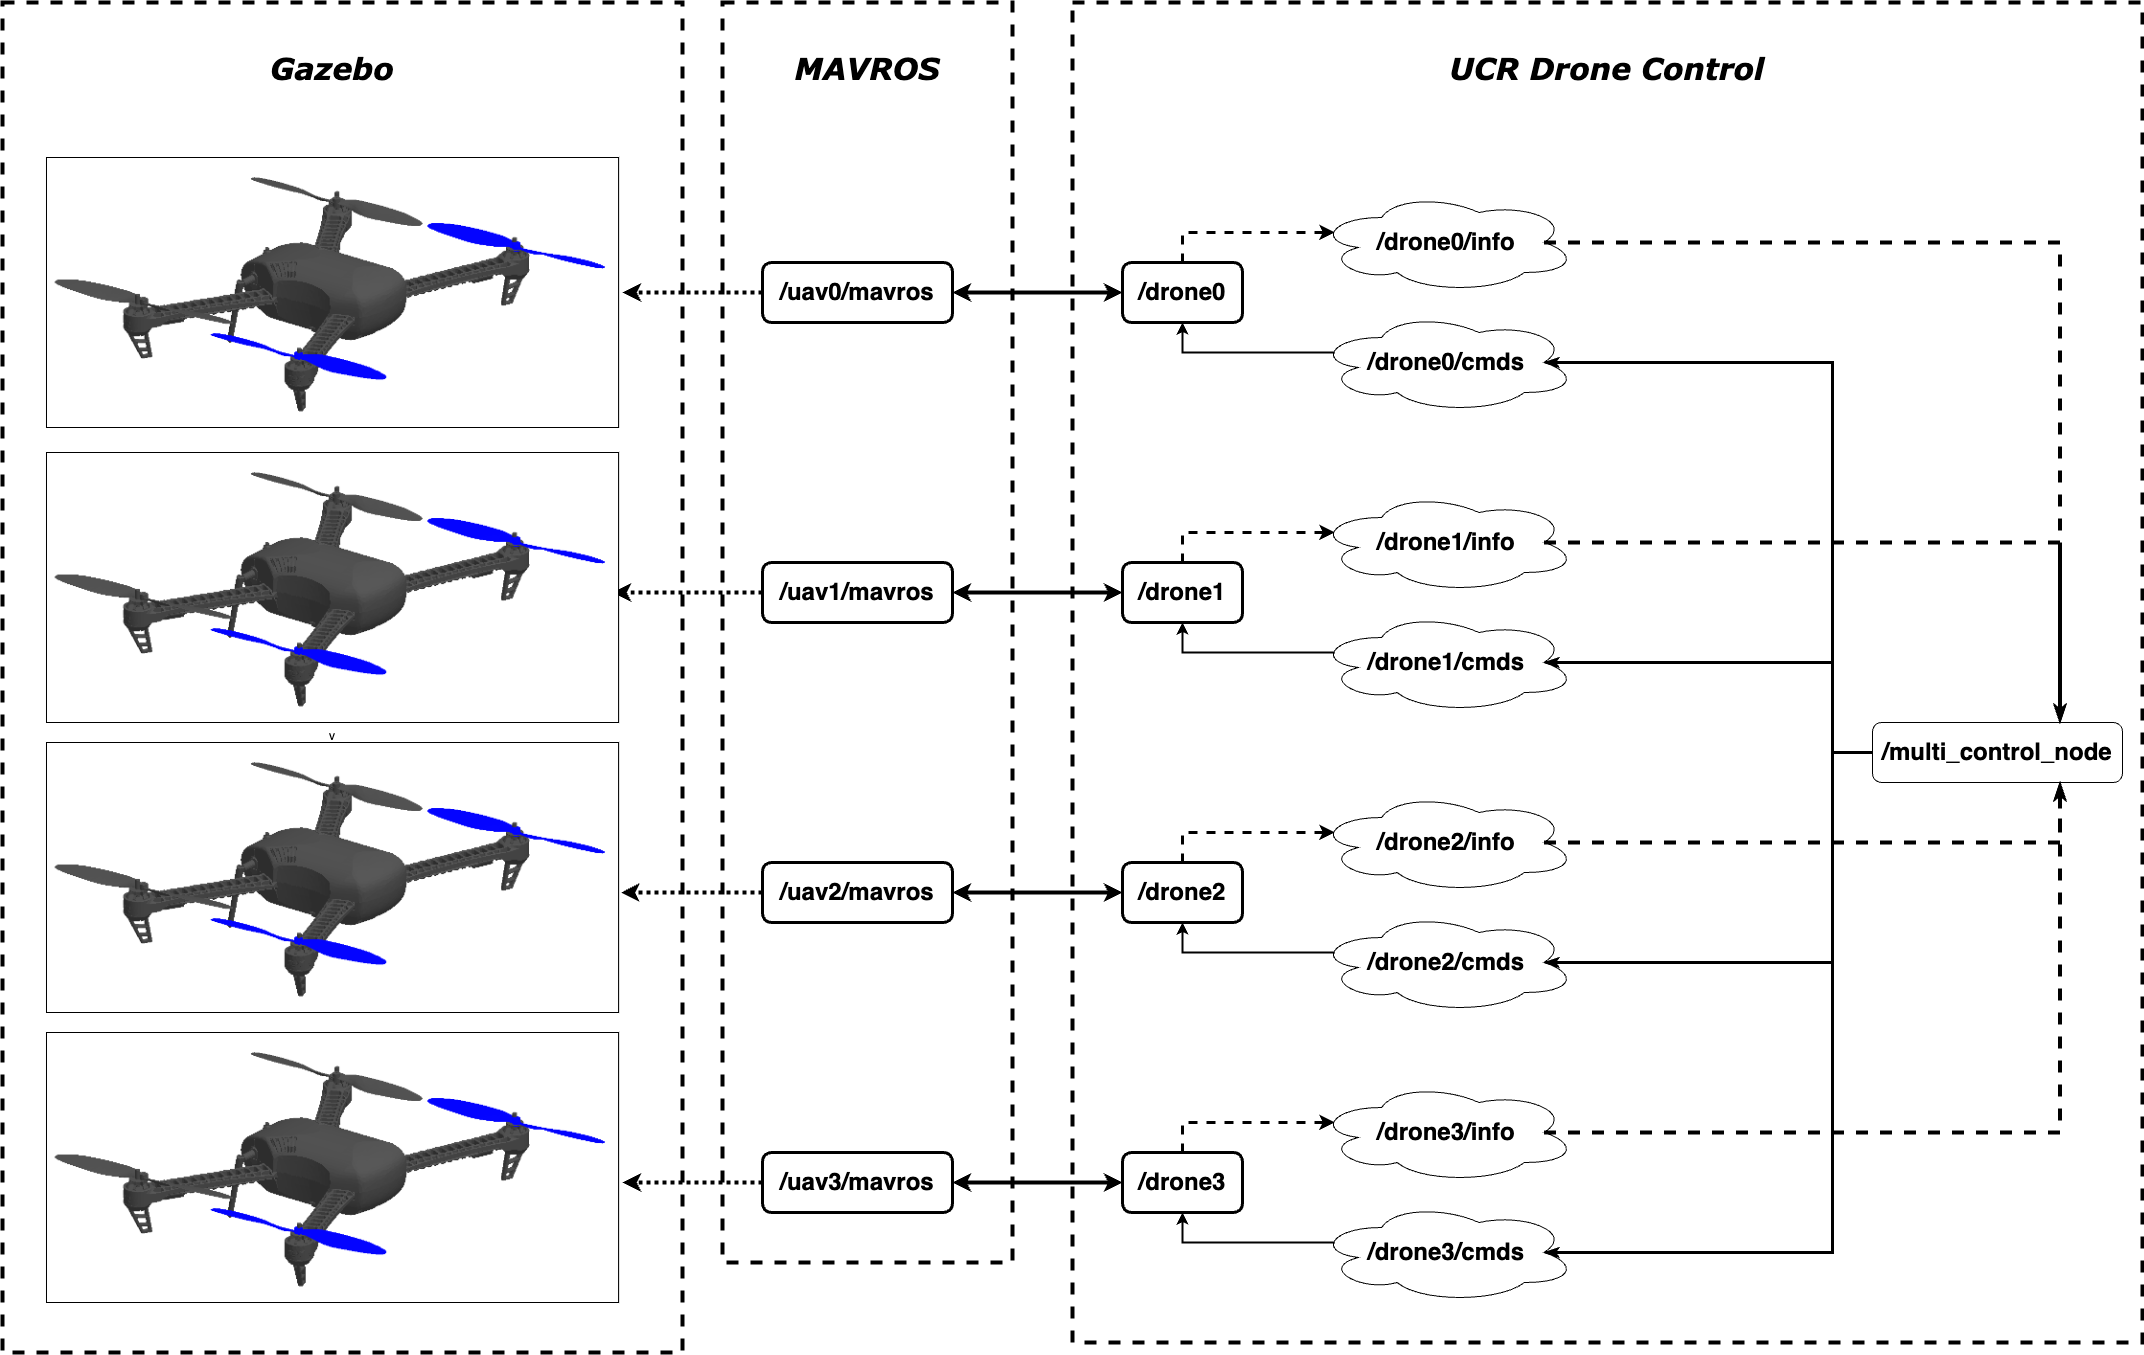
    This breakdown will help explain essential information needed to interface, commands and response, with the single drone control node. Below is a overview of the software structure(The connection between Gazebo and MAVROS is abstracted). newpic drawio

    Multi Drone Control Structure

    The multiDrone.cpp file stores the code for the ROS node that controls all of the single drone control nodes. In the current file, there are no examples.

    Single Drone Control Structure

    The singleDrone.cpp file stores the code for the ROS node that controls a single drone. Multiple instances of this node allow for the independent control of multiple drones, with the aid of the multi-drone control node. Below is a visaulization of the multi_control_node and single_drone_control(drone0) node interactions through certain topics.

    image

    The single drone control node is centered around a state-based control approach. For the state-based control, it must be known that a variable inside the /drone# node stores the state the drone is in. Below shows the different states the drone can be in, and depending which one the drone is in determines the drone’s behavior. For example, if the node has the drone in the HOVERING state, then the drone would simply stay at, or very close, to a single point in the 3D space. The GROUND_IDLE state is the state the drone is first initialized to on the ground. All other states should be self-explanatory.

    image

    As for transitioning the drone through the possible states, a command needs to be sent to the node using the dcontrol.msg format, which will then be interpreted by the interpretCommand function. A command, string, is inputted into the “command” section, and a point, three floats, into the target section. Not all commands need a target point inputted, such as LIFT and STOP. Below is a table of all of the possible commands that could be sent and whether they need a point to be sent alongside it. A list of commands can also be found in the msg file.

    Commands

    Command Target
    SHUTOFF N/A
    STOP N/A
    LIFT Optional
    LAND N/A
    TRANSIT_ADD Required
    TRANSIT_NEW Required
    Explanation
    • SHUTOFF command immediately disables the drone. Useful for emergency shutoffs. Note that drones can be shut off high in the sky, causing them to fall quite a bit.
    • STOP command stops a drone dead in its track by deleting all of its trajectories and putting it in the HOVERING state. Useful for stopping a drone, but not disabling it.
    • LIFT command lifts a drone off the ground into the air. If a point is given with a z > 0, then it will take off to that location. If no point is given it will take off 2m above its current position. A point is not needed to liftoff properly.
    • LAND command gently lands a drone onto the ground. Used generally at the end of a flight or when a drone needs to be taken out of the sky safely.
    • TRANSIT_ADD command will generate a trajectory for the drone to follow, to a given target. A point is needed. If the drone is HOVERING and this command is called, it will calculate an optimal path from its current location to the target location using the MAV Trajectory Generation library. If the drone is currently in a trajectory, it will save that trajectory and go there once it is done with the current trajectory. Multiple trajectories can be added during or after a trajectory is complete.
    • TRANSIT_NEW command is the same as the TRANSIT_ADD command, but with one difference. If it is called while a drone is following a trajectory, it will immediately stop following that trajectory, stabilize by hovering in place, delete all stored trajectories, and go to the new indented location. A point is needed. This is useful for following a new set of trajectories or moving toward a newly planned course.

    Command Behaviors

    Although the commands have certain outcomes, as explained above, they only work in certain situations. For example, a TRANSIT_NEW or TRANSIT_ADD command will not execute if the drone has not lifted off. For each command, there are prerequisite states that the drone must be in. Below are commands with the states that will work. Note the SHUTTING_DOWN state is not listed since the drone will turn off once in that state.

    Commands and Prerequisite States
    • SHUTOFF: GROUND_IDLE, LIFTING_OFF, HOVERING, IN_TRANSIT, LANDING
    • STOP: LIFTING_OFF, HOVERING, IN_TRANSIT, LANDING
    • LIFT: GROUND_IDLE
    • LAND: LIFTING_OFF, HOVERING, IN_TRANSIT
    • TRANSIT_ADD: HOVERING, IN_TRANSIT
    • TRANSIT_NEW: HOVERING, IN_TRANSIT

    Automatic State Transitions

    Some states can automatically transition to another state. Such as, if the drone is in the LIFTING_OFF state and it has reached its intended point of takeoff, it will automatically go to the HOVERING state. Below are the automatic state transitions that happen once a drone is put into a state in the From column.

    From To
    LIFTING_OFF HOVERING
    IN_TRANSIT* HOVERING
    LANDING SHUTTING_DOWN

    *The IN_TRANSIT state will only go into the HOVERING state if there are no trajectories planned/stored after the current one. If there is multiple trajectories planned, it will stay in the IN_TRANSIT state to all planned trajectories.

    Responses

    Responses are a way to send information from a single drone control node to the multi drone control node. Responses communicate the drone’s state, position, and target. This may be useful for verifying if a message was received, a command was executed, or a position was reached. Below is the format of such messages.

    Format (Data Type & Name)

    uint16 droneid
    uint8 state
    geometry_msgs/Pose pose
    geometry_msgs/Pose target

    • droneid corresponds to the drone number the drone# node are using to identify the drone.
    • state corresponds to the state the drone is in, see image above to see which number corresponds to which state.
    • pose is the current position(x,y,z) of the drone, relative to its origin.
    • target is the position the drone is trying to go to, usually the end of the current trajectory.

    Package Structure

    The drone_control package is structured into five main folders: helper, launch, msg, src and test folder. Below are quick summaries of each folder’s purpose.

    src

    The src folder stores all the control code. Currently, the file singleDrone.cpp contains the ROS node code for each drone. It optimizes a path to a desired point, controls the state of the drone, and recieves/interprets control signals to the drone. The multiDrone.cpp file is used to control numerous drones by sending commands to each drone, and recieve any information from each drone.

    helper

    The helper folder stores any mathematical computations or data conversions needed. This allows for testing and easy extensibility for future computations/conversions. Some of the functions written are the isStationary(…), isFlat(…), reachedLocation(…), and segmentToPoint(…).

    test

    The test folder contains tests for the helper functions in the helper folder. Some of the functions tested are mathematical computations, such as isStationary(…), while others are data conversions like in the segmentToPoint(…) function. GoogleTest is the test framework used.

    launch

    The launch folder contains the setup of the Gazebo simulation and MAVROS nodes. The fourDronesNodes.launch are example launch files used for testing the single/multi control structure.

    msg

    The msg folder contains the custom messages that are communicated between the individual drone nodes and the multi control node.


    Tools

    • C++
    • Catkin(Modified CMake)
    • Gazebo
    • Google Test
    • Git
    • Github
    • Linux
    • rqt(Debugging)
    • VSCode
    • VMWare

    Libraries/References


    Footnotes

    1. https://customerconnect.vmware.com/en/downloads/info/slug/desktop_end_user_computing/vmware_workstation_pro/16_0 (VMWare)

    2. https://releases.ubuntu.com/18.04/ (Ubuntu)

    3. https://www.digitalocean.com/community/tutorials/how-to-configure-ssh-key-based-authentication-on-a-linux-server (SSH Keys)

    4. https://dev.px4.io/v1.11_noredirect/en/setup/dev_env_linux_ubuntu.html (PX4 Install in Root)

    5. http://wiki.ros.org/melodic/Installation/Ubuntu (ROS – Desktop Full Installation)

    6. https://github.com/PX4/PX4-Devguide/blob/master/build_scripts/ubuntu_sim_common_deps.sh (Simulation – Run code after line 12 in terminal)

    7. https://wiki.hanzheteng.com/quadrotor/px4#gazebo-sitl-simulation (Gazebo)

    8. https://pillow.readthedocs.io/en/stable/installation.html (Pillow) 2

    9. https://gstreamer.freedesktop.org/documentation/installing/on-linux.html?gi-language=c (GStreamer) 2

    10. https://docs.px4.io/v1.12/en/ros/mavros_installation.html (MAVROS – Source Installation, Install Released/Stable MAVROS, use sudo when installing GeographicLib)

    11. https://github.com/ethz-asl/mav_trajectory_generation#installation-instructions-ubuntu (MAV Trajcetory Generation)

    12. https://docs.qgroundcontrol.com/master/en/getting_started/download_and_install.html (QGroundControl)

    13. https://answers.gazebosim.org//question/13214/virtual-machine-not-launching-gazebo/ (Gazebo)

    Visit original content creator repository https://github.com/IseanB/UCR-Drone-Control
  • over-api

    API – OVER 💖

    Bienvenido al API de la app OVER

    Un API de ingreso de tareas y control de ingresos de usuarios.

    OBJETIVO 🎯

    Esta aplicacion tiene como objetivo ser soporte y ayuda en mi experiencia como desarrollador, dando a conocer un poco de mi flujo de trabajo y el como me desenvuelvo al momento de desarrollar una aplicacion y demostrar mi conocimientos en arquitectura de software y patrones de diseño guiandome en conceptos de codigo limpio.

    EN EL DESARROLLO SE HA UTILIZADO 🔈

    • PHP V 8.1.9
    • Laravel V 9.24.0
    • MySQL
    • Composer V 2.0.12

    ARQUITECTURA & CLEAN CODE 💡

    • ARQUITECTURA HEXAGONAL Y DDD (Domain driven design)
    • TDD (Test driven development)
    • Conceptos sobre S.O.L.I.D
    • Single responsibility principle
    • Liskov substitution principle
    • Interface segregation principle
    • Dependency inversion principle
    • API
    • REST
    • HATEOAS
    • POO

    HERRAMIENTAS UTILIZADAS PARA EL DESARROLLO 🔧

    • PHP Storm
    • Laragon
    • Git
    • GitHub
    • Postman
    • MySQL
    • DataGrip
    • Heroku
    • Star UML

    ARBOL DE DIRECTORIOS 🌳

    src.

    ¿DESEAS PROBAR LA API EN POSTMAN?

    DERECHOS – Cristian Camilo Vasquez – 2022 😄

    Visit original content creator repository https://github.com/cristianV0117/over-api
  • aqi-notify

    aqi-notify

    This is a simple program to fetch the current air quality index (AQI) from
    airnow.gov, based on zip code, and send the AQI and time to an email address
    (which may or may not forward to SMS).

    Requirements:

    • SMTP server to send mail from (a gmail account will work)
    • A server to run this program on (e.g. a Raspberry Pi or hosted VM)
      • with Node.js v12 or newer installed
    • (If you want SMS) your cell carrier’s email-to-sms address

    Usage:

    1. Clone this repository
    2. Install dependencies: cd aqi-notify && yarn
    3. Create and configure a .env file in the root of the project.
      See below for an example file.
    4. Create a cron job to run the program every hour. For example:
      30 * * * * export $(grep -v '^#' /path/to/aqi-notify/.env | xargs) && /path/to/aqi-notify/index.js >/dev/null 2>&1
      

      This will load the environment variables from the .env file and run index.js every hour at 30 past.

    Example .env file

    # Send notification only if the hour of reported data is within these times
    # Hours are 00-23, both settings are inclusive
    MIN_HOUR=6
    MAX_HOUR=20
    
    # Send notification only if AQI is greater than or equal to this threshold
    # and hour of reported data is between MIN_HOUR and MAX_HOUR
    AQI_THRESHOLD=50
    
    # Send notification if AQI is greater than or equal to this threshold, regardless of *_HOUR settings
    # Should be greater than AQI_THRESHOLD, or -1 to disable
    AQI_OVERRIDE_THRESHOLD=100
    
    # Location to check
    ZIP_CODE=12345
    
    # Comma-delimited list of addresses to send notification to
    SEND_LIST=5551234567@text.some-carrier.com,5557654321@another-carrier.com
    
    # SMTP credentials & configuration
    SMTP_USER=username
    SMTP_PASS=password
    SMTP_HOST=smtp.gmail.com
    SMTP_PORT=465
    SMTP_SECURE=true
    
    # API Key
    AIR_NOW_API_KEY=uuid
    
    # Log level, one of: debug, info, error
    LOG_LEVEL=info

    Visit original content creator repository
    https://github.com/KorySchneider/aqi-notify

  • Mask_RCNN

    Mask R-CNN for Object Detection and Segmentation

    This is an implementation of Mask R-CNN on Python 3, Keras, and TensorFlow. The model generates bounding boxes and segmentation masks for each instance of an object in the image. It’s based on Feature Pyramid Network (FPN) and a ResNet101 backbone. (Modified from the actual implementation https://github.com/matterport/Mask_RCNN)

    The repository includes:

    • Source code of Mask R-CNN built on FPN and ResNet101.
    • Training code for MS COCO
    • Jupyter notebooks to visualize the detection pipeline at every step
    • ParallelModel class for multi-GPU training
    • Evaluation on MS COCO metrics (AP)
    • Example of training on your own dataset

    Getting Started

    • demo.ipynb Is the easiest way to start. It shows an example of using a model pre-trained on MS COCO to segment objects in your own images. It includes code to run object detection and instance segmentation on arbitrary images.

    • train_shapes.ipynb shows how to train Mask R-CNN on your own dataset. This notebook introduces a toy dataset (Shapes) to demonstrate training on a new dataset.

    • (model.py, utils.py, config.py): These files contain the main Mask RCNN implementation.

    • inspect_data.ipynb. This notebook visualizes the different pre-processing steps to prepare the training data.

    • inspect_model.ipynb This notebook goes in depth into the steps performed to detect and segment objects. It provides visualizations of every step of the pipeline.

    • inspect_weights.ipynb This notebooks inspects the weights of a trained model and looks for anomalies and odd patterns.

    Step by Step Detection

    To help with debugging and understanding the model, there are 3 notebooks (inspect_data.ipynb, inspect_model.ipynb, inspect_weights.ipynb) that provide a lot of visualizations and allow running the model step by step to inspect the output at each point. Here are a few examples:

    1. Anchor sorting and filtering

    Visualizes every step of the first stage Region Proposal Network and displays positive and negative anchors along with anchor box refinement.

    2. Bounding Box Refinement

    This is an example of final detection boxes (dotted lines) and the refinement applied to them (solid lines) in the second stage.

    3. Mask Generation

    Examples of generated masks. These then get scaled and placed on the image in the right location.

    4.Layer activations

    Often it’s useful to inspect the activations at different layers to look for signs of trouble (all zeros or random noise).

    5. Weight Histograms

    Another useful debugging tool is to inspect the weight histograms. These are included in the inspect_weights.ipynb notebook.

    6. Logging to TensorBoard

    TensorBoard is another great debugging and visualization tool. The model is configured to log losses and save weights at the end of every epoch.

    6. Composing the different pieces into a final result

    Training on MS COCO

    We’re providing pre-trained weights for MS COCO to make it easier to start. You can use those weights as a starting point to train your own variation on the network. Training and evaluation code is in samples/coco/coco.py. You can import this module in Jupyter notebook (see the provided notebooks for examples) or you can run it directly from the command line as such:

    # Train a new model starting from pre-trained COCO weights
    python3 samples/coco/coco.py train --dataset=/path/to/coco/ --model=coco
    
    # Train a new model starting from ImageNet weights
    python3 samples/coco/coco.py train --dataset=/path/to/coco/ --model=imagenet
    
    # Continue training a model that you had trained earlier
    python3 samples/coco/coco.py train --dataset=/path/to/coco/ --model=/path/to/weights.h5
    
    # Continue training the last model you trained. This will find
    # the last trained weights in the model directory.
    python3 samples/coco/coco.py train --dataset=/path/to/coco/ --model=last
    

    You can also run the COCO evaluation code with:

    # Run COCO evaluation on the last trained model
    python3 samples/coco/coco.py evaluate --dataset=/path/to/coco/ --model=last
    

    The training schedule, learning rate, and other parameters should be set in samples/coco/coco.py.

    Training on Your Own Dataset

    Start by reading this blog post about the balloon color splash sample. It covers the process starting from annotating images to training to using the results in a sample application.

    In summary, to train the model on your own dataset you’ll need to extend two classes:

    Config This class contains the default configuration. Subclass it and modify the attributes you need to change.

    Dataset This class provides a consistent way to work with any dataset. It allows you to use new datasets for training without having to change the code of the model. It also supports loading multiple datasets at the same time, which is useful if the objects you want to detect are not all available in one dataset.

    See examples in samples/shapes/train_shapes.ipynb, samples/coco/coco.py, samples/balloon/balloon.py, and samples/nucleus/nucleus.py.

    Differences from the Official Paper

    This implementation follows the Mask RCNN paper for the most part, but there are a few cases where we deviated in favor of code simplicity and generalization. These are some of the differences we’re aware of. If you encounter other differences, please do let us know.

    • Image Resizing: To support training multiple images per batch we resize all images to the same size. For example, 1024x1024px on MS COCO. We preserve the aspect ratio, so if an image is not square we pad it with zeros. In the paper the resizing is done such that the smallest side is 800px and the largest is trimmed at 1000px.

    • Bounding Boxes: Some datasets provide bounding boxes and some provide masks only. To support training on multiple datasets we opted to ignore the bounding boxes that come with the dataset and generate them on the fly instead. We pick the smallest box that encapsulates all the pixels of the mask as the bounding box. This simplifies the implementation and also makes it easy to apply image augmentations that would otherwise be harder to apply to bounding boxes, such as image rotation.

      To validate this approach, we compared our computed bounding boxes to those provided by the COCO dataset. We found that ~2% of bounding boxes differed by 1px or more, ~0.05% differed by 5px or more, and only 0.01% differed by 10px or more.

    • Learning Rate: The paper uses a learning rate of 0.02, but we found that to be too high, and often causes the weights to explode, especially when using a small batch size. It might be related to differences between how Caffe and TensorFlow compute gradients (sum vs mean across batches and GPUs). Or, maybe the official model uses gradient clipping to avoid this issue. We do use gradient clipping, but don’t set it too aggressively. We found that smaller learning rates converge faster anyway so we go with that.

    Requirements

    Python 3.4, TensorFlow 1.3, Keras 2.0.8 and other common packages listed in requirements.txt.

    MS COCO Requirements:

    To train or test on MS COCO, you’ll also need:

    If you use Docker, the code has been verified to work on this Docker container.

    Installation

    1. Clone this repository

    2. Install dependencies

      pip3 install -r requirements.txt
    3. Run setup from the repository root directory

      python3 setup.py install
    4. Download pre-trained COCO weights (mask_rcnn_coco.h5) from the releases page.

    5. (Optional) To train or test on MS COCO install pycocotools from one of these repos. They are forks of the original pycocotools with fixes for Python3 and Windows (the official repo doesn’t seem to be active anymore).

    Visit original content creator repository https://github.com/minar09/Mask_RCNN
  • vue-previewable-image


    vue-previewable-image

    A previewable image Vue component based on viewerjs.

    ⚠️ TIPS: Current vue-previewable-image needs Vue verison to 3.2.0+. For vue2, please use 1.x.

    Features

    • ✔️ Support preview image via viewerjs.
    • ✔️ Support image lazy load.
    • ✔️ Support using image viewer as a component via ImageViewer.

    Package

    Version Support Vue version Docs
    ^1.7.0+ ^2.7.14 See v1
    ^2.1.2+ ^3.2.0 and above See v2

    Installation

    # pnpm
    $ pnpm add vue-previewable-image
    
    # yarn
    $ yarn add vue-previewable-image
    
    # npm
    $ npm i vue-previewable-image

    Usage

    Do not forgot to import the style vue-previewable-image/dist/style.css

    <template>
      <main>
        <PreviewableImage
          v-model:current-preview-index="currentIndex"
          :src="src"
          :preview-src-list="srcList"
          :viewer-title="viewerTitle"
          width="100px"
          @switch="handleSwitch"
        />
      </main>
    </template>
    
    <script setup lang="ts">
    import { ref } from 'vue'
    import { PreviewableImage } from 'vue-previewable-image'
    import type { CustomViewerTitle, ViewerSwitchEvent } from 'vue-previewable-image'
    
    const src =
      'https://fuss10.elemecdn.com/e/5d/4a731a90594a4af544c0c25941171jpeg.jpeg'
    
    const srcList = [
      'https://fuss10.elemecdn.com/8/27/f01c15bb73e1ef3793e64e6b7bbccjpeg.jpeg',
      'https://fuss10.elemecdn.com/1/8e/aeffeb4de74e2fde4bd74fc7b4486jpeg.jpeg',
    ]
    
    const viewerTitle: CustomViewerTitle = (img, { index, total }) => {
      console.log('img:', img)
      return `${img.alt} (${index + 1}/${total})`
    }
    
    const handleSwitch: ViewerSwitchEvent = (index, viewer) => {
      console.log('on switch:', index, viewer)
    }
    
    const currentIndex = ref(0)
    </script>
    

    You also can use viewerjs from this package, This is equal to import Viewer from 'viewerjs'.

    import { Viewer } from 'vue-previewable-image'

    Or, you can using image viewer as a component, See ImageViewer.

    Using via Vue plugin

    // main.ts
    
    import { createApp } from 'vue'
    import App from './App.vue'
    import PreviewableImage from 'vue-previewable-image'
    import type { PreviewableImageOptions } from 'vue-previewable-image'
    
    const app = createApp(App)
    
    app.use(PreviewableImage, {
      // set global component name
      componentName: 'PreviewableImage',
    
      // set Viewer default options
      defaultViewerOptions: {
        // ...
      }
    
    } as PreviewableImageOptions).mount('#app')

    Attributes

    Prop name Description Type Available value Default value
    width The img container width string undefined
    height The img container height string undefined
    src The src of img string undefined
    alt The alt of img string undefined
    referrerPolicy The referrerPolicy of img string undefined
    lazy Whether to enable image lazy load boolean true
    zIndex Define the CSS z-index value of the viewer in modal mode number or string 2015
    fit The object-fit of img string fill / contain / cover / none / scale-down fill
    previewSrcList Define your previewable image list string[] or { src: string; alt: string}[] []
    currentPreviewIndex Current preview image shown index, support v-model number 0
    viewerOptions Define viewerjs Options {}
    viewerTitle Define viewer title. First argument is HTMLImageElement which is generated by previewSrcList, second argument is a object { index: number; total: number } which record current viewer index and previewable image count Function undefined

    Events

    Event name Description Callback arguments
    switch Emit when preview image switch. (index: number, viewer: Viewer) => void
    load Emit when image load success. (e: Event) => void
    error Emit when image load error. (e: Event) => void

    Slots

    Name Description
    placeholder Define the placeholder content to display when image is not loaded
    error Define the content to display when image load error
    Visit original content creator repository https://github.com/yisibell/vue-previewable-image
  • ethereum-kit-ios

    EthereumKit-iOS

    EthereumKit-iOS is a native(Swift), secure, reactive and extensible Ethereum client toolkit for iOS platform. It can be used by ETH/Erc20 wallet or by dapp client for any kind of interactions with Ethereum blockchain.

    Features

    • Ethereum wallet support, including internal Ether transfer transactions
    • Support for ERC20 token standard
    • Uniswap DEX support
    • Reactive-functional API
    • Implementation of Ethereum’s JSON-RPC client API over HTTP or WebSocket
    • Support for Infura
    • Support for Etherscan

    EthereumKit.swift

    • Sync account state/balance
    • Sync/Send/Receive Ethereum transactions
    • Internal transactions retrieved from Etherscan
    • Reactive API for Smart Contracts (Erc20Kit.swift and UniswapKit.swift use EthereumKit.swift for interactions with the blockchain)
    • Reactive API for wallet
    • Restore with mnemonic phrase

    Erc20Kit.swift

    • Sync balance
    • Sync/Send/Receive Erc20 token transactions
    • Allowance management
    • Incoming Erc20 token transactions retrieved from Etherscan
    • Reactive API for wallet

    UniswapKit.swift

    Supports following settings:

    • Price Impact
    • Deadline
    • Recipient
    • Fee on Transfer

    Usage

    Initialization

    First you need to initialize an EthereumKit.Kit instance

    import EthereumKit
    
    let ethereumKit = try! Kit.instance(
            words: ["word1", ... , "word12"],
            syncMode: .api,
            networkType: .ropsten,
            rpcApi: .infuraWebSocket(id: "", secret: ""),
            etherscanApiKey: "",
            walletId: "walletId",
            minLogLevel: .error
    )
    syncMode parameter

    • .api: Uses RPC
    • .spv: Ethereum light client. Not supported currently
    • .geth: Geth client. Not supported currently
    networkfkType parameter

    • .mainNet
    • .ropsten
    • .kovan
    rpcApi parameter

    • .infuraWebSocket(id: "", secret: ""): RPC over HTTP
    • .infura(id: "", secret: """): RPC over WebSocket
    Additional parameters:

    • minLogLevel: Can be configured for debug purposes if required.

    Starting and Stopping

    EthereumKit.Kit instance requires to be started with start command

    ethereumKit.start()
    ethereumKit.stop()

    Getting wallet data

    You can get account state, lastBlockHeight, syncState, transactionsSyncState and some others synchronously

    guard let state = ethereumKit.accountState else {
        return
    }
    
    state.balance    // 2937096768
    state.nonce      // 10
    
    ethereumKit.lastBlockHeight  // 10000000

    You also can subscribe to Rx observables of those and some others

    ethereumKit.accountStateObservable.subscribe(onNext: { state in print("balance: \(state.balance); nonce: \(state.nonce)") })
    ethereumKit.lastBlockHeightObservable.subscribe(onNext: { height in print(height) })
    ethereumKit.syncStateObservable.subscribe(onNext: { state in print(state) })
    ethereumKit.transactionsSyncStateObservable.subscribe(onNext: { state in print(state) })
    
    // Subscribe to all Ethereum transactions synced by the kit
    ethereumKit.allTransactionsObservable.subscribe(onNext: { transactions in print(transactions.count) })
    
    // Subscribe to Ether transactions
    ethereumKit.etherTransactionsObservable.subscribe(onNext: { transactions in print(transactions.count) })

    Send Transaction

    let decimalAmount: Decimal = 0.1
    let amount = BigUInt(decimalAmount.roundedString(decimal: decimal))!
    let address = Address(hex: "0x73eb56f175916bd17b97379c1fdb5af1b6a82c84")!
    
    ethereumKit
            .sendSingle(address: address, value: amount, gasPrice: 50_000_000_000, gasLimit: 1_000_000_000_000)
            .subscribe(onSuccess: { transaction in 
                print(transaction.transaction.hash.hex)  // sendSingle returns FullTransaction object which contains transaction, receiptWithLogs and internalTransactions
            })

    Estimate Gas Limit

    let decimalAmount: Decimal = 0.1
    let amount = BigUInt(decimalAmount.roundedString(decimal: decimal))!
    let address = Address(hex: "0x73eb56f175916bd17b97379c1fdb5af1b6a82c84")!
    
    ethereumKit
            .estimateGas(to: address, amount: amount, gasPrice: 50_000_000_000)
            .subscribe(onSuccess: { gasLimit in 
                print(gasLimit)
            })

    Send Erc20 Transaction

    import EthereumKit
    import Erc20Kit
    
    let decimalAmount: Decimal = 0.1
    let amount = BigUInt(decimalAmount.roundedString(decimal: decimal))!
    let address = Address(hex: "0x73eb56f175916bd17b97379c1fdb5af1b6a82c84")!
    
    let erc20Kit = Erc20Kit.Kit.instance(ethereumKit: ethereumKit, contractAddress: "contract address of token")
    let transactionData = erc20Kit.transferTransactionData(to: address, value: amount)
    
    ethereumKit
            .sendSingle(transactionData: transactionData, gasPrice: 50_000_000_000, gasLimit: 1_000_000_000_000)
            .subscribe(onSuccess: { [weak self] _ in})

    Send Uniswap swap transaction

    import EthereumKit
    import UniswapKit
    import Erc20Kit
    
    let uniswapKit = UniswapKit.Kit.instance(ethereumKit: ethereumKit)
    
    let tokenIn = uniswapKit.etherToken
    let tokenOut = uniswapKit.token(try! Address(hex: "0xad6d458402f60fd3bd25163575031acdce07538d"), decimal: 18)
    let amount: Decimal = 0.1
    
    uniswapKit
            .swapDataSingle(tokenIn: tokenIn, tokenOut: tokenOut)
            .flatMap { swapData in
                let tradeData = try! uniswapKit.bestTradeExactIn(swapData: swapData, amountIn: amount)
                let transactionData = try! uniswapKit.transactionData(tradeData: tradeData)
                
                return ethereumKit.sendSingle(transactionData: transactionData, gasPrice: 50_000_000_000, gasLimit: 1_000_000_000_000)
            }
            .subscribe(onSuccess: { [weak self] _ in})

    Extending

    Add transaction syncer

    Some smart contracts store some information concerning your address, which you can’t retrieve in a standard way over RPC. If you have an external API to get them from, you can create a custom syncer and add it to EthereumKit. It will sync all the transactions your syncer gives.

    Erc20TransactionSyncer is a good example of this. It gets token transfer transactions from Etherscan and feeds EthereumKit syncer with them. It is added to EthereumKit as following:

    let transactionSyncer = Erc20TransactionSyncer(...)
    ethereumKit.add(syncer: transactionSyncer)

    Smart contract call

    In order to make a call to any smart contract, you can use ethereumKit.sendSingle(transactionData:,gasPrice:,gasLimit:) method. You need to create an instance of TransactionData object. Currently, we don’t have an ABI or source code parser. Please, look in Erc20Kit.swift and UniswapKit.swift to see how TransactionData object is formed.

    Prerequisites

    • Xcode 10.0+
    • Swift 5+
    • iOS 11+

    Installation

    CocoaPods

    CocoaPods is a dependency manager for Cocoa projects. You can install it with the following command:

    $ gem install cocoapods

    CocoaPods 1.5.0+ is required to build EthereumKit.

    To integrate EthereumKit into your Xcode project using CocoaPods, specify it in your Podfile:

    source 'https://github.com/CocoaPods/Specs.git'
    platform :ios, '10.0'
    use_frameworks!
    
    target '<Your Target Name>' do
      pod 'EthereumKit.swift'
      pod 'Erc20.swift'
      pod 'UniswapKit.swift'
    end

    Then, run the following command:

    $ pod install

    Example Project

    All features of the library are used in example project. It can be referred as a starting point for usage of the library.

    Dependencies

    • HSHDWalletKit – HD Wallet related features, mnemonic phrase generation.
    • OpenSslKit.swift – Crypto functions required for working with blockchain.
    • Secp256k1Kit.swift – Crypto functions required for working with blockchain.
    • HsToolKit.swift – Helpers library from HorizontalSystems
    • RxSwift
    • BigInt
    • GRDB.swift
    • Starscream

    License

    The EthereumKit-iOS toolkit is open source and available under the terms of the MIT License.

    Visit original content creator repository
    https://github.com/horizontalsystems/ethereum-kit-ios