Category: Blog

  • MiniMax-Gomoku

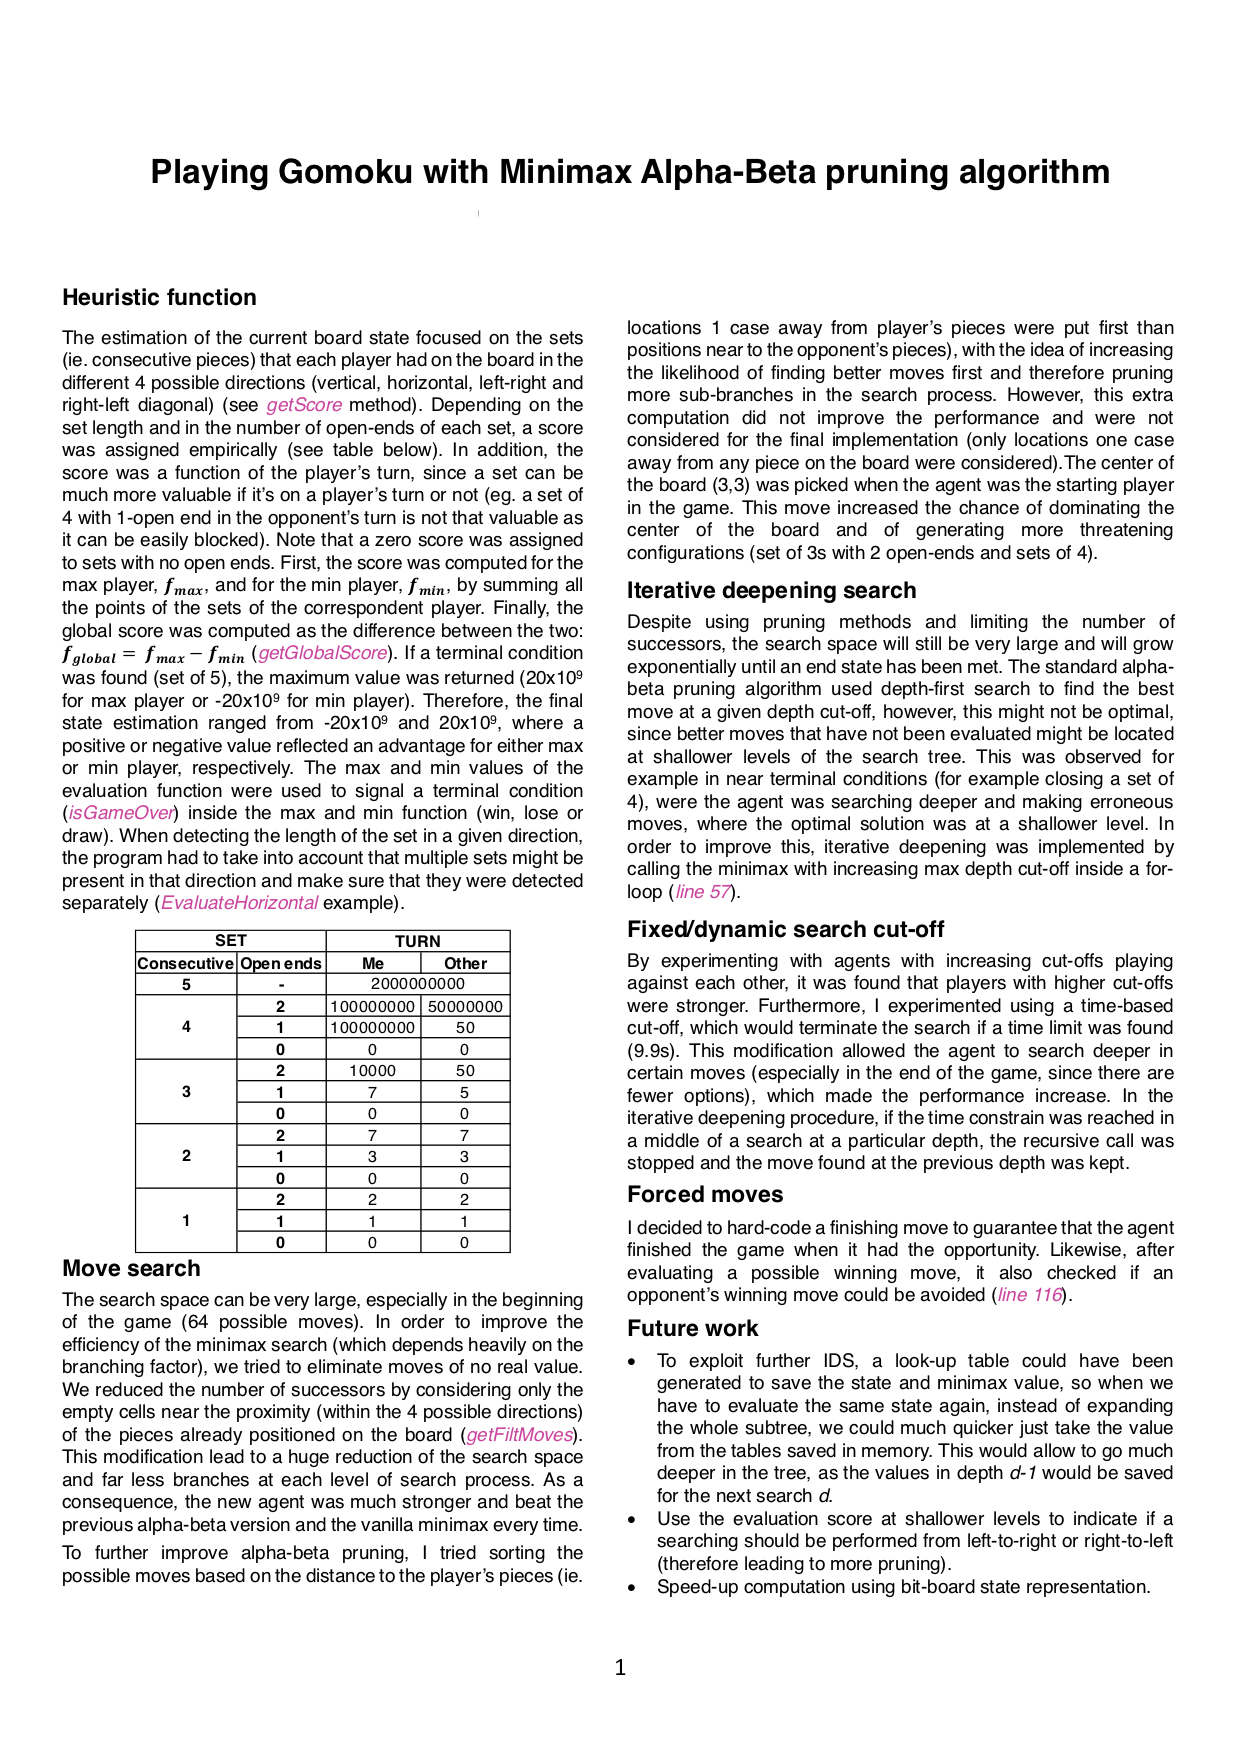
    Playing Gomoku with minimax alpha-beta pruning algorithm

    • Program developed in Java as part of the AI module at Queen Mary University of London.
    • Solution built reached 4th place in the class competition of 100+ students.
    • GUI for the game was already provided.
    • To play against it run java GomokuReferee and select Player.

    Instructions:

    Two players (white and black) take turns at placing a stone of his/her colour on an unoccupied square on the board (white moves first). The first player to complete a continuous horizontal, vertical or diagonal line of 5 or more stones of his/her colour is the winner (scoring 2 points). The loser scores 0. If all squares are occupied and neither player has won, then each player gets 1 point.

    Restrictions:

    • Time limit of 10 seconds per move. Any program which exceeds this limit will immediately forfeit the game to its opponent.
    • Similarly any program which raises an exception or makes an illegal move (out of range or already occupied) will lose immediately. There are no other restrictions on moves (gomoku experts may be aware that some tournaments have further restrictions).

    Solution:

    Visit original content creator repository https://github.com/goncinious/MiniMax-Gomoku
  • CoreVPN

    CoreVPN

    Example

    See Example to get started quickly.
    To run the example project, clone the repo, and run pod install.
    Then add next capability`s to your app target:
    – Personal VPN
    – Network Extensions (Packet Tunnel, App Proxy)

    import CoreVPN
    
    class ViewController: UIViewController {
       var corevpn: CoreVPN!
        
        override func viewDidLoad() {
            super.viewDidLoad()
            self.corevpn = CoreVPN(serviceName: "Name_of_your_vpn (you will see that name in settings)", servers: corevpnServers, delegate: self)
        }
        
        @IBAction func connect(_ sender: UIButton) {
            corevpn.connect()
        }
        
        @IBAction func disconnect(_ sender: UIButton) {
            corevpn.disconnect()
        }
        
        @IBAction func chooseOptimalLocation(_ sender: UIButton) {
            corevpn.getOptimalServer { server in
                // select best server based on ping
                self.corevpn.selectServer(server: server)
            }
        }
        
        @IBAction func chooseRandomLocation(_ sender: UIButton) {
            if let server = corevpnServers.randomElement() {
                // select server you need
                corevpn.selectServer(server: server)
            }
        }
    }
    

    And Delegate methods

    extension ViewController: CoreVPNDelegate {
        func serverChanged(server: CoreVPNServerModel) {
            // update view or make smth you need
        }
        
        func connenctionTimeChanged(time: String) {
            // update view or make smth you need
        }
        
        func connectionStateChanged(state: CoreVPNConnectionState) {
            // update view or make smth you need
        }
    }
    

    Requirements

    iOS >= 9.0

    Installation

    CoreVPN is available through CocoaPods. To install
    it, simply add the following line to your Podfile:

    pod 'CoreVPN'

    Author

    Alexey Trushkovsky, trushkovskya@gmail.com

    License

    CoreVPN is available under the MIT license. See the LICENSE file for more info.

    Visit original content creator repository
    https://github.com/AlexTrushkovsky/CoreVPN

  • yaasl

    yaasl – yet another atomic store library

    license NPM Version NPM Downloads minzipped size

    This project is meant for personal use. I won’t stop you from using it, but I would rather recommend to use a similar and more mature solution like jotai.

    See the docs for detailed documentation.

    Motivation

    TL;DR – It’s fun and I dislike the jotai API.

    Note: Jotai is really cool, and I love the work of dai-shi generally.

    See this page for a full explanation.

    Installation

    You can install a yaasl package like you would do with any other:

    npm i @yaasl/<package>

    Available packages:

    Name Description
    @yaasl/core Core package for vanilla JS.
    @yaasl/devtools Adapter to use redux browser devtools
    @yaasl/react React bindings for yaasl.
    @yaasl/preact Preact bindings for yaasl.

    Quickstart

    1. Pick one of the main packages
    npm i @yaasl/core
    npm i @yaasl/react
    npm i @yaasl/preact
    1. Create an atom
    import { createAtom } from "@yaasl/core";
    
    const myAtom = createAtom({ defaultValue: 0 });
    1. Use the atom
    // Read
    const currentValue = myAtom.get(atom);
    // Write
    myAtom.set(nextValue);
    // Subscribe to changes
    myAtom.subscribe((value) => {
      console.log(value);
    });

    Usage examples

    Vanilla typescript

    import { createAtom, CONFIG, localStorage } from "@yaasl/core";
    
    // Provide an app name to yaasl
    CONFIG.name = "demo-vanilla";
    
    // Create a counter atom that is connected to the local storage
    const counter = createAtom({
      name: "counter", // local storage key will be "demo-vanilla/counter"
      defaultValue: 0,
      effects: [localStorage()],
    });
    
    const setupCounter = (element: HTMLButtonElement) => {
      const updateCounterText = (value: number) =>
        (element.innerHTML = `count is ${value}`);
    
      element.addEventListener("click", () => {
        // Set the value of the atom
        counter.set((previous) => previous + 1);
      });
    
      // Subscribe to value changes
      counter.subscribe((value) => updateCounterText(value));
    
      // Read the value of the atom in the store
      updateCounterText(counter.get());
    };
    
    const counter = document.getElementById("counter");
    setupCounter(counter);

    React (or Preact)

    import { createAtom, CONFIG, localStorage, useAtom } from "@yaasl/react"; // or "@yaasl/preact"
    
    // Provide an app name to yaasl
    CONFIG.name = "demo-react";
    
    // Create a counter atom that is connected to the local storage
    const counter = createAtom({
      name: "counter", // local storage key will be "demo-react/counter"
      defaultValue: 0,
      effects: [localStorage()],
    });
    
    export const Counter = () => {
      // Use the atom like you would use a state
      const [value, setValue] = useAtom(counter);
    
      const onClick = () => setValue((previous) => previous + 1);
    
      return <button onClick={onClick}>count is {value}</button>;
    };
    Visit original content creator repository https://github.com/PrettyCoffee/yaasl
  • nepali-apps

    Please feel free to contribute. Also, I will be building an API to serve the list in JSON.

    Apps can be mobile, web, or desktop apps. They must be active.

    Contents

    Calendar

    Stock Market and Money

    Accounting

    News

    Payment Processors

    E-commerce

    Map

    Driving License

    Audiobook

    Games

    Jobs and Internships

    Astrology and Horoscope

    Marriage and Dating

    Keyboard

    Government

    Telecom and ISP

    Nepali Learning

    School and College

    Travel and Delivery

    Contributing

    This repository is open for contributions. Add products you know of in the respective category. If you want to add a new category, do it.

    License

    Fuck License!! Do anything you like with this repository.

    Socials

    • Follow r/programmersNepal for useful blogs/readmes.
    • I will be creating more accounts in telegram, slack etc for Nepali programmers.

    Visit original content creator repository
    https://github.com/neymarsabin/nepali-apps

  • checkinpanel

    定时面板上的签到盒

    GitHub Repo stars GitHub forks GitHub issues Telegram GitHub code size in bytes Code style: black Scrutinizer code quality (GitHub/Bitbucket) GitHub last commit

    简介

    一个主要运行在 𝐞𝐥𝐞𝐜𝐕𝟐𝐏𝐪𝐢𝐧𝐠𝐥𝐨𝐧𝐠 等定时面板,同时支持系统运行环境的签到项目

    环境:𝑷𝒚𝒕𝒉𝒐𝒏 3.8+ / 𝑵𝒐𝒅𝒆.𝒋𝒔 10+ / 𝑩𝒂𝒔𝒉 4+ / 𝑶𝒑𝒆𝒏𝑱𝑫𝑲8 / 𝑷𝒆𝒓𝒍5

    注意

    不回答任何关于依赖安装失败的问题,包括且不限于 pip 无法找到 tomli 依赖等,请仔细阅读项目 README

    特别声明

    • 本仓库发布的脚本及其中涉及的任何解锁和解密分析脚本,仅用于测试和学习研究,禁止用于商业用途,不能保证其合法性、准确性、完整性和有效性,请根据情况自行判断。

    • 本项目内所有资源文件,禁止任何公众号、自媒体进行任何形式的转载、发布。

    • 本人对任何脚本问题概不负责,包括但不限于由任何脚本错误导致的任何损失或损害。

    • 间接使用脚本的任何用户,包括但不限于建立 VPS 或在某些行为违反国家/地区法律或相关法规的情况下进行传播,本人对于由此引起的任何隐私泄漏或其他后果概不负责。

    • 请勿将本仓库的任何内容用于商业或非法目的,否则后果自负。

    • 如果任何单位或个人认为该项目的脚本可能涉嫌侵犯其权利,则应及时通知并提供身份证明、所有权证明,我们将在收到认证文件后删除相关脚本。

    • 任何以任何方式查看此项目的人或直接或间接使用该项目的任何脚本的使用者都应仔细阅读此声明。本人保留随时更改或补充此免责声明的权利。一旦使用并复制了任何相关脚本或 checkinpanel 项目的规则,则视为您已接受此免责声明。

    您必须在下载后的 24 小时内从计算机或手机中完全删除以上内容

    您使用或者复制了本仓库且本人制作的任何脚本,则视为 已接受 此声明,请仔细阅读

    𝐞𝐥𝐞𝐜𝐕𝟐𝐏 使用方法

    1. 添加任务

    TASK -> 添加订阅任务 -> 修改名称、更新方式、任务 -> 获取内容 -> 全部添加

    名称:签到项目

    同名任务更新方式: 替换

    任务:

    https://raw.githubusercontent.com/OreosLab/checkinpanel/master/dailycheckin.json
    

    2. 抓包配置

    下载 check.sample.toml,根据注释说明进行抓包并配置

    3. 上传配置

    check.sample.toml 重命名为 check.toml 后放入 script/Lists 文件夹

    • OVERVIEW -> EFSS 文件管理界面 -> 是否开启 EFSS 功能:开启 -> 目录:./script/Lists -> 选择文件:check.toml -> 开始上传

    • elecV2P 3.4.6 已支持在线编辑,右键文件即可

    4. 配置通知

    4.1 JSMANAGE -> store/cookie 常量储存管理填写通知环境变量

    变量 / key 描述 支持语言 参考 / value
    HITOKOTO 一言 PY true 为开启,false 为关闭,默认关闭
    BARK_PUSH bark 设备码 JS PY BARK 推送使用,填写 URL 即可,例如: https://api.day.app/DxHcxxxxxRxxxxxxcm
    BARK_ARCHIVE * bark 存档 PY 是否存档
    BARK_GROUP * bark 消息分组 JS PY 消息分组
    BARK_SOUND * bark 声音 JS PY 例如: choo ,具体值 bark-推送铃声-查看所有铃声
    CONSOLE 控制台输出 PY true 为开启,false 为关闭,默认关闭
    DD_BOT_SECRET 钉钉机器人 JS PY SH 钉钉推送官方文档密钥,机器人安全设置页面,加签一栏下面显示的 SEC 开头的字符串,注:填写了 DD_BOT_TOKENDD_BOT_SECRET ,钉钉机器人安全设置只需勾选 加签 即可,其他选项不要勾选
    DD_BOT_TOKEN 钉钉机器人 JS PY SH 钉钉推送官方文档,只需 https://oapi.dingtalk.com/robot/send?access_token=XXX 等于符号后面的 XXX
    FSKEY 飞书 PY 飞书官方文档,只需 https://open.feishu.cn/open-apis/bot/v2/hook/xxxxxxxxxxxx 部分
    GOBOT_URL go-cqhttp JS PY 例如:推送到个人QQ: http://127.0.0.1/send_private_msg 群: http://127.0.0.1/send_group_msg
    GOBOT_QQ go-cqhttp 的推送群或者用户 JS PY GOBOT_URL 设置 /send_private_msg 时填入 user_id=个人QQ/send_group_msg 时填入 group_id=QQ群
    GOBOT_TOKEN * go-cqhttp 的 access_token JS PY go-cqhttp 文件设置的访问密钥
    IGOT_PUSH_TOKEN iGot 聚合推送 JS PY 参考文档,支持多方式推送
    PUSH_KEY server 酱 JS PY SH server 酱推送官方文档,JS 和 PY 推送兼容新旧版本
    PUSH_TURBO_KEY server 酱 Turbo 版 SH server 酱 TURBO 推送官方文档,仅支持 SH
    PUSH_PLUS_TOKEN pushplus 用户令牌 JS PY SH 可直接加到请求地址后,如: http://www.pushplus.plus/send/{token} 官方文档
    PUSH_PLUS_USER * pushplus 群组编码 JS PY 一对多推送下面 -> 您的群组(如无则新建) -> 群组编码 1. 需订阅者扫描二维码 2. 如果您是创建群组所属人,也需点击“查看二维码”扫描绑定,否则不能接受群组消息推送
    QMSG_KEY qmsg 酱 JS PY SH qmsg 酱推送官方文档,填写 KEY 代码即可
    QMSG_TYPE * qmsg 酱推送类型 JS PY qmsg 酱推送官方文档,如果需要推送到群填写 group ,其他的都推送到 QQ
    QYWX_AM 企业微信应用 JS PY 参考文档,依次填入 corpid, corpsecret, touser(注:多个成员ID使用 | 隔开), agentid, media_id(选填,不填默认文本消息类型)
    QYWX_KEY 企业微信机器人 JS PY 官方文档,只需 https://qyapi.weixin.qq.com/cgi-bin/webhook/send?key=693a91f6-7xxx-4bc4-97a0-0ec2sifa5aaa key= 后面部分
    SRE_TOKEN push.jwks123.com SH 官网关注公众号后再次点击获取令牌
    TG_BOT_TOKEN tg 机器人 JS PY SH 申请 @BotFather 的 Token,如 10xxx4:AAFcqxxxxgER5uw
    TG_USER_ID tg 机器人 JS PY SH @getidsbot 发送 /start 获取到的纯数字 ID,如 1434078534
    TG_API_HOST * tg 代理 api JS PY Telegram api 自建的反向代理地址 例子:反向代理地址 http://aaa.bbb.ccc 则填写 aaa.bbb.ccc 简略搭建教程
    TG_PROXY_AUTH * tg 代理认证参数 JS username:password,如 Oreo:123456TG_PROXY_HOST 中填了可不填
    TG_PROXY_HOST * tg 机器人代理 IP 地址 JS PY 代理类型为 http,比如您代理是 http://127.0.0.1:1080 ,则填写 127.0.0.1 ,有密码例子: username:password@127.0.0.1
    TG_PROXY_PORT * tg 机器人代理端口 JS PY 代理端口号,代理类型为 http,比如您代理是 http://127.0.0.1:1080 ,则填写 1080

    * 表示选填

    4.2 另一种通知配置方式(当和 4.1 中值重复时,以 4.1 值为准)

    下载项目中的推送配置文件配置文件夹,按照上述说明修改配置文件中的值并改名为 notify.toml ,你可以自由地删除该文件中某些不需要的值(注意语法)。

    使用了配置文件后,你可以将配置文件放在持久化位置,不受脚本更新、重置容器的影响。

    如果想自定义配置文件的位置和文件名,请设置通知环境变量 NOTIFY_CONFIG_PATH , 例如 /usr/local/app/script/notify.toml 。建议保持 toml 的后缀,防止编辑器的误解。

    关于 toml 的语法参考:

    4.3 通知说明

    本通知调用了项目中的 𝒏𝒐𝒕𝒊𝒇𝒚_𝒎𝒕𝒓.𝒑𝒚 。如果你想在你自己的项目中使用这个通知脚本,将它拷贝并调用对应的通知函数即可。

    在非容器环境中,通知环境变量使用 系统的环境变量 或者 你通过 NOTIFY_CONFIG_PATH 环境变量指定的配置文件 进行配置。

    特别的,如果你想要创建一个基于 python 的 elecV2P 或者 qinglong 项目,并有意愿使用 toml 文件,那么强烈建议你拷贝此文件,如此可以大幅度降低用户脚本的配置难度和升级难度。

    如果只希望使用 json 模块和单纯获取环境变量方法,那么可以拷贝 𝒏𝒐𝒕𝒊𝒇𝒚_𝒎𝒕𝒓_𝒆𝒏𝒗.𝒑𝒚

    5. 检查依赖

    • 运行 签到依赖 任务后的日志

      oSs9xK.png

    • 如果任务列表安装不成功,参考 #12

    𝐪𝐢𝐧𝐠𝐥𝐨𝐧𝐠 使用方法

    1. ssh 进入容器

    docker exec -it qinglong bash

    修改 qinglong 为你的青龙容器名称

    2. 拉取仓库

    解决 Shell 脚本无法拉取问题:将以下代码在 config.sh 相应位置替换

    ## ql repo命令拉取脚本时需要拉取的文件后缀,直接写文件后缀名即可
    RepoFileExtensions="js pl py sh ts"

    可添加定时任务,名称、时间自定

    ql repo https://github.com/OreosLab/checkinpanel.git "api_|ck_|ins_" "^checkin" "^notify|^utils|cpm" "master"

    3. 安装依赖

    • 运行 签到依赖 任务

    • 依赖持久化配置

      • 签到依赖 任务保持定时运行即可

    4. 拷贝文件

    cp /ql/repo/OreosLab_checkinpanel_master/check.sample.toml /ql/config/check.toml

    通知配置文件(可选)

    cp /ql/repo/OreosLab_checkinpanel_master/notify.sample.toml /ql/config/notify.toml

    5. 配置通知

    参见上文中的配置通知

    特别的:

    • 如果你已经配置了 config.sh, 那么你可以不需要做任何改变。
    • 如果使用环境变量,请在 qinglong 面板中配置。
    • 如果使用配置文件,请修改 /ql/config/notify.toml 文件。
    • 当然你也可以在 qinglong 面板中配置 NOTIFY_CONFIG_PATH 环境变量为配置文件指定其他位置。

    6. 抓包配置

    不出意外的话可以在青龙面板的配置文件下找到 check.toml 文件

    根据注释说明进行抓包并配置

    补充说明

    1. 添加了葫芦侠的签到配置

    参数说明: HLX.username :用户名 HLX.password :密码的 MD5 32 位小写加密生成

    2. 添加了网易云游戏的签到配置

    官网

    参数说明: GAME163.authorization

    登录后抓取签到请求(一般请求的请求头也有这个字段)

    4tfx5F.png

    3. Shell 脚本配置

    • 目前 Shell 脚本只有一个 SSPanel 签到,如需使用请参考 env.sample 配置 .env 后放入 script/Lists/ql/config 文件夹
    • 支持自定义配置文件路径
      • 环境变量 / store KEY 名称:ENV_PATH
      • 参考值 / VALUE:/usr/local/app/script/.env

    4. 添加了欢太商城的签到配置

    • 欢太商城 HttpCanary 抓包教程
    • 部分域名屏蔽境外 IP 访问,所以本项目不适于在 非中国 IP 代理网络下 / Github Actions / 境外 VPS 上运行!
    • 从未在欢太商城做过任务,请先手动进入任务中心完成一下任务再使用,否则可能无法获取到任务列表数据导致出错!@YYplus

    5. 添加了时光相册的签到配置

    4tWaFg.png

    6. EUserv 在未开启登录验证时有效

    • True Captcha

    • 如图注册账号后获取 useridapikey

      5e9nF1.png

    其他说明

    1. 请自行修改执行时间。

    2. elecV2P 运行 手动更新 任务可强制同步本仓库。

    3. 大部分脚本移植于 Sitoi,Sitoi 于 2021 年 9 月 3 日 dailycheckin-0.1.7 版本适配了青龙,使用教程与本仓库教程不相同,切勿使用本仓库 checkinpanel 的同时去问大佬。

    4. 2021 年 9 月 13 日起不再更新 .json 后缀的配置文件。

    5. 2021 年 9 月 23 日起重新初始化项目,原本文件移到这里,上述仓库不再进行更新,期望稳定的用户可以切换到上述仓库。

    6. 2021 年 11 月 17 日起由 JSON5 配置转为更为友好的 TOML 配置。

    计划说明

    • 𝑷𝒚𝒕𝒉𝒐𝒏 | api | LeetCode 每日一题 | 每日一句 | 天气预报 | 每日新闻 | 爱企查e卡监控 | Hax 监控 | RSS 订阅
    • 𝑷𝒚𝒕𝒉𝒐𝒏 | 多账号 | AcFun | 百度搜索资源平台 | Bilibili | 天翼云盘 | CSDN | 多看阅读 | 恩山论坛 | Fa米家 | 网易云游戏 | 葫芦侠 | 爱奇艺 | 全民K歌 | MEIZU 社区 | 芒果 TV | 小米运动 | 网易云音乐 | 一加手机社区官方论坛 | 哔咔漫画 | 吾爱破解 | 什么值得买 | 百度贴吧 | V2EX | 腾讯视频 | 微博 | 联通沃邮箱 | 哔咔网单 | 王者营地 | 有道云笔记 | 智友邦 | 机场签到 | 欢太商城 | NGA | 掘金 | GLaDOS | HiFiNi | 时光相册 | 联通营业厅 | 无忧行 | FreeNom | EUserv | Site | SF 轻小说 | 在线工具 | CCAVA | 企鹅电竞 | 联想乐云 | WPS | HOSTLOC | Epic | Hax 续期提醒
    • 𝑺𝒉𝒆𝒍𝒍 | 多账号 | SSPanel 签到 | 国内加速
    • 𝑱𝒂𝒗𝒂𝑺𝒄𝒓𝒊𝒑𝒕 | 多账号 | 什么值得买任务版 | 爱企查 | 网易蜗牛读书 | 联想商城
    • 𝑱𝒂𝒗𝒂 | Bilibili 助手
    • 𝑷𝒆𝒓𝒍 | JSON5toTOML 工具

    项目完成情况

    • 多账号补全
    • 配置文件由严格的 .json 向支持注释的 .json5 过渡,再向更友好的 .toml 过渡
    • 更多环境适配
    • 配置文件支持自定义路径
    • 通知多线程
    • 通知输出优化
    • 通知方式增加,如飞书
    • Shell 消息推送、环境检查单列
    • 项目重新初始化,更新日志规范化
    • 依赖安装重构
    • cron 随机
    • 任务多合一执行
    • CK 检测判断是否跳出

    测试情况

    状态 名称
    国内加速 | Hax 监控 | LeetCode 每日一题 | 每日一句 | 天气预报 | 每日新闻 | RSS 订阅 | 机场签到 | 爱企查 | 百度搜索资源平台 | Bilibili | Bilibili 助手 | CCAVA | 天翼云盘 | CSDN | 网易蜗牛读书 | 多看阅读 | 恩山论坛 | EUserv | 时光相册 | Fa米家 | FreeNom | GLaDOS | 网易云游戏 | HiFiNi | 葫芦侠 | HOSTLOC | JSON5toTOML 工具 | 掘金 | 全民K歌 | 联想商城 | MEIZU 社区 | 小米运动 | NGA | 一加手机社区官方论坛 | 吾爱破解 | Site | 什么值得买 | 什么值得买任务版 | SSPanel 签到 | 百度贴吧 | 在线工具 | V2EX | 微博 | WPS | 王者营地 | 有道云笔记
    哔咔漫画 | 哔咔网单 | 智友邦

    致谢

    @𝐰𝐞𝐧𝐦𝐨𝐮𝐱 ————— 𝗰𝗵𝗲𝗰𝗸𝗯𝗼𝘅

    @𝐒𝐢𝐭𝐨𝐢 ——————– 𝗱𝗮𝗶𝗹𝘆𝗰𝗵𝗲𝗰𝗸𝗶𝗻

    @𝐲𝐮𝐱𝐢𝐚𝐧𝟏𝟓𝟖 ———– 𝗾𝗹-𝗰𝗵𝗲𝗰𝗸𝗯𝗼𝘅

    @𝐢𝐬𝐞𝐜𝐫𝐞𝐭 ————— 𝗦𝗦𝗣𝗮𝗻𝗲𝗹 𝗦𝗵𝗲𝗹𝗹

    @𝐡𝐰𝐤𝐱𝐤 ———————– 𝗛𝗲𝘆𝗧𝗮𝗽

    @𝐥𝐮𝐦𝐢𝐧𝐨𝐥𝐞𝐨𝐧 —- 𝗲𝗽𝗶𝗰𝗴𝗮𝗺𝗲𝘀-𝗰𝗹𝗮𝗶𝗺𝗲𝗿

    @𝑶𝒕𝒉𝒆𝒓𝒔 ————– 𝔰𝔠𝔯𝔦𝔭𝔱 𝔠𝔬𝔪𝔪𝔢𝔫𝔱𝔰

    历史 Star 数

    Stargazers over time

    Visit original content creator repository https://github.com/OreosLab/checkinpanel
  • NodeExpressApi

    CRUD, Node JS Express and MongoDB

    with JS vanilla + Angular

    required install:

    1. Node JS : https://nodejs.org/en/download/
    

    get started:

    1. mongoDB: 
        1.1. create user + password <password> - https://account.mongodb.com/account/login
        1.2. login to mongo atlas
        1.3. create DB <dbname> (cluster->collection->create db btn) 
        1.4. create collection name:"products"
        1.5. copy your connection string from:
            - right menu -> click "Cluster" -> click "connect" btn -> popup will open
            - click "connect with your application" -> copy the "const uri = ...."
            - uri need to be like this: const uri = "mongodb+srv://linoravny:<password>@cluster0.ps0o2.azure.mongodb.net/<dbname>?retryWrites=true&w=majority";
            -  <password> => change to your passweord , <dbname> - the db name that you create in section 1.2.
    
    2. this project
        2.1. open server.js file
        2.2. change the uri to your copy uri from section 1.5
        2.3. open cmd in the root
        2.4. run -> $ npm install
    

    run project

    server node JS in the root

    - $ npm run start;  (http://localhost:3000/)
    

    desctopVanilla client

    - run index.html in desktopVanilla/index.html (right click   on index html + copy path -> then run in chrome)
    

    angular

    Visit original content creator repository
    https://github.com/linoravny/NodeExpressApi

  • SimpleCipherJava

    SimpleCipherJava

    This package hosts an array of frequently used regex validations and regex expression evaluation functionalities. In general, String check encompasses last word check, middle word check, first word check, sentence validation, phone number validation, name validation with or without honorific, password with both default parameter settings and custom parameter settings, hexadecimal string validation,alphanumeric string validation and binary string validations. Expression resolving encompasses conversions like infix to postfix and infix to prefix, and evaluation compasses java equation solving and resultant equation output.

    The package makes use of intense regex expressions for peak validation under default settings. SimpleCipher is highly useful for developers who are in need for rapid and accurate FORM VALIDATIONS
    that are available over both the Web, Android and Javascript.

    Name validation:

    According to javadoc,

    /**

    • This function validates if a string is valid a valid name. The
      honorific is allowed if user defined.
    • @param name String that needs to be validated.
    • @param checkHonorific True if name includes a honorific else false.
    • @param isAllUpperCase True is all the letters are in uppercase, else
      false. Then it checks if the first letter of every starting word is in
      uppercase.
    • @return True if the String is a valid word, else false.
      */

    String name=”Paul Scholes”;

    boolean check=SimpleCipher.Strings.Validate.isName(userInputName, false, false);

    Custom password validation:

    Allows developers to decide their own password restriction parameters. First create an object of CustomPasswordFilter with desired precision parameters. For example,

    CustomPasswordFilter cpf=CustomPasswordFilter.getInstance(“ABCdef”, 1, null, 0,”%$”, 2, 1, 0);

    The above piece of code, creates a custom password precision that shall allow a password to have

    Parameter 1: Alphabets “ABCdef”.

    Parameter 2: Minimum 1 alphabet.

    Parameter 3: Ward off numeric digit [0-9] restriction.

    Parameter 4: Minimum number of numeric digit character. 0 since we already warded off digit validation.

    Parameter 5: Symbols “%$”.

    Parameter 6: Minimum 2 symbols.

    Parameter 7: Total number of minimum characters in the password.

    Parameter 8: Total number of maximum characters in the password, 0 if no restriction.

    For further and better explanation refer to javadoc.

    Once this is done, we can now apply for any password validation with above defined restrictions,

    boolean check=SimpleCipher.Strings.Validate.isCustomPassword(userInputPassword,cpf);

    This returns only true or false based on userInputPassword match, however developers may want to let their user know of individual field validation by creating progress dialog box that ticks off the validated fields.

    To allow such parametric validations, developers can use function isCustomPasswordParametric(userInputPassword, CustomPasswordFilter), that returns a boolean array of size 5. The index definitions are as follows:

    Index 0 – Alphabet validation along with minimum alphabet length check.

    Index 1 – Digit validation along with minimum digit length check.

    Index 2 – Symbol validation along with minimum symbol length check.

    Index 3 – Total minimum length check.

    Index 4 – Total maximum length check.

    For in depth and better explanation refer to javadoc.

    Expression Evaluation:

    The sub package Expressions is responsible for evaluating expressions.

    For example, say we want to solve an expression 10 + ( 2 * 5 ).
    Then the equivalent code shall be as follows,
    Double result=SimpleCipher.Expressions.Evaluation.solveEq(“(,10,+,(,2,*,5,),)”);

    For in depth and better explanation refer to javadoc.

    Visit original content creator repository
    https://github.com/iamsudiptasaha/SimpleCipherJava

  • OLX.com.pk-Scrapper

    Web Scraping and Data Analysis for OLX.com

    Introduction

    OLX.com.pk is a prominent online classifieds platform serving as a versatile marketplace for a wide range of goods and services in Pakistan. It has gained immense popularity as a go-to destination for both buyers and sellers to post and find classified advertisements. OLX offers a comprehensive spectrum of categories, including real estate, automobiles, electronics, home and garden, fashion, and services. The platform allows users to connect, trade, and engage in transactions for various items and services.
    Data Analysis and Visualization:
    Subsequent to the successful web scraping activities on OLX.com.pk, you utilized data analysis and visualization tools to make sense of the collected data. Such tools are instrumental in exploring and interpreting the scraped data, enabling you to generate insightful data visualizations and analytics.

    Potential Insights and Applications:

    Through your web scraping and data analysis endeavours on OLX.com.pk, you can potentially unearth valuable insights about the e-commerce and classifieds market in Pakistan. These insights could be leveraged by consumers to make informed purchase decisions, by sellers to create more effective listings, or by market analysts to gain a deeper understanding of consumer preferences and market trends in the Pakistani e-commerce sector.

    Visit original content creator repository
    https://github.com/zohaibbashir/OLX.com.pk-Scrapper

  • tarantool-autovshard

    Autovshard

    Build Status Coverage Status

    A wrapper around Tarantool Vshard with automatic master election, failover and centralized configuration storage in Consul.

    Sponsored by Avito

    Features

    • Centralized config storage with Consul.
    • Automatic Vsahrd reconfiguration (both storage and router) when the config changes in Consul.
    • Automatic master election for each replicaset with a distributed lock with Consul.
    • Automatic failover when a master instance becomes unavailable.
    • Master weight to set the preferred master instance.
    • Switchover delay.

    Status

    Usage

    1. Put Autovshard config to Consul KV under <consul_kv_prefix>/<vshard_cluster_name>/autovshard_cfg_yaml.

      # autovshard_cfg.yaml
      rebalancer_max_receiving: 10
      bucket_count: 100
      rebalancer_disbalance_threshold: 10
      sharding:
          aaaaaaaa-aaaa-aaaa-aaaa-aaaaaaaaaaaa:
              weight: 10
              replicas:
                  aaaaaaaa-aaaa-aaaa-aaaa-000000000001:
                      master_weight: 99
                      switchover_delay: 10
                      address: a1:3301
                      name: a1
                      master: false
                  aaaaaaaa-aaaa-aaaa-aaaa-000000000002:
                      master_weight: 20
                      switchover_delay: 10
                      address: a2:3301
                      name: a2
                      master: false
          bbbbbbbb-bbbb-bbbb-bbbb-bbbbbbbbbbbb:
              weight: 10
              replicas:
                  bbbbbbbb-bbbb-bbbb-bbbb-000000000001:
                      master_weight: 10
                      switchover_delay: 10
                      address: b1:3301
                      name: b1
                      master: false
                  bbbbbbbb-bbbb-bbbb-bbbb-000000000002:
                      master_weight: 55
                      switchover_delay: 10
                      address: b2:3301
                      name: b2
                      master: false
      #!/usr/bin/env sh
      
      cat autovshard_cfg.yaml | consul kv put "autovshard/mycluster/autovshard_cfg_yaml" -

      Autovshard Consul config parameters

      The config is similar to Vshard config, but it has some extra fields and has address field instead of uri because we don’t want to mix config with passwords.

      • master_weight – an instance with higher weight in a replica set eventually gets master role. This parameter is dynamic and can be changed by administrator at any time. The number is used only for comparison with the master_weights of the other members of a replica set.
      • switchover_delay – a delay in seconds to wait before taking master role away from another running instance with lower master_weight. This parameter is dynamic and can be changed by administrator at any time. A case when this parameter is useful is when an instance with the highest master_weight is restarted several times in a short amount of time. If the instance is up for a shorter time than the switchover_delay there will be no master switch (switchover) every time the instance is restarted. And when the instance with the highest master_weight stays up for longer than the switchover_delay then the instance will finally get promoted to master role.
      • address – TCP address of the Tarantool instance in this format: <host>:<port>. It is passed through to Vshard as part of uri parameter.
      • name – same as name in Vshard.
      • master – same as master in Vshard. The role of the instance. DO NOT set master=true for multiple instances in one replica set. This parameter will be changed dynamically during the lifecycle of Autovshard. It can also be changed by administrator at any time. It is safe to set master=false for all instances.
    2. Put this into your tarantool init.lua.

      local box_cfg = {
          listen = 3301,  -- required
          instance_uuid = "aaaaaaaa-aaaa-aaaa-aaaa-000000000001",  -- required for storage instances, prefer lowercase
          replicaset_uuid = "aaaaaaaa-aaaa-aaaa-aaaa-aaaaaaaaaaaa",  -- required for storage instances, prefer lowercase
          replication_connect_quorum = 0,  -- recommended, search Tarantool issue tracker for "quorum" and "bootstrap"
          replication_connect_timeout=5,  -- to start faster when some replicas are unavailable
          -- ! DO NOT set `replication` parameter, Vshard will take care of it
          -- specify any other_box_cfg options
      }
      
      autovshard = require("autovshard").Autovshard.new{
          box_cfg = box_cfg,  -- Tarantool instance config
          cluster_name = "mycluster",  -- the name of your sharding cluster
          login = "storage",  -- login for Vshard
          password = "storage",  -- password for Vshard
          consul_http_address = "http://127.0.0.1:8500",  -- assuming Consul agent is running on localhost
          consul_token = nil,
          consul_kv_prefix = "autovshard",
          -- consul_session_ttl = 60 -- optional, not recommended to change, default is 15 seconds
          router = true,  -- true for Vshard router instance
          storage = true,  -- true for Vshard storage instance
          automaster = true,  -- enables automatic master election and auto-failover
      }
      
      autovshard:start()  -- autovshard will run in the background
      -- to stop it call autovshard:stop()
      
      -- This might be helpful (Tarantool >= 2.0)
      -- box.ctl.on_shutdown(function() autovshard:stop(); require("fiber").sleep(2) end)
      
      -- If you use package.reload (https://github.com/moonlibs/package-reload)
      -- package.reload:register(autovshard, autovshard.stop)
      

      Important: If Consul is unreachable the Tarantool instance is set to read-only mode.

      Autovshard Tarantool config parameters

      • box_cfg – table, parameters for box.cfg call
      • cluster_name – string, the name of your sharding cluster
      • login – string, login for Vshard
      • password – string, password for Vshard
      • consul_http_address – a string with Consul address or a table of multiple Consul addresses. Examples: "http://127.0.0.1:8500", {"https://consul1.example.com:8501", "https://consul2.example.com:8501"} If multiple Consul addresses are set and Consul is unreachable at an address, Autovshard will use the next address from the array for the subsequent requests to Consul. Note: All addresses must point to the instances of the same Consul cluster in the same Consul datacenter.
      • consul_token – optional string, Consul token (if you use ACLs)
      • consul_kv_prefix – string, a prefix in Consul KV storage. Must be the same on all instances in a Tarantool cluster.
      • consul_session_ttl – optional number, Consul session TTL. Not recommended to change, default is 15 seconds. Must be between 10 and 86400.
      • router – boolean, true for Vshard router instances
      • storage – boolean, – true for Vshard storage instance
      • automaster – boolean, enables automatic master election and auto-failover

    See also

    Installation

    Luarocks sucks at pinning dependencies, and Vshard does not support (as of 2019-07-01) painless installation without Tarantool sources. Therefore Vshard is not mentioned in the rockspec.

    1. Install Vshard first.
    2. Install Autovshard. Autovshard depends only on Vshard. Replace <version> with the version you want to install:
      luarocks install "https://raw.githubusercontent.com/bofm/tarantool-autovshard/master/rockspecs/autovshard-<version>-1.rockspec"
      
      or
      tarantoolctl rocks install "https://raw.githubusercontent.com/bofm/tarantool-autovshard/master/rockspecs/autovshard-<version>-1.rockspec"
      

    How it works

    Internally Autovshard does 2 things (which are almost independent of each other):

    • Watch the config in Consul and apply it as soon as it changes. Whatever the config is, it is converted to Vshard config and passed to vshard.storage.cfg() and vshard.router.cfg() according to the parameters of the Autovshard Tarantool config. If Consul is unreachable, Autovshard sets the Tarantool instance to read-only mode to avoid having multiple master instances in a replicaset (this feature is called fencing).
    • Maintain master election with a distributed lock and change the config in Consul when the lock is acquired. This is done only on Vshard storage instances when automaster is enabled. Autovshard only changes master field of the Autovshard Consul config.

    You can check out CI e2e tests logs to get familiar with what Autovshard prints to the Tarantool log in different situations.

    Notes on Consul

    It is recommended to run Consul agent on each server with Tarantool instances and set consul_http_address to the address of the agent on localhost.

    TODO

    • More testing
    • Integration testing and CI
    • e2e tests with Gherkin and BDD
    • Improve logging
    • See todo’s in the sources
    Visit original content creator repository https://github.com/bofm/tarantool-autovshard