The earthquake datasets are gathered from the Northern California Earthquake Data Center through the ANSS Composite Catalog Search.
Acknowledgement
“Waveform data, metadata, or data products for this study were accessed through the Northern California Earthquake Data Center (NCEDC), doi:10.7932/NCEDC.”
Download and extract the dataset archive with tar zxf ncedc-earthquakes-dataset.tar.gz from the terminal. Run the below commands to ingest the data sets to your Elasticsearch cluster. Please note, you may need to configure ncedc-earthquakes-logstash.conf file in case your are not running Elasticsearch node on your local host.
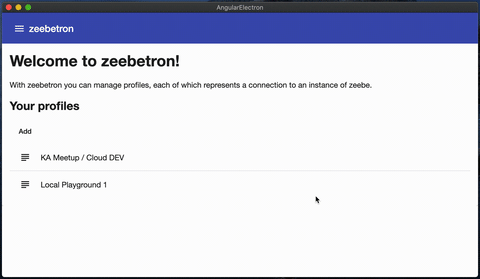
zeebetron is a small frontend to manage different profiles for zeebe instances (cloud or local).
Usually I use zbctl or my own small starter project to interact with zeebe. But since I had a lot of zeebe instances and I was switching between them, I wanted to build a small tool to manage profiles.
The added value of zeebetron is
Manage different profiles including addresses and if necessary oAuth information
Manage different workflows for deploying or creating new instances
The tool itself is built with Electron and Angular. The communication with zeebe is done via zeebe-node, the rendering of BPMN diagrams is done using bpmn-js.
Телеграм бот для подбора отелей. Анализирует текущие предложения по отелям и с учетом критериев, введенных пользователем, выдает наиболее подходящие.
В работе использует Rapid Api
Особенности
Возможность настройки выводимых результатов, например, количества искомых отелей, необходимость вывода фотографий отелей и их количества
Сохранение поисковых запросов в базу данных и возможность вывода на экран истории поиска с разбивкой для каждого пользователя
Доступные команды
/start – запуск бота
/help – вывод основных команд
/lowprice – вывод топа самых дешевых отелей в городе
/highprice – вывод топа самых дорогих отелей в городе
/bestdeal – вывод топа отелей, находящихся в заданном диапазоне цен и расстояний от центра города
/history – вывод истории поиска отелей
Использованные технологии
Python 3
PyTelegramBotApi(telebot)
Подготовка и запуск
Установить интерпретатор Python версии 3.10 и пакеты, перечисленные в файле requirements.txt
Создать своего бота с помощью бота @BotFather и сохранить свой токен
Создать учетную запись на сайте rapidapi.com и сохранить X-RapidAPI-Key, X-RapidAPI-Host
Создать файл .env в директории программы, сохранить туда токен, X-RapidAPI-Key, X-RapidAPI-Host по примеру в файле .env.template
This package provides a CLI tool to create Adobe CEP Extensions.
Features
Create Adobe CEP Extension Bundles without needing to download them from the CEP-Resources Github repository.
Add new extensions to existing Adobe CEP Extension Bundles.
Automatically generate .debug files based on your inputs.
Usage
Navigate to the Folder you want to create your extension in.
By default the tool checks to see if you’re creating an extension in the official Adobe extensions folder. If not, it will give you a warning asking if you want to continue.
The tool will request information about your extension, then create the necessary files for your extension.
Flags
--options: Display a list of all flags available for create-adobe-extension.
--add: Add a new extension to an existing extension bundle (make sure you’re inside the folder of the bundle you’d like to add to before running).
--folder-check: Enable/disable a warning when creating an extension outside of standard Adobe Extensions folder.
User Responses
Project Name: Name of the extension Folder and the first extension in this bundle.
Bundle ID: Must begin with “com.” i.e.: “com.test”.
Extension ID: Must begin with your Bundle ID. i.e.: “com.test.panel”.
Extension Version: Extension version identifier. Set to 1.0.0 by default.
CSXS Version: Sets the version of CSXS this extension will use. Set by default to the newest version.
Extension Type: Indicates whether the this is a Panel, ModalDialog, Modless or Custom Extension.
Program(s): Defines which program or programs this extension will open in.
Program Version(s): Sets the version or versions this extension will run in. To set a range, seperate two numbers with a comma. Set by default to “1.0,99.0”.
Enable Node.js: Enable or disable the use of Node.js in your extension.
Enable Debugging: Set whether or not to enable debugging. If enabled, this tool will create a .debug file with the appropriate extension info and adds a function to your javascript file that reloads your jsx script every time your javascript file is initialized (use in conjunction with Adobe Live Reload for an optimal debugging experience).
Changelog
v1.2.0 (2022-04-25)
Added
Added –add flag which allows for the creation of new extensions within an existing extension bundle.
Added –options flag which displays all flags available in this package.
Added –folder-check flag which enables/disables a check to warn users when they are creating an extension outside of the official Adobe extensions folders.
Changes
Updated README to clarify where the extension folders are located, what the package checks for and how to disable the checking.
Removed
Removed Ascii art title because it was annoying me when I used this package.
v1.1.3 (2022-04-19)
Changes
Changed Ascii art title to match npm package title.
v1.1.2 (2022-04-19)
Changes
Changed method of detecting the current working folder for CEP Extension fold check.
v1.1.0 (2022-04-19)
Added
Added README file
Added check for whether user is in CEP Extensions folder
Poseidon began as a joint effort between two of the IQT Labs: Cyber Reboot and Lab41. The project’s goal is to explore approaches to better identify what nodes are on a given (computer) network and understand what they are doing. The project utilizes Software Defined Networking and machine learning to automatically capture network traffic, extract relevant features from that traffic, perform classifications through trained models, convey results, and provide mechanisms to take further action. While the project works best leveraging modern SDNs, parts of it can still be used with little more than packet capture (pcap) files.
The Poseidon project originally began as an experiment to test the merits of leveraging SDN and machine learning techniques to detect abnormal network behavior. (Please read our blogs posts linked below for several years of background) While that long-term goal remains, the unfortunate reality is that the state of rich, labelled, public, and MODERN network data sets for ML training is pretty poor. Our lab is working on improving the availability of network training sets, but in the near term the project remains focused on 1) improving the accuracy of identifying what a node IS (based on captured IP header data) and 2) developing Poseidon into a “harness” of sorts to house machine learning techniques for additional use cases. (Read: Not just ours!)
Prerequisites
Docker – Poseidon and related components run on top of Docker, so understanding the fundamentals will be useful for troubleshooting as well. Note: installing via Snap is currently unsupported. A Good Ubuntu Docker Quick-Start
Compose – Poseidon is orchestrated with docker-compose. You will need a version that supports compose file format version 3 and health check conditions (minimum 1.29.2).
Curl – command-line for transferring data with URLs.
Note: Installation on OS X is possible but not supported.
Installing
Permissions for Docker
To simplify using commands with Docker, we recommend allowing the user that will be executing Poseidon commands be part of the docker group so they can execute Docker commands without sudo. Typically, this can be done with:
sudo usermod -aG docker $USER
Followed by closing the existing shell and starting a new one.
Getting the bits
NOTE: If you have previously installed Poseidon from a .deb package, please remove it first. Installation from .deb is no longer supported.
Install the poseidon script which we will use to install and manage Poseidon.
NOTE: Poseidon requires at least Faucet version 1.9.46 or higher.
Poseidon uses a faucetconfrpc server, to maintain Faucet configuration. Poseidon starts its own server for you by default, and also by default Poseidon and Faucet have to be on the same machine. To run Faucet on a separate machine, you will need to start faucetconfrpc on that other machine, and update faucetconfrpc_address to point to where the faucetconfrpc is running. You may also need to update faucetconfrpc_client, if you are not using the provided automatically generated keys.
If you have Faucet running already, make sure Faucet is started with the following environment variables, which allow Poseidon to change its config, and receive Faucet events:
Faucet is now configured and ready for use with Poseidon.
Faucet stacking
Faucet supports stacking (distributed switching – multiple switches acting together as one). Poseidon also supports this – Poseidon’s mirroring interface should be connected to a port on the root switch. You will need to allocate a port on each non-root switch also, and install a loopback plug (either Ethernet or fiber) in that port. Poseidon will detect stacking and take care of the rest of the details (using Faucet’s tunneling feature to move mirror packets from the non-root switches to the root switch’s mirror port). The only Poseidon config required is to add the dedicated port on each switch to the controller_mirror_port dictionary.
Configuring Poseidon
You will need to create a directory and config file on the server where Poseidon will run.
Now, edit this file. You will need to set at minimum:
controller_type, as appropriate to the controller you are running (see above).
collector_nic: must be set to the interface name on the server, that is connected to the switch mirror port.
controller_mirror_ports: must be set to the interface on the switch that will be used as the mirror port.
Optionally, you may also set controller_proxy_mirror_ports (for switches that don’t have their own mirror ports, and can be mirrored with another switch).
Updating Poseidon
From v0.10.0, you can update an existing Poseidon installation with poseidon -u (your configuration will be preserved). Updating from previous versions is not supported – please remove and reinstall as above. You can also give poseidon -u a specific git hash if you want to update to an unreleased version.
Usage
After installation you’ll have a new command poseidon available for looking at the configuration, logs, and shell, as well as stopping and starting the service.
$ poseidon help
Poseidon, an application that leverages software defined networks (SDN) to acquire and then feed network traffic to a number of machine learning techniques. For more info visit: https://github.com/IQTLabs/poseidon

Usage: poseidon [option]
Options:
    -a,  api           get url to the Poseidon API
    -c,  config        display current configuration info
    -d,  delete        delete Poseidon installation (uses sudo)
    -e,  shell         enter into the Poseidon shell, requires Poseidon to already be running
    -h,  help          print this help
    -i,  install       install Poseidon repo (uses sudo)
    -l,  logs          display the information logs about what Poseidon is doing
    -r,  restart       restart the Poseidon service (uses sudo)
    -s,  start         start the Poseidon service (uses sudo)
    -S,  stop          stop the Poseidon service (uses sudo)
    -u,  update        update Poseidon repo, optionally supply a version (uses sudo)
    -V,  version       get the version installed
Step 0:
Optionally specify a prefix location to install Poseidon by setting an environment variable, if it is unset, it will default to /opt and Poseidon. (If using Faucet, it will also override /etc locations to this prefix.)
export POSEIDON_PREFIX=/tmp
Step 1:
poseidon install
Step 2:
Configure Poseidon for your preferred settings. Open /opt/poseidon/poseidon.config (add the Poseidon prefix if you specified one).
For using Faucet, make sure to minimally change the controller_mirror_ports to match the switch name and port number of your mirror port. You will also need to update the collector_nic in the poseidon section to match the interface name of the NIC your mirror port is connected to.
Step 3:
If you don’t have Faucet already and/or you want to Poseidon to spin up Faucet for you as well, simply run the following command and you will be done:
poseidon start
Step 4:
If you are using your own installation of Faucet, you will need to enable communication between Poseidon and Faucet. Poseidon needs to change Faucet’s configuration, and Faucet needs to send events to Poseidon. This configuration needs to be set with environment variables (see https://docs.faucet.nz/). For example, if running Faucet with Docker, you will need the following environment configuration in the faucet service in your docker-compose file:
If Faucet and Poseidon are running on the same machine, you can start Poseidon and you will be done:
poseidon start --standalone
Step 5:
If you are running Faucet and Poseidon on different machines, configuration is more complex (work to make this easier is ongoing): execute Step 4 first. Then you will need to run event-adapter-rabbitmq and faucetconfrpc services on the Faucet host, and change Poseidon’s configuration to match.
First start all services from helpers/faucet/docker-compose.yaml on the Faucet host, using a Docker network that has network connectivity with your Poseidon host. Set FA_RABBIT_HOST to be the address of your Poseidon host. faucet_certstrap will generate keys in /opt/faucetconfrpc which will need to be copied to your Poseidon host. Then modify faucetconfrpc_address in /opt/poseidon/config/poseidon.config to point to your Faucet host.
You can now start Poseidon:
poseidon start --standalone
Troubleshooting
Poseidon by its nature depends on other systems. The following are some common issues and troubleshooting steps.
Poseidon doesn’t detect any hosts.
The most common cause of this problem, with the FAUCET controller, is RabbitMQ connectivity.
Check that the RabbitMQ event adapter (faucet/event-adapter-rabbitmq) is running and not restarting.
# docker ps|grep faucet/event-adapter-rabbitmq
4a7509829be0        faucet/event-adapter-rabbitmq           "/usr/local/bin/entr…"   3 days ago          Up 3 days
Check that FAUCET.Event messages are being received by Poseidon.
This command reports the time that the most recent FAUCET.Event message was received by Poseidon.
If run repeatedly over a couple of minutes this timestamp should increase.
If installed as described above, poseidon’s codebase will be at /opt/poseidon. At this location, make changes, then run poseidon restart.
Network Data Logging
Poseidon logs some data about the network it monitors. Therefore it is important to secure Poseidon’s own host (aside from logging, Poseidon can of course change FAUCET’s network configuration).
There are two main types of logging at the lowest level. The first is FAUCET events – FAUCET generates an event when it learns on which port a host is present on the network, and the event includes source and destination Ethernet MAC and IP addresses (if present). For example:
The second type of logging is host based pcap captures, with most of the application (L4) payload removed. Poseidon causes the ncapture component (https://github.com/IQTLabs/network-tools/tree/main/network_tap/ncapture) to capture traffic, which is logged in /opt/poseidon_files. These are used in turn to learn host roles, etc.
Using pipeline with the GridSearchCV to fine-tune hyperparameters, Logistic regression and SVM model are used to predict the sentiment analysis of a movie review. After that, model is saved and loaded again to test it with text.
Pickle is used to save and load the model.
Sentiment Analysis with Deep Learning using ANN and CNN in Tensorflow
Simple Artificial Neural Network (ANN) and 1D Convolutional Neural Network (CNN) models are used to predict sentiment analysis for IMDB movei reviews, which is a binary classification problem.
Spacy en_core_web_lg pretrained model (https://spacy.io/models/en) is used to convert texts to vectors in dataframes.
Feature scaling is applied to X_train and X_test using MinMaxScaler before being fed inputs into the neural network.